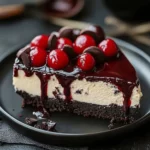
Black Forest Cheesecake Bliss is a dessert that brings unparalleled joy to every celebration. Imagine rich layers of chocolate cheesecake, enhanced with whipped cream and cherries. This enchanting dessert combines the beloved flavors of traditional Black Forest cake with the creamy elegance of cheesecake, making it irresistible. If you’re a fan of decadent desserts, this recipe is sure to become a favorite. Whether you’re hosting a dinner party, celebrating a birthday, or simply wanting to treat yourself, this cheesecake will create a magical moment at the table.
Creating Black Forest Cheesecake Bliss is not just about making a cake; it’s about engaging with flavors and textures that sing together in harmony. The smooth, creamy cheesecake balances beautifully with the tartness of cherries and the richness of the chocolate. Each slice offers a delightful experience that invites you back for more. In this guide, you will learn why this recipe stands out, how to prepare it, and some wonderful tips for serving it perfectly. Make sure to add this amazing dessert to your baking repertoire!
Each layer of Black Forest Cheesecake Bliss is designed to evoke old-world charm while presenting a modern twist. You’ll leave your friends and family awestruck with every bite, as the flavors meld into a beautifully rich and luxurious cheesecake. Here’s why this recipe is worth your time and effort!
Why You’ll Love This Recipe
There are countless reasons to fall in love with Black Forest Cheesecake Bliss. Here are just a few:
1. Decadent Flavor: The combination of chocolate, cherries, and cream creates an unforgettable taste experience.
2. Impressive Presentation: This cheesecake looks stunning when served, providing an elegant touch to any gathering.
3. Versatile Dessert: Perfect for birthdays, holidays, or a sweet pick-me-up on a weekday!
4. Easy to Follow: With straightforward directions, even novice bakers can achieve delicious results.
5. Customizable Elements: Feel free to alter the ingredients to cater to dietary preferences—like using gluten-free cookies or a dairy-free cream.
6. Rich Textures: The contrast between the creamy filling and the crunch of the crust sets this cheesecake apart.
These irresistible traits combine to make Black Forest Cheesecake Bliss a must-try recipe that will win over any crowd.
Preparation and Cooking Time
The total time required to prepare Black Forest Cheesecake Bliss is approximately 2 hours, including preparation, baking, and cooling. Here’s how that’s broken down:
– Preparation Time: 30-45 minutes
– Cooking Time: 60-70 minutes
– Cooling Time: 2-3 hours (or overnight for best results)
These times may vary slightly based on your skills and kitchen equipment, but this should give you a solid framework to follow.
Ingredients
– 1 ¾ cups chocolate cookie crumbs
– ½ cup unsalted butter, melted
– 1 tablespoon granulated sugar
– 3 (8-ounce) packages cream cheese, softened
– 1 cup granulated sugar
– 3 large eggs
– 1 teaspoon vanilla extract
– ½ cup sour cream
– ¼ cup unsweetened cocoa powder
– 1 cup cherry pie filling
– 2 cups whipped cream (for topping)
– ¼ cup dark chocolate shavings (for garnish)
Step-by-Step Instructions
Creating Black Forest Cheesecake Bliss can be straightforward when you follow these clear steps:
1. Preheat Oven: Begin by preheating your oven to 325°F (163°C). Grease a 9-inch springform pan.
2. Make the Crust: In a bowl, combine chocolate cookie crumbs, melted butter, and sugar. Mix thoroughly until the crumbs are moistened.
3. Press the Crust: Pack the crumb mixture into the bottom of the springform pan. Press firmly to form an even layer. Bake for 10 minutes, then cool.
4. Mix Cream Cheese: In a large bowl, beat the softened cream cheese until smooth and creamy, avoiding lumps.
5. Add Sugar: Gradually add 1 cup of granulated sugar, mixing until well combined.
6. Incorporate Eggs: Add eggs one at a time, mixing well after each addition. Ensure a smooth texture.
7. Flavor It: Stir in the vanilla extract, sour cream, and cocoa powder until fully blended.
8. Pour Filling: Carefully pour the cheesecake mixture over the cooled crust, smoothing the top with a spatula.
9. Bake: Place in the oven and bake for about 60-70 minutes, or until the center is set but slightly jiggly.
10. Cool and Chill: Once baked, turn off the oven and leave the cheesecake inside for 1 hour. Afterward, remove it and let it cool to room temperature. Refrigerate for at least 2-3 hours or overnight.
11. Prepare Topping: Before serving, spread the cherry pie filling over the top of the cheesecake.
12. Top with Whipped Cream: Add a generous layer of whipped cream, finishing with dark chocolate shavings for garnish.
These straightforward steps will guide you in creating this amazing dessert effortlessly.
How to Serve
When it comes to serving Black Forest Cheesecake Bliss, consider these helpful tips:
1. Presentation: Use a cake stand to elevate the appearance of the cheesecake, making it visually stunning.
2. Slice Proportion: Opt for small, generous slices to encourage seconds without overwhelming your guests.
3. Accompaniments: Serve with additional cherry pie filling or a dollop of whipped cream on the side.
4. Beverage Pairing: This cheesecake pairs beautifully with coffee, dessert wine, or even a sparkling beverage for added flair.
5. Garnishing Touch: For a touch of elegance, sprinkle additional chocolate shavings or fresh cherries on each slice before serving.
By following these suggestions, you will elevate the experience of this delicious cheesecake and create lasting memories for everyone at the table. Enjoy crafting and sharing this incredible dessert!
Additional Tips
– Use Fresh Ingredients: Using fresh cherries for topping enhances the overall taste and adds a burst of natural flavor.
– Allow Cheesecake to Cool Gradually: After baking, leave the cheesecake in the oven with the door slightly ajar. This gradual cooling helps prevent cracks on the surface.
– Serve at Room Temperature: For the best flavor and texture, let your Black Forest Cheesecake Bliss sit at room temperature for about 30 minutes before serving.
Recipe Variation
Feel free to customize your Black Forest Cheesecake Bliss to suit your taste or occasion. Here are some variations to consider:
1. Chocolate Ganache Topping: For an extra-rich finish, drizzle a smooth chocolate ganache over the top before adding whipped cream and cherries.
2. Nutty Addition: Add crushed walnuts or pecans to the crust for an extra crunch and flavor dimension.
3. Cheesecake Swirl: Create a swirl effect by adding spoonfuls of cherry pie filling into the cheesecake mixture before baking and gently swirling with a knife.
4. Sugar-Free Version: Use sugar substitute products to craft a healthier version without losing the delicious taste.
Freezing and Storage
– Storage: Keep your Black Forest Cheesecake Bliss in the refrigerator, well-covered, to maintain its freshness. It should last up to 5 days.
– Freezing: You can freeze slices of the cheesecake for up to 2 months. Wrap each slice in plastic wrap, then place them in an airtight container to prevent freezer burn.
Special Equipment
To successfully prepare Black Forest Cheesecake Bliss, you’ll need the following kitchen tools:
– 9-inch springform pan
– Mixing bowls
– Hand or stand mixer
– Rubber spatula
– Measuring cups and spoons
– Small saucepan (for melting butter)
Frequently Asked Questions
Can I make this cheesecake ahead of time?
Yes! Black Forest Cheesecake Bliss can be made a day before serving. It actually tastes better as it chills, allowing the flavors to meld.
What if I can’t find cherry pie filling?
You can substitute fresh cherries or other fruit preserves if cherry pie filling is not available. Just ensure to adjust sugar according to taste.
Can I use low-fat cream cheese?
Absolutely! Low-fat cream cheese can be used, but keep in mind that it may alter the texture slightly, making it less creamy.
Is this dessert suitable for gluten-free diets?
Yes! You can use gluten-free chocolate cookies to create the crust, making it friendly for those with gluten sensitivities.
Conclusion
Black Forest Cheesecake Bliss is more than just a dessert; it’s a celebration of flavors that elevates any occasion. Its luscious layers of chocolate and cherries create an unforgettable experience for anyone lucky enough to take a bite. Whether you enjoy it with friends and family or savor it on your own, this cheesecake promises to deliver happiness and delight at every turn. Don’t hesitate; treat yourself to this magnificent dessert as it’s bound to become a cherished favorite in your home!
Black Forest Cheesecake Bliss: An Incredible Secret Recipe
- Total Time: 0 hours
Ingredients
– 1 ¾ cups chocolate cookie crumbs
– ½ cup unsalted butter, melted
– 1 tablespoon granulated sugar
– 3 (8-ounce) packages cream cheese, softened
– 1 cup granulated sugar
– 3 large eggs
– 1 teaspoon vanilla extract
– ½ cup sour cream
– ¼ cup unsweetened cocoa powder
– 1 cup cherry pie filling
– 2 cups whipped cream (for topping)
– ¼ cup dark chocolate shavings (for garnish)
Instructions
Creating Black Forest Cheesecake Bliss can be straightforward when you follow these clear steps:
1. Preheat Oven: Begin by preheating your oven to 325°F (163°C). Grease a 9-inch springform pan.
2. Make the Crust: In a bowl, combine chocolate cookie crumbs, melted butter, and sugar. Mix thoroughly until the crumbs are moistened.
3. Press the Crust: Pack the crumb mixture into the bottom of the springform pan. Press firmly to form an even layer. Bake for 10 minutes, then cool.
4. Mix Cream Cheese: In a large bowl, beat the softened cream cheese until smooth and creamy, avoiding lumps.
5. Add Sugar: Gradually add 1 cup of granulated sugar, mixing until well combined.
6. Incorporate Eggs: Add eggs one at a time, mixing well after each addition. Ensure a smooth texture.
7. Flavor It: Stir in the vanilla extract, sour cream, and cocoa powder until fully blended.
8. Pour Filling: Carefully pour the cheesecake mixture over the cooled crust, smoothing the top with a spatula.
9. Bake: Place in the oven and bake for about 60-70 minutes, or until the center is set but slightly jiggly.
10. Cool and Chill: Once baked, turn off the oven and leave the cheesecake inside for 1 hour. Afterward, remove it and let it cool to room temperature. Refrigerate for at least 2-3 hours or overnight.
11. Prepare Topping: Before serving, spread the cherry pie filling over the top of the cheesecake.
12. Top with Whipped Cream: Add a generous layer of whipped cream, finishing with dark chocolate shavings for garnish.
These straightforward steps will guide you in creating this amazing dessert effortlessly.
- Prep Time: 15 minutes
- Cook Time: 60-70 minutes
Nutrition
- Serving Size: 12 slices
- Calories: 420 kcal
- Fat: 25g
- Protein: 6g