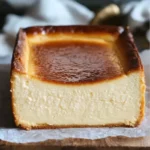
Cheesecake in a loaf pan offers an incredible way to enjoy this beloved dessert. There’s something wonderfully comforting about a smooth, creamy cheesecake nestled into a sliceable form. This unique presentation elevates the classic cheesecake experience, making it not only delicious but also visually appealing. Imagine serving individual slices of creamy cheesecake drizzled with fruit compote or chocolate sauce at your next gathering. With each bite, you’ll find the delightful richness of traditional cheesecake, but with the convenience and elegance of a loaf format.
Creating cheesecake in a loaf pan combines simplicity with an amazing depth of flavor. It is perfect for special occasions, potlucks, or even just an indulgent treat at home. Baking this cheesecake in a loaf pan means you’ll have perfectly proportioned slices, making it easy for guests to enjoy. Their smiles will reflect the joyful delight this dessert brings. Let’s explore why this recipe is so special and how to create it in your own kitchen.
In this guide, you will discover everything from the essential ingredients to step-by-step instructions for making your very own cheesecake in a loaf pan. Whether you’re a novice baker or a seasoned pro, this incredible recipe will help you create something that everyone will love. Dive into the world of cheesecake like never before!
Why You’ll Love This Recipe
Cheesecake in a loaf pan not only offers an incredible taste but also presents several compelling reasons to make it. Here’s why you’ll fall head over heels for this recipe:
1. Perfect Slices: The loaf pan allows you to slice the cheesecake neatly, giving everyone a perfect portion without the mess.
2. Impressive Presentation: The unique shape makes it a stunning centerpiece for your dessert table.
3. Easy to Customize: You can add various toppings, such as fruit, chocolate, or caramel, to suit your preferences.
4. Time-Saving: Baking in a loaf pan means shorter cooking times compared to traditional cheesecake recipes.
5. No Water Bath Needed: This recipe avoids the hassle of a water bath while still yielding a creamy texture.
6. Great for Any Occasion: Whether it’s a birthday, holiday, or casual get-together, this cheesecake is perfect for any celebration.
With these enticing reasons, it’s clear why cheesecake in a loaf pan has gained popularity among dessert lovers. Every bite promises to be a delightful experience that will make you come back for more!
Preparation and Cooking Time
Making cheesecake in a loaf pan is efficient and straightforward. The total time required is about 1 hour and 30 minutes, including preparation and baking. Here’s a breakdown of the timing:
– Preparation Time: 20-25 minutes
– Cooking Time: 50-60 minutes
– Cooling Time: 30-60 minutes (or until completely chilled)
These estimates may vary based on your kitchen equipment and personal experience, but they provide a great guideline for planning your baking session.
Ingredients
– 8 oz cream cheese, softened
– 1 cup granulated sugar
– 2 large eggs
– 1 teaspoon vanilla extract
– 1 tablespoon lemon juice
– 1 cup sour cream
– 1/4 cup all-purpose flour
– 1/4 teaspoon salt
– Optional: Fruit compote or chocolate for topping
Step-by-Step Instructions
Creating this amazing cheesecake in a loaf pan is a simple process. Follow these step-by-step instructions to ensure your success:
1. Preheat Oven: Preheat your oven to 325°F (163°C). Prepare a 9×5 inch loaf pan by greasing it or lining with parchment paper for easy removal.
2. Mix Cream Cheese: In a large mixing bowl, beat the softened cream cheese with an electric mixer until smooth.
3. Add Sugar: Gradually add the granulated sugar while continuing to mix until well combined and fluffy.
4. Incorporate Eggs: Add the eggs one at a time, mixing well after each addition to maintain a smooth consistency.
5. Flavor Additions: Mix in the vanilla extract and lemon juice to enhance the flavor.
6. Sour Cream and Flour: Fold in the sour cream, followed by the all-purpose flour and salt. This will give your cheesecake its creamy texture.
7. Pour into Pan: Pour the cheesecake batter into the prepared loaf pan evenly. Tap it gently on the countertop to remove air bubbles.
8. Bake: Place the loaf pan in the preheated oven and bake for 50-60 minutes. The cheesecake should be set with a slight jiggle in the center.
9. Cool Down: Once baked, remove the pan and let it cool at room temperature for 10 minutes. Then, chill it in the refrigerator for at least 30 minutes, or until it’s completely done cooling.
10. Slice and Serve: Once chilled, carefully remove the cheesecake from the loaf pan. Use a sharp knife to slice the cheesecake into portions.
With these clear instructions, you’ll find creating cheesecake in a loaf pan to be an effortless achievement!
How to Serve
To create an unforgettable experience while serving your cheesecake in a loaf pan, consider these tips:
1. Presentation: Use a serving platter without distractions to highlight the beauty of the cheesecake.
2. Toppings: Add fresh fruit compote, chocolate drizzle, or even a sprinkle of crushed nuts for added texture and flavor.
3. Serving Suggestions: Pair these slices with a dollop of whipped cream or a scoop of ice cream for a decadent treat.
4. Beverage Pairing: Serve with coffee, tea, or dessert wine to elevate the flavor experience even further.
5. Creative Slicing: Experiment with different slice sizes. Smaller slices can encourage guests to sample more while larger slices can cater to big appetites.
By putting thought into how you serve your cheesecake, you’re sure to impress your guests and create lasting memories over this delicious dessert!
Additional Tips
– Use Room Temperature Ingredients: Make sure your cream cheese, eggs, and sour cream are at room temperature for a smoother batter. This helps achieve a creamier texture.
– Avoid Overmixing: Mix the batter just until combined to avoid incorporating too much air, which can cause cracks during baking.
– Experiment with Flavors: Enhance the flavor by adding citrus zest or a hint of almond extract to the batter for a unique twist.
– Check for Doneness: A slight jiggle in the center indicates that your cheesecake is ready. Overbaking may lead to a cracked surface.
Recipe Variation
There are numerous ways to put a spin on your cheesecake in a loaf pan. Here are a few variations to consider:
1. Chocolate Cheesecake: Blend in half a cup of melted dark chocolate for a rich chocolate variation. Top with whipped cream and chocolate shavings.
2. Berry Swirl: Fold in a cup of fresh or frozen berries into the batter before pouring it into the pan. This adds vibrant colors and flavors.
3. Nutty Delight: Incorporate finely chopped nuts into the batter for added texture. Top with crushed nuts or a nut-based crust if desired.
4. Savory Cheesecake: For a savory option, reduce the sugar and mix in ingredients like garlic, herbs, and cream cheese for an appetizer twist.
Freezing and Storage
For those who wish to save their cheesecake for later, it’s essential to consider proper storage:
– Storage: Store leftover cheesecake slices in an airtight container in the refrigerator for up to 5 days.
– Freezing: To freeze, wrap individual slices tightly in plastic wrap followed by aluminum foil. They will stay fresh for up to 3 months. Thaw overnight in the fridge before serving.
Special Equipment
To successfully create a cheesecake in a loaf pan, you will need some basic kitchen tools:
– 9×5 inch Loaf Pan: Ensure your pan is of good quality for even baking.
– Electric Mixer: A hand mixer or stand mixer works best to achieve a smooth and creamy batter.
– Spatula: Use a rubber spatula for folding in ingredients without deflating the batter.
– Parchment Paper: Helps in easy removal from the pan and prevents sticking.
Frequently Asked Questions
How long does the cheesecake need to chill before serving?
Typically, it’s best to let the cheesecake chill in the refrigerator for at least 2-4 hours to set properly.
Can I substitute any ingredients for dietary restrictions?
Absolutely! You can use gluten-free flour or a dairy-free cream cheese alternative for a gluten-free or dairy-free version of this cheesecake.
Is it necessary to bake the cheesecake in a water bath?
No, this recipe is designed to be baked without a water bath, making it simpler to prepare while still achieving a great texture.
How can I tell when the cheesecake is properly baked?
The cheesecake should be set with a slight jiggle in the middle. If it appears too liquidy, continue to bake in 5-minute increments.
Conclusion
Cheesecake in a loaf pan not only redefines the classic dessert but also impresses with its elegance and ease of serving. Its versatile nature allows you to explore various flavors and presentations, making it suitable for any occasion. With this recipe, the rich, creamy texture and perfect slices guarantee a delightful experience for everyone. By following the tips, variations, and storage suggestions outlined here, your cheesecake is sure to be a crowd-pleaser that leaves a lasting impression. Whether you’re serving it at a celebration or enjoying it at home, this dessert is sure to satisfy your cravings.
Cheesecake in a Loaf Pan: An Amazing Ultimate Recipe
- Total Time: 0 hours
Ingredients
– 8 oz cream cheese, softened
– 1 cup granulated sugar
– 2 large eggs
– 1 teaspoon vanilla extract
– 1 tablespoon lemon juice
– 1 cup sour cream
– 1/4 cup all-purpose flour
– 1/4 teaspoon salt
– Optional: Fruit compote or chocolate for topping
Instructions
Creating this amazing cheesecake in a loaf pan is a simple process. Follow these step-by-step instructions to ensure your success:
1. Preheat Oven: Preheat your oven to 325°F (163°C). Prepare a 9×5 inch loaf pan by greasing it or lining with parchment paper for easy removal.
2. Mix Cream Cheese: In a large mixing bowl, beat the softened cream cheese with an electric mixer until smooth.
3. Add Sugar: Gradually add the granulated sugar while continuing to mix until well combined and fluffy.
4. Incorporate Eggs: Add the eggs one at a time, mixing well after each addition to maintain a smooth consistency.
5. Flavor Additions: Mix in the vanilla extract and lemon juice to enhance the flavor.
6. Sour Cream and Flour: Fold in the sour cream, followed by the all-purpose flour and salt. This will give your cheesecake its creamy texture.
7. Pour into Pan: Pour the cheesecake batter into the prepared loaf pan evenly. Tap it gently on the countertop to remove air bubbles.
8. Bake: Place the loaf pan in the preheated oven and bake for 50-60 minutes. The cheesecake should be set with a slight jiggle in the center.
9. Cool Down: Once baked, remove the pan and let it cool at room temperature for 10 minutes. Then, chill it in the refrigerator for at least 30 minutes, or until it’s completely done cooling.
10. Slice and Serve: Once chilled, carefully remove the cheesecake from the loaf pan. Use a sharp knife to slice the cheesecake into portions.
With these clear instructions, you’ll find creating cheesecake in a loaf pan to be an effortless achievement!
- Prep Time: 15 minutes
- Cook Time: 50-60 minutes
Nutrition
- Serving Size: 8 slices
- Calories: Approximately 300 kcal per slice
- Fat: 20g
- Protein: 6g