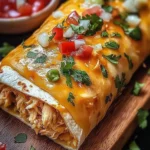
Chi-Chi’s Baked Chicken Chimichangas are a delightful twist on a classic dish. Bursting with flavors and baked to golden perfection, these chimichangas create an exciting dining experience that everyone will enjoy. Loaded with spiced chicken, ooey-gooey cheese, and fresh veggies, it’s a culinary extravaganza that promises to be both satisfying and memorable. Whether you’re cooking for a family dinner or hosting a gathering, these chimichangas will make a lasting impression.
These baked delights are not only delicious but also relatively healthy compared to their fried counterparts. The combination of baked tortillas stuffed with savory chicken filling makes for a tempting option that feels indulgent without the guilt. The crispy exterior paired with a soft, flavorful center creates a perfect harmony of textures that’s simply irresistible.
Get ready to elevate your mealtime routine with this wonderful recipe. In this article, you’ll discover why Chi-Chi’s Baked Chicken Chimichangas should be your next culinary masterpiece, how to prepare them, and tips on serving them to impress your guests. Let’s dive into the incredible world of flavors that Chi-Chi’s Baked Chicken Chimichangas offer!
Why You’ll Love This Recipe
Chi-Chi’s Baked Chicken Chimichangas blend simple ingredients with vibrant flavors, making them a go-to favorite. Here are some compelling reasons to master this recipe:
1. Quick & Easy: Enjoy a simple preparation process that doesn’t require advanced cooking skills, making it ideal for busy weeknights.
2. Family-Friendly: These chimichangas appeal to both kids and adults. Their fun hand-held nature makes them great for family meals.
3. Healthy Alternative: Baking instead of frying significantly reduces fat content without sacrificing flavor, making these a nutritious option.
4. Customizable: Feel free to adapt the filling to your tastes by adding different vegetables or cheeses, catering to everyone’s preferences.
5. Make-Ahead Friendly: Prepare them in advance, freeze, and bake when you’re ready to serve—a perfect solution for meal prepping!
6. Impressive Presentation: Golden-brown chimichangas topped with fresh garnishes look stunning on any table, impressing your guests effortlessly.
With these factors in mind, you’ll see why Chi-Chi’s Baked Chicken Chimichangas are destined to become a beloved dish in your household. Each bite is packed with flavor, showcasing the versatility of this incredible recipe.
Preparation and Cooking Time
Preparing Chi-Chi’s Baked Chicken Chimichangas takes about 1 hour and 15 minutes from start to finish. Here’s a breakdown of the essential timing:
– Preparation Time: 30 minutes
– Cooking Time: 30-35 minutes
– Cooling Time: 10-15 minutes
This timeline is manageable, allowing you to spend less time in the kitchen and more time enjoying your meal with loved ones!
Ingredients
– 2 cups cooked shredded chicken
– 1 cup shredded cheese (cheddar or Mexican blend)
– 1 cup salsa
– 1 cup black beans, rinsed and drained
– 1 cup corn (canned or frozen)
– 1 teaspoon cumin
– 1 teaspoon chili powder
– ½ teaspoon garlic powder
– ½ teaspoon onion powder
– 8 large flour tortillas
– Cooking spray or olive oil for brushing
– Fresh cilantro for garnish (optional)
– Sour cream for serving (optional)
– Avocado slices for serving (optional)
Step-by-Step Instructions
Creating Chi-Chi’s Baked Chicken Chimichangas is simple when you follow these easy steps:
1. Preheat your oven to 375°F (190°C). Line a baking sheet with parchment paper.
2. Mix Ingredients: In a large bowl, combine the shredded chicken, shredded cheese, salsa, black beans, corn, cumin, chili powder, garlic powder, and onion powder. Mix until thoroughly combined.
3. Prepare Tortillas: Warm the flour tortillas in the microwave for about 30 seconds to make them more pliable.
4. Fill Tortillas: Spoon about ¼ cup of the chicken mixture into the center of each tortilla.
5. Fold and Roll: Fold the sides of the tortilla inwards, then tightly roll from the bottom up to secure the filling inside.
6. Place on Baking Sheet: Position the rolled chimichangas seam-side down on the prepared baking sheet.
7. Brush with Oil: Lightly spray or brush the tops of the chimichangas with cooking spray or olive oil to promote browning.
8. Bake: Bake in the preheated oven for 30-35 minutes or until they are golden brown and crispy.
9. Cool: Remove from the oven and let them cool for 10-15 minutes before serving.
10. Garnish: Top with fresh cilantro, and serve alongside sour cream or avocado slices, if desired.
These simple instructions will guide you in creating delicious and visually appealing baked chimichangas that everyone will love!
How to Serve
To create a memorable dining experience with Chi-Chi’s Baked Chicken Chimichangas, consider these serving tips:
1. Presentation: Plate the chimichangas neatly on a large serving platter. A colorful garnish of cilantro can significantly enhance the visual appeal.
2. Accompaniments: Serve with a side of salsa, guacamole, or a fresh salad to balance out the flavors and textures.
3. Portion Control: Offer individual chimichangas or cut them in half for a sharing-style meal. This encourages guests to try a variety of dips.
4. Beverage Pairing: Consider pairing these delicious bites with a refreshing beverage, such as iced tea or a light beer, to enhance the experience.
By thoughtfully presenting your Chi-Chi’s Baked Chicken Chimichangas, you will impress your guests and create a delightful dining occasion that showcases the incredible flavors of this dish.
Additional Tips
– Serve with Dips: Enhance your Chi-Chi’s Baked Chicken Chimichangas with a variety of sauces, such as salsa, guacamole, or even a spicy queso dip.
– Experiment with Spices: Feel free to adjust the seasoning in the filling. Add some cayenne pepper for extra heat or smoked paprika for a unique twist.
– Use Fresh Produce: Incorporate fresh vegetables like diced bell peppers or chopped green onions into the filling for added crunch and flavor.
– Customize the Cheese: Use a mix of cheeses, such as Monterey Jack or pepper jack, to create a tantalizing cheesy experience.
– Garnish Creatively: Top your chimichangas with fresh avocado slices, a dollop of sour cream, or a sprinkle of lime juice for a zesty finish.
Recipe Variation
You can tailor Chi-Chi’s Baked Chicken Chimichangas in many exciting ways:
1. Vegetarian Version: Substitute the chicken with black beans or lentils for a hearty vegetarian option that is just as satisfying.
2. Seafood Twist: Use cooked shrimp or crab meat in place of the chicken for a delicious seafood chimichanga.
3. Breakfast Chimichangas: Fill tortillas with scrambled eggs, cheese, and diced veggies for a breakfast-inspired variation that can be enjoyed any time of day.
4. Spicy Chicken: Add jalapeños or a dash of hot sauce to the filling for those who love an extra kick.
5. Sweet Chimichangas: For a dessert twist, fill with sweetened cream cheese and fruit, then bake until golden and drizzle with chocolate sauce.
Freezing and Storage
– Storage: Keep your cooked chimichangas in an airtight container in the refrigerator for up to 3-4 days. Reheat them in the oven for the best texture.
– Freezing: Allow the baked chimichangas to cool completely before wrapping each one tightly in plastic wrap and then aluminum foil. Freeze for up to 3 months. To reheat, bake from frozen at 375°F (190°C) for 40-45 minutes.
Special Equipment
To successfully prepare Chi-Chi’s Baked Chicken Chimichangas, you will need:
– Large Mixing Bowl: To combine the filling ingredients.
– Baking Sheet: For cooking the chimichangas evenly in the oven.
– Parchment Paper: To line the baking sheet for easy cleanup.
– Microwave or Skillet: For warming the tortillas, making them easier to roll.
– Basting Brush: For applying oil to the tops of the chimichangas before baking.
Frequently Asked Questions
Can I use rotisserie chicken for this recipe?
Absolutely! Rotisserie chicken is a great time-saver and adds delicious flavor.
What toppings pair well with chimichangas?
Consider serving with shredded lettuce, diced tomatoes, or a sprinkle of cheese to elevate the presentation.
Are these chimichangas kid-friendly?
Yes! Their fun, handheld nature makes them appealing to children. They can also customize their fillings.
Can I bake them without oil?
While oil promotes browning, you can skip it for a slightly less crispy exterior; they will still taste great!
Is this dish gluten-free?
To make Chi-Chi’s Baked Chicken Chimichangas gluten-free, use corn tortillas instead of flour tortillas.
Conclusion
Chi-Chi’s Baked Chicken Chimichangas are not just a delectable meal but a versatile dish perfect for any occasion. Their crispy exterior and flavorful filling appeal to everyone at the table. With the ability to customize and serve them in various ways, these chimichangas are sure to be a hit. Whether you’re preparing a family dinner or entertaining friends, you can create an unforgettable culinary experience with this fantastic recipe!
Chi-Chi’s Baked Chicken Chimichangas: An Amazing Ultimate Recipe
- Total Time: 0 hours
Ingredients
– 2 cups cooked shredded chicken
– 1 cup shredded cheese (cheddar or Mexican blend)
– 1 cup salsa
– 1 cup black beans, rinsed and drained
– 1 cup corn (canned or frozen)
– 1 teaspoon cumin
– 1 teaspoon chili powder
– ½ teaspoon garlic powder
– ½ teaspoon onion powder
– 8 large flour tortillas
– Cooking spray or olive oil for brushing
– Fresh cilantro for garnish (optional)
– Sour cream for serving (optional)
– Avocado slices for serving (optional)
Instructions
Creating Chi-Chi’s Baked Chicken Chimichangas is simple when you follow these easy steps:
1. Preheat your oven to 375°F (190°C). Line a baking sheet with parchment paper.
2. Mix Ingredients: In a large bowl, combine the shredded chicken, shredded cheese, salsa, black beans, corn, cumin, chili powder, garlic powder, and onion powder. Mix until thoroughly combined.
3. Prepare Tortillas: Warm the flour tortillas in the microwave for about 30 seconds to make them more pliable.
4. Fill Tortillas: Spoon about ¼ cup of the chicken mixture into the center of each tortilla.
5. Fold and Roll: Fold the sides of the tortilla inwards, then tightly roll from the bottom up to secure the filling inside.
6. Place on Baking Sheet: Position the rolled chimichangas seam-side down on the prepared baking sheet.
7. Brush with Oil: Lightly spray or brush the tops of the chimichangas with cooking spray or olive oil to promote browning.
8. Bake: Bake in the preheated oven for 30-35 minutes or until they are golden brown and crispy.
9. Cool: Remove from the oven and let them cool for 10-15 minutes before serving.
10. Garnish: Top with fresh cilantro, and serve alongside sour cream or avocado slices, if desired.
These simple instructions will guide you in creating delicious and visually appealing baked chimichangas that everyone will love!
- Prep Time: 15 minutes
- Cook Time: 30-35 minutes
Nutrition
- Serving Size: 4-6 chimichangas
- Calories: 480 kcal
- Fat: 18g
- Protein: 30g