Introduction
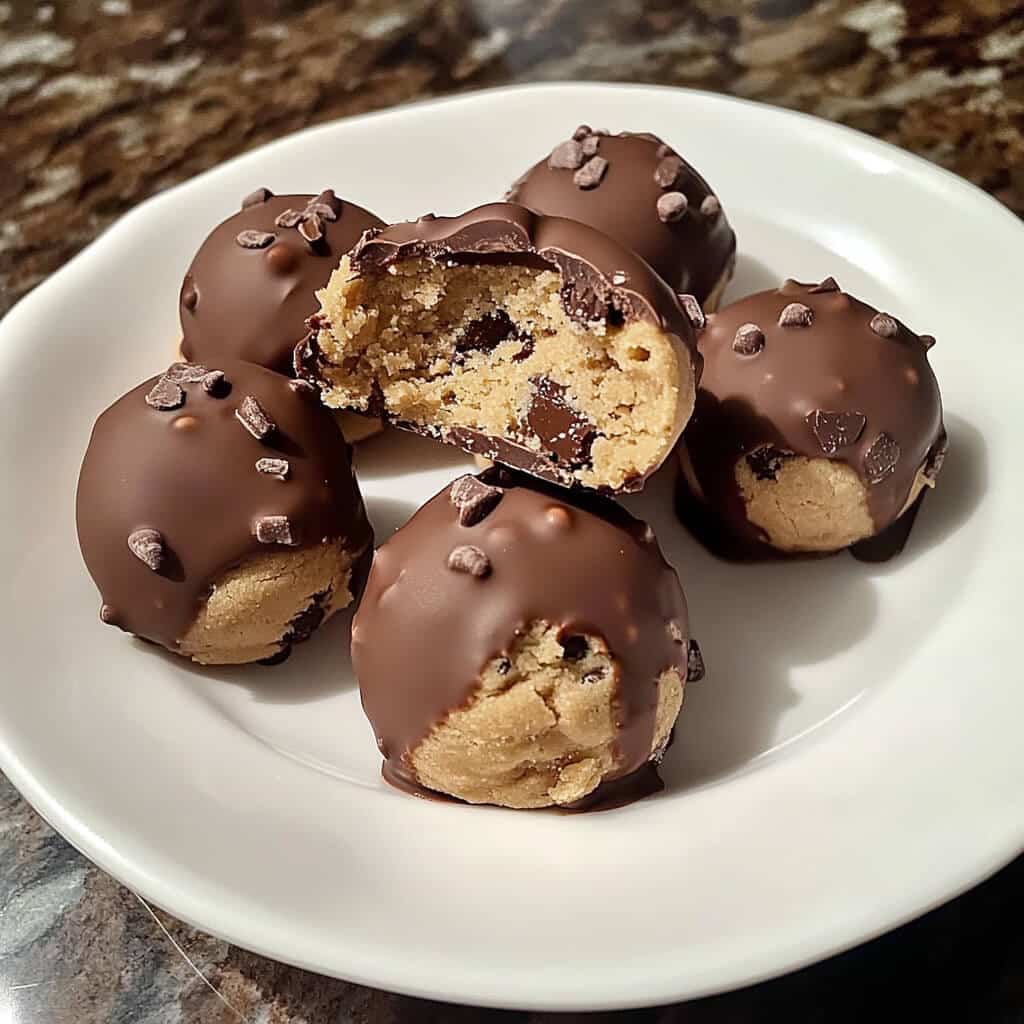
Chocolate Covered Cookie Dough Balls are the ultimate bite-sized indulgence, combining the nostalgic joy of cookie dough with the decadence of a smooth chocolate coating. Each ball is rich, creamy, and satisfyingly sweet, making it the perfect little treat for any occasion. Whether you’re craving a quick dessert or looking to impress at a party, these treats hit all the right notes.
These cookie dough balls are special because they’re safe to eat raw, with heat-treated flour and no eggs. The dough is buttery, packed with mini chocolate chips, and just the right balance of sweetness. Once coated in a layer of melted chocolate and chilled to perfection, they transform into a dessert that’s both playful and elegant.
I remember making these for the first time on a lazy weekend, and they became an instant hit with friends and family. The fun part is dipping each ball in chocolate—messy but worth it! The snap of the chilled chocolate shell followed by the soft cookie dough center is a texture lover’s dream.
Chocolate Covered Cookie Dough Balls are perfect for when you want something indulgent and easy to share. They’re great as a dessert, snack, or even a thoughtful homemade gift. Once you try them, they’ll quickly become a go-to for satisfying that sweet tooth!
Perfect for:
- Dessert tables at parties
- Holiday gift boxes
- Movie night snacks
- Kid-friendly baking activities
- Everyday sweet cravings
Why You’ll Love This Chocolate Covered Cookie Dough Balls
Here are the reasons Chocolate Covered Cookie Dough Balls will become your new favorite dessert:
- No-Bake Simplicity: No need to turn on the oven—perfect for quick desserts or warm-weather treats.
- Egg-Free and Safe: No raw eggs, and the flour is heat-treated to ensure safe, edible dough.
- Chocolate Lovers’ Dream: A generous chocolate shell encases each ball, adding a rich, crunchy texture to the creamy dough.
- Customizable: You can mix in your favorite add-ins like mini chocolate chips or sprinkles for extra fun.
- Make-Ahead Friendly: Store these in the fridge or freezer for a grab-and-go sweet treat any time.
Preparation and Cooking Time
- Total Time: 1 hour (includes chilling time)
- Preparation Time: 20 minutes
- Chilling Time: 40 minutes
- Servings: 20-24 balls
- Calories per serving: Approximately 120-150 calories
- Key Nutrients: Carbs: 15g, Fat: 7g, Protein: 1g
Ingredients
Gather these ingredients for Chocolate Covered Cookie Dough Balls:
- ½ cup unsalted butter, softened
- ¾ cup brown sugar, packed
- 1 teaspoon vanilla extract
- 1 ¼ cups all-purpose flour (heat-treated for safety)
- ½ teaspoon salt
- 1 cup mini chocolate chips
- 8 oz semisweet or milk chocolate, melted (for coating)
Ingredient Highlights
- Unsalted Butter: Creates a creamy, rich base for the dough.
- Brown Sugar: Adds a deep caramel flavor and moisture to the dough.
- Vanilla Extract: Enhances the flavor and adds warmth to the cookie dough.
- Heat-Treated Flour: Ensures the dough is safe to eat without baking.
- Mini Chocolate Chips: Perfectly sized for mixing into the dough for a burst of chocolate in every bite.
- Melted Chocolate: A glossy, rich coating that hardens into the perfect shell for the cookie dough balls.
Step-by-Step Instructions
Here’s how to make Chocolate Covered Cookie Dough Balls:
Prepare the Dough:
- Cream the Butter and Sugar: In a large bowl, beat the softened butter and brown sugar until light and fluffy, about 2-3 minutes.
- Add Vanilla: Mix in the vanilla extract.
- Incorporate Dry Ingredients: Gradually add the heat-treated flour and salt, mixing until fully combined.
- Mix in Chocolate Chips: Stir in the mini chocolate chips until evenly distributed.
- Chill the Dough: Cover the dough and chill in the refrigerator for 20-30 minutes to make it easier to roll.
Form the Balls:
- Shape the Dough: Once chilled, roll the dough into small, bite-sized balls (about 1 tablespoon each) and place them on a parchment-lined baking sheet.
Coat with Chocolate:
- Melt the Chocolate: In a microwave or double boiler, melt the semisweet or milk chocolate until smooth and glossy.
- Dip the Balls: Using a fork or skewer, dip each ball into the melted chocolate, ensuring it’s fully coated. Let any excess chocolate drip off before placing the ball back onto the parchment paper.
- Chill to Set: Refrigerate the coated balls for 15-20 minutes, or until the chocolate is fully set.
Serve and Enjoy:
- Garnish (Optional): Drizzle with white chocolate or sprinkle with crushed nuts or sea salt for an extra touch.
How to Serve Chocolate Covered Cookie Dough Balls
Chocolate Covered Cookie Dough Balls can be served in various ways to suit any occasion:
- Party Platters: Arrange on a decorative tray with a mix of dark and white chocolate drizzles for visual appeal.
- Gift Boxes: Place in mini cupcake liners and box them up for homemade gifts.
- Dessert Boards: Pair with fruits, cookies, and other sweets on a dessert charcuterie board.
- Mini Pops: Insert a toothpick or small skewer into each ball for a cake pop-style presentation.
- Frozen Treats: Serve straight from the freezer for a chilled dessert during warm months.
Additional Tips for Chocolate Covered Cookie Dough Balls
Follow these tips for the best Chocolate Covered Cookie Dough Balls:
- Heat-Treat the Flour: To make raw flour safe to eat, bake it on a parchment-lined sheet at 350°F for 5 minutes or microwave it in 30-second intervals until it reaches 165°F.
- Chill Before Dipping: Chilled dough is easier to work with and less likely to break apart when dipped in chocolate.
- Thin the Chocolate: If the melted chocolate is too thick, add a small amount of coconut oil to thin it for easier coating.
- Use a Fork for Dipping: A fork or dipping tool allows excess chocolate to drip off and creates a smoother coating.
- Store Properly: Keep in an airtight container in the refrigerator to maintain freshness and prevent the chocolate from softening.
Recipe Variations for Chocolate Covered Cookie Dough Balls
Here are 10 variations to customize your Chocolate Covered Cookie Dough Balls:
- Peanut Butter Cookie Dough: Replace half the butter with peanut butter for a nutty twist.
- Oatmeal Cookie Dough: Add ½ cup of quick oats for added texture.
- Dark Chocolate Lovers: Use dark chocolate for coating for a more intense flavor.
- White Chocolate Drizzle: Drizzle with white chocolate for a decorative touch.
- Sprinkle Fun: Roll the balls in colorful sprinkles before the chocolate sets.
- Sea Salt Topping: Sprinkle with flaky sea salt for a sweet-salty combination.
- Coconut Delight: Mix in shredded coconut or sprinkle it over the chocolate coating.
- Mint Chocolate: Add a drop of peppermint extract to the dough for a minty flavor.
- S’mores Style: Add crushed graham crackers and mini marshmallows for a s’mores-inspired version.
- Chocolate Hazelnut: Mix in crushed hazelnuts and use hazelnut spread in place of some of the butter.
Freezing and Storage for Chocolate Covered Cookie Dough Balls
- Freezing: These cookie dough balls freeze well. Place them in a single layer in an airtight container and freeze for up to 2 months. Thaw in the fridge before serving.
- Refrigeration: Store in the refrigerator in an airtight container for up to 1 week.
Special Equipment for Chocolate Covered Cookie Dough Balls
Here are some tools that make preparing Chocolate Covered Cookie Dough Balls easier:
- Mixing Bowls: Essential for combining the dough ingredients.
- Hand Mixer or Stand Mixer: Speeds up the creaming process for the butter and sugar.
- Measuring Cups and Spoons: Ensures accurate measurements for perfect cookie dough.
- Parchment Paper: Prevents sticking and makes cleanup easier.
- Baking Sheet: Ideal for chilling and setting the cookie dough balls.
- Fork or Dipping Tool: Helps coat the balls evenly in melted chocolate.
- Microwave or Double Boiler: For melting the chocolate to a smooth consistency.
- Spoon or Cookie Scoop: Ensures uniform-sized balls for even chilling and coating.
- Cooling Rack: Can be used to drip excess chocolate off after dipping.
- Storage Containers: Keeps the balls fresh in the fridge or freezer.
FAQ Section for Chocolate Covered Cookie Dough Balls
- How do I make heat-treated flour?
Spread flour on a baking sheet and bake at 350°F for 5 minutes or microwave it until it reaches 165°F. - Can I use regular chocolate chips for coating?
Yes, you can melt regular chocolate chips, but adding a bit of coconut oil can help thin the chocolate for easier dipping. - Can I freeze the dough before coating?
Yes, you can freeze the uncoated balls, then dip them in chocolate when ready. - Is this recipe kid-friendly?
Absolutely! It’s a fun, safe way for kids to enjoy cookie dough without raw eggs. - Can I use almond flour instead of all-purpose?
Yes, almond flour can be used, but it will change the texture and flavor slightly. - How long do they last in the fridge?
They’ll stay fresh for up to 1 week in an airtight container. - What if my dough is too sticky?
Chill it longer, or add a tablespoon of heat-treated flour to help firm it up. - Can I make them gluten-free?
Yes, use gluten-free flour and ensure any add-ins are also gluten-free. - What chocolate works best?
Semisweet, milk, or dark chocolate all work well. Use your favorite! - How do I avoid chocolate cracks?
Ensure the balls are not too cold before dipping, and let the chocolate set slowly at room temperature.

Chocolate Covered Cookie Dough Balls
- Total Time: 1 hour
- Yield: 20–24 balls 1x
Description
Chocolate Covered Cookie Dough Balls are the ultimate bite-sized indulgence, combining the nostalgic joy of cookie dough with the decadence of a smooth chocolate coating. Each ball is rich, creamy, and satisfyingly sweet, making it the perfect little treat for any occasion. Whether you’re craving a quick dessert or looking to impress at a party, these treats hit all the right notes.
Ingredients
- ½ cup unsalted butter, softened
- ¾ cup brown sugar, packed
- 1 teaspoon vanilla extract
- 1 ¼ cups all-purpose flour (heat-treated for safety)
- ½ teaspoon salt
- 1 cup mini chocolate chips
- 8 oz semisweet or milk chocolate, melted (for coating)
Instructions
Prepare the Dough:
- Cream the Butter and Sugar: In a large bowl, beat the softened butter and brown sugar until light and fluffy, about 2-3 minutes.
- Add Vanilla: Mix in the vanilla extract.
- Incorporate Dry Ingredients: Gradually add the heat-treated flour and salt, mixing until fully combined.
- Mix in Chocolate Chips: Stir in the mini chocolate chips until evenly distributed.
- Chill the Dough: Cover the dough and chill in the refrigerator for 20-30 minutes to make it easier to roll.
Form the Balls:
- Shape the Dough: Once chilled, roll the dough into small, bite-sized balls (about 1 tablespoon each) and place them on a parchment-lined baking sheet.
Coat with Chocolate:
- Melt the Chocolate: In a microwave or double boiler, melt the semisweet or milk chocolate until smooth and glossy.
- Dip the Balls: Using a fork or skewer, dip each ball into the melted chocolate, ensuring it’s fully coated. Let any excess chocolate drip off before placing the ball back onto the parchment paper.
- Chill to Set: Refrigerate the coated balls for 15-20 minutes, or until the chocolate is fully set.
Serve and Enjoy:
- Garnish (Optional): Drizzle with white chocolate or sprinkle with crushed nuts or sea salt for an extra touch.
- Prep Time: 20 minutes
Nutrition
- Calories: 120-150kcal
- Fat: 7g
- Carbohydrates: 15g
- Protein: 1g
Conclusion for Chocolate Covered Cookie Dough Balls
Chocolate Covered Cookie Dough Balls are the ultimate indulgent treat, offering a perfect balance of rich chocolate and soft, sweet cookie dough with every bite. Their bite-sized nature makes them ideal for snacking, sharing, or serving at parties and gatherings.
What makes this recipe stand out is its versatility. You can customize the dough by adding mix-ins like chopped nuts, sprinkles, or even mini chocolate chips for added texture and fun. Experiment with different types of chocolate—dark, milk, or white—to suit your cravings or special occasions.
These no-bake delights are quick to prepare, making them a go-to option when you need a sweet fix in a flash. I’m excited for you to try these irresistible treats! Be sure to share your creations and tag me on social media—I’d love to see your unique twists. Enjoy every decadent bite!