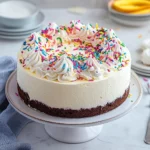
Copycat Dairy Queen Ice Cream Cake is an amazing dessert that perfectly embodies the spirit of celebration. Whether it’s a birthday, an anniversary, or just a special occasion, this ice cream cake captures the deliciousness of the original without the need to head to the store. Imagine layers of vanilla and chocolate ice cream, surrounded by rich fudge and crunchy cookie crumbles, all topped off with luscious whipped cream. This cake isn’t just dessert—it’s an experience that brings friends and family together in joy.
If you’ve ever indulged in a Dairy Queen Ice Cream Cake, you understand how special this treat is. The rich textures and combinations of flavors create a symphony that dances on your palate. The layers offer a delightful surprise with every bite. This copycat version ensures that you can whip this beauty up at home, bringing the joy of Dairy Queen straight to your kitchen.
In this guide, we will delve into why this recipe stands out, explore the preparation and cooking times, and provide you with a detailed ingredients list followed by step-by-step instructions. With simple techniques and accessible ingredients, this recipe is perfect for bakers of all skill levels. Let’s uncover the bliss that is the Copycat Dairy Queen Ice Cream Cake!
Why You’ll Love This Recipe
There are countless reasons why this Copycat Dairy Queen Ice Cream Cake will become a staple in your dessert repertoire. Here are just a few enticing aspects of this incredible recipe:
1. Homemade Experience: Enjoying something made from scratch adds a personal touch that store-bought cakes often lack.
2. Layered Delight: With distinct layers of ice cream and fudge, your taste buds will experience a delightful treat at every bite!
3. Customizable Flavors: Feel free to personalize the cake with your favorite ice cream flavors or fillings.
4. Perfect for Any Occasion: Be it a birthday party, holiday celebration, or family gathering, this cake suits every event.
5. Showstopping Presentation: The stunning layers of ice cream and toppings create a visual masterpiece on your dessert table.
6. Easy to Make: This recipe is straightforward, with simple steps that anybody can follow.
With these reasons in mind, it’s easy to see why this Copycat Dairy Queen Ice Cream Cake is loved by many. Each slice promises a mix of flavors that will leave a lasting impression!
Preparation and Cooking Time
Preparing the Copycat Dairy Queen Ice Cream Cake is a delightful endeavor that will have your guests raving for more. The total time required is roughly 5 hours, primarily due to the freezing time. Here’s the breakdown:
– Preparation Time: 30 minutes
– Freezing Time: 4 hours
– Assembling Time: 30 minutes
This timeline allows the ingredients to meld together perfectly, ensuring that your cake is as delicious as it is beautiful.
Ingredients
– 1 box of chocolate sandwich cookies (like Oreos)
– ½ cup unsalted butter, melted
– 1 quart of vanilla ice cream, softened
– 1 quart of chocolate ice cream, softened
– ½ cup hot fudge sauce
– 1 tub of whipped topping (8 oz)
– Chocolate shavings or sprinkles for garnish (optional)
Step-by-Step Instructions
Creating this delicious Copycat Dairy Queen Ice Cream Cake requires a few easy steps. Follow these guidelines to ensure your cake turns out flawlessly:
1. Prepare the Cookie Crust: In a mixing bowl, crush the chocolate sandwich cookies until fine. Combine them with melted butter and mix until evenly coated. Press the mixture firmly into the bottom of a 9-inch springform pan to form a crust.
2. Layer Vanilla Ice Cream: Scoop the softened vanilla ice cream onto the cookie crust. Spread it evenly using a spatula. Smooth the surface to create a flat layer.
3. Freeze: Carefully cover the pan with plastic wrap and freeze the vanilla layer for about 1 hour, or until solid.
4. Add Hot Fudge Sauce: After the vanilla ice cream has set, drizzle the hot fudge sauce over the frozen layer, distributing it evenly across the surface.
5. Layer Chocolate Ice Cream: Scoop the softened chocolate ice cream on top of the fudge layer. Spread it out evenly to create the second ice cream layer.
6. Freeze Again: Cover the pan once more and freeze for another 1-2 hours until the chocolate ice cream is fully set.
7. Add Topping: Once the cake is firm, remove it from the freezer. Spread the whipped topping over the top layer of chocolate ice cream, smoothing it out with a spatula.
8. Garnish: If desired, sprinkle chocolate shavings or sprinkles on top for decoration.
9. Final Freeze: Place the entire cake back in the freezer for an additional hour before serving, allowing everything to set and meld together.
10. Serve: To serve, carefully remove the sides of the springform pan, slice, and enjoy your delicious creation!
How to Serve
Serving your Copycat Dairy Queen Ice Cream Cake can be as fun as making it! Here are some creative serving suggestions:
1. Presentation: Consider using a decorative cake stand to showcase your beautiful layered cake. A simple white plate allows the stunning colors to shine.
2. Add Accompaniments: Serve each slice with a drizzle of extra hot fudge or a side of fresh fruit to elevate the dessert.
3. Portion Control: Cut generous slices but encourage smaller sizes to leave room for seconds!
4. Beverage Pairing: Pair the cake with a cold glass of milk, or opt for a warm cup of coffee to balance the sweetness.
5. Store Leftovers Properly: If you have leftovers, store them in an airtight container in the freezer for up to two weeks. Just be sure to cover them well to avoid freezer burn.
By following these serving tips, you’ll create a memorable dessert experience that will delight everyone at your gathering!
Additional Tips
– Use Quality Ice Cream: Select premium brands of vanilla and chocolate ice cream for the richest flavor.
– Soften Ice Cream Gradually: Let your ice cream sit at room temperature for about 15 minutes to make spreading easier.
– Crust Consistency: Ensure the cookie crust is packed tightly. This will help it hold together when you slice the cake.
– Experiment with Toppings: Don’t hesitate to add toppings such as crushed cookies, nuts, or fruit for added texture and flavor.
Recipe Variation
Feel free to switch things up! Here are a few variations to try:
1. Mint Chocolate Chip Version: Substitute the chocolate ice cream for mint chocolate chip for a refreshing twist.
2. Strawberry Delight: Layer fresh strawberries between the ice cream layers for a fruity contrast.
3. Peanut Butter Fudge: Add a layer of creamy peanut butter between the ice cream layers for a rich flavor combination.
4. Chocolate Chip Cookie Dough: Incorporate cookie dough pieces into the ice cream layers for extra indulgence.
Freezing and Storage
– Storage: Keep the cake wrapped in plastic wrap in the freezer to maintain freshness. It will last up to two weeks when properly stored.
– Serving Slices: When ready to serve, let the slices sit at room temperature for a few minutes. This will allow them to soften slightly for easier cutting.
Special Equipment
You will need a few essential tools to prepare this cake successfully:
– Springform pan
– Mixing bowls
– Spatula for spreading ice cream
– Plastic wrap for covering
– An ice cream scoop for easier portioning
Frequently Asked Questions
Can I make this cake a day ahead?
Yes! In fact, making it a day ahead allows the flavors to develop.
What if I don’t have a springform pan?
You can use a regular cake pan, though it may be harder to remove the cake for slicing.
Can I use non-dairy ice cream?
Absolutely! Non-dairy ice cream works well if you have dietary restrictions.
Why is freezing time so long?
Freezing is crucial to ensure that each layer sets properly, maintaining the structural integrity of the cake.
How do I cut the cake?
Use a hot knife (run it under warm water) to cut through the layers, making for cleaner slices.
Conclusion
Creating a Copycat Dairy Queen Ice Cream Cake at home is a rewarding experience that will impress your guests. With its rich layers of ice cream, fudge, and whipped topping, this dessert brings the joy of Dairy Queen right to your kitchen. Enjoy it for every special occasion or just to elevate a regular day. The delightful flavors and textures will have everyone asking for seconds!
Copycat Dairy Queen Ice Cream Cake: The Amazing Ultimate Recipe You Need to Try
- Total Time: 30 minutes
Ingredients
– 1 box of chocolate sandwich cookies (like Oreos)
– ½ cup unsalted butter, melted
– 1 quart of vanilla ice cream, softened
– 1 quart of chocolate ice cream, softened
– ½ cup hot fudge sauce
– 1 tub of whipped topping (8 oz)
– Chocolate shavings or sprinkles for garnish (optional)
Instructions
Creating this delicious Copycat Dairy Queen Ice Cream Cake requires a few easy steps. Follow these guidelines to ensure your cake turns out flawlessly:
1. Prepare the Cookie Crust: In a mixing bowl, crush the chocolate sandwich cookies until fine. Combine them with melted butter and mix until evenly coated. Press the mixture firmly into the bottom of a 9-inch springform pan to form a crust.
2. Layer Vanilla Ice Cream: Scoop the softened vanilla ice cream onto the cookie crust. Spread it evenly using a spatula. Smooth the surface to create a flat layer.
3. Freeze: Carefully cover the pan with plastic wrap and freeze the vanilla layer for about 1 hour, or until solid.
4. Add Hot Fudge Sauce: After the vanilla ice cream has set, drizzle the hot fudge sauce over the frozen layer, distributing it evenly across the surface.
5. Layer Chocolate Ice Cream: Scoop the softened chocolate ice cream on top of the fudge layer. Spread it out evenly to create the second ice cream layer.
6. Freeze Again: Cover the pan once more and freeze for another 1-2 hours until the chocolate ice cream is fully set.
7. Add Topping: Once the cake is firm, remove it from the freezer. Spread the whipped topping over the top layer of chocolate ice cream, smoothing it out with a spatula.
8. Garnish: If desired, sprinkle chocolate shavings or sprinkles on top for decoration.
9. Final Freeze: Place the entire cake back in the freezer for an additional hour before serving, allowing everything to set and meld together.
10. Serve: To serve, carefully remove the sides of the springform pan, slice, and enjoy your delicious creation!
- Prep Time: 30 minutes
- Cook Time: 0 minutes
Nutrition
- Serving Size: 12 slices
- Calories: 450 kcal
- Fat: 22g
- Protein: 6g