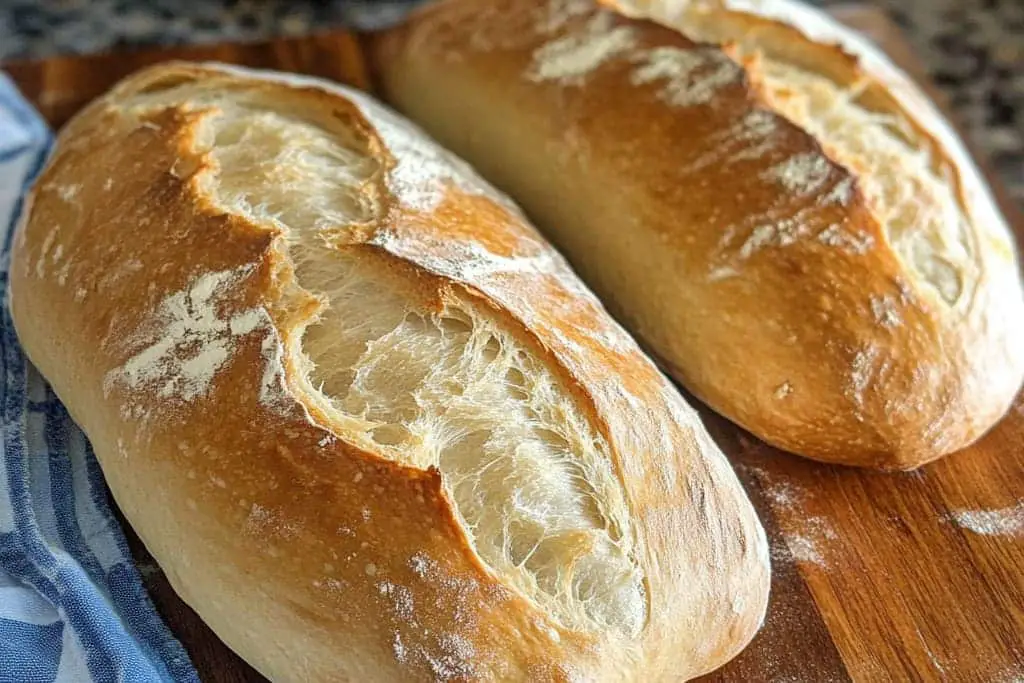
Crusty Italian Bread is the cornerstone of Italian cuisine, loved by many for its amazing texture and incredible crust. This bread is not just a staple; it’s an experience that brings warmth and love to any meal. Picture yourself pulling a loaf out of the oven, the aroma filling your kitchen, with a crust so crispy that it crackles under your fingers. Each bite reveals a soft, chewy interior that seems to melt in your mouth. This delightful artisan bread can elevate any dish, from savory pastas to sweet spreads.
When you make Crusty Italian Bread, you’re not just baking; you’re creating a culinary masterpiece that harks back to generations of Italian tradition. It’s also incredibly rewarding to knead the dough, allowing the gluten to develop and transform simple ingredients into a loaf that sings of authenticity. In this guide, we’ll walk through everything you need to know to bake your own Crusty Italian Bread at home, from preparation to the final crusty result ready for your dining table.
You’ll discover why this recipe is beloved by many, the essentials for preparation and cooking, and the joy of sharing it with loved ones. Whether you’re a seasoned baker or just beginning your culinary journey, creating Crusty Italian Bread is an achievable goal that will impress everyone at your table. Let’s dive into why this recipe is a must-try for 2023!
Why You’ll Love This Recipe
Creating Crusty Italian Bread from scratch is a fulfilling experience. Here’s why you’ll want to embrace this incredible recipe:
1. Authentic Flavor: Each loaf boasts a delightful combination of flavors that only comes from traditional baking methods.
2. Simple Ingredients: Most of the ingredients are standard pantry items, making this recipe accessible.
3. Versatile Use: This bread is perfect for sandwiches, dips, or simply enjoyed with olive oil.
4. Impressive Results: The rustic design and golden crust make for a stunning presentation.
5. Satisfying Process: Kneading and shaping the dough offers a sensory experience, engaging both your hands and your mind.
6. Perfect for Sharing: Homemade bread brings people together, making it an ideal dish for gatherings.
These elements contribute to a well-rounded recipe that not only delights your taste buds but also enhances your baking skills. Each loaf you create is not just food; it’s a labor of love.
Preparation and Cooking Time
Understanding the time involved is essential for planning your baking schedule. Here’s an approximate time breakdown for making Crusty Italian Bread:
– Preparation Time: 30 minutes
– Rising Time: 2 hours
– Cooking Time: 30-35 minutes
– Cooling Time: 30 minutes
In total, expect to spend about 3 to 4 hours from start to finish. However, most of this time involves letting the dough rise and rest. This passive time allows you to go about other tasks while your bread develops flavor and texture.
Ingredients
– 4 cups all-purpose flour
– 1 ½ cups warm water (about 110°F or 43°C)
– 2 teaspoons active dry yeast
– 2 teaspoons salt
– 1 tablespoon sugar
– 1 tablespoon olive oil (optional)
Step-by-Step Instructions
To create Crusty Italian Bread, follow these simple steps. Patience is key; each step builds upon the last to create something truly wonderful.
1. Activate Yeast:
– In a small bowl, combine warm water, sugar, and yeast. Let it sit for about 5-10 minutes until frothy.
2. Mix Ingredients:
– In a large mixing bowl, whisk together the flour and salt. Make a well in the center.
3. Combine Wet and Dry:
– Pour the yeast mixture into the well in the flour. Mix until a rough dough begins to form.
4. Knead the Dough:
– Transfer the dough to a lightly floured surface. Knead for about 10 minutes until smooth and elastic.
5. First Rise:
– Place the dough in a lightly oiled bowl. Cover with a damp cloth and let it rise in a warm area for about 1-2 hours, or until doubled in size.
6. Shape the Dough:
– Punch the risen dough down gently to release air. Shape it into a round or oval loaf.
7. Second Rise:
– Place the shaped dough on a floured baking sheet or a parchment-lined baking stone. Cover and let it rise for another 30-60 minutes.
8. Preheat the Oven:
– About 30 minutes before baking, preheat your oven to 450°F (230°C). Place an empty baking tray on the bottom rack, which will help create steam.
9. Score the Loaf:
– Just before baking, use a sharp knife or a razor blade to score the top of the dough. This allows it to expand while baking.
10. Bake:
– Place the bread in the oven and carefully add a cup of hot water to the empty tray below. Bake for 30-35 minutes, or until the crust is golden brown and sounds hollow when tapped.
11. Cool:
– Remove the bread from the oven and allow it to cool on a wire rack for at least 30 minutes before slicing.
By following these steps, you will find the process both enjoyable and rewarding. Each step enhances the flavors and textures, culminating in a beautiful crusty loaf.
How to Serve
Crusty Italian Bread can be served in countless ways. Here are some suggestions to make the most of your delicious creation:
1. Slicing Technique: Use a serrated knife to slice the bread. This helps maintain the integrity of the crust.
2. With Olive Oil: Serve slices with a small dish of high-quality olive oil for dipping. It complements the bread beautifully.
3. Pairing with Meals: This bread is fantastic with soups, pasta dishes, or alongside a charcuterie board.
4. Toasting: Lightly toast slices and top them with avocado, tomatoes, or cheese for a quick snack.
5. Storing: If you have leftover bread, store it in a paper bag at room temperature. For longer preservation, slice and freeze, then toast directly from the freezer.
These ideas will enhance your enjoyment of Crusty Italian Bread and invite others to savor its homemade goodness. Enjoy baking and sharing your artisan bread with family and friends!
Additional Tips
– Use a Baking Stone: For an even better crust, consider using a baking stone. It retains heat well and helps achieve that perfect crusty exterior.
– Experiment with Flour: Try using a mix of all-purpose flour and bread flour for added chewiness and structure.
– Don’t Rush the Rising: Allow the dough enough time to rise. The longer it proofs, the better the flavor and texture will be.
– Enhance with Herbs: Adding herbs like rosemary or garlic, into the dough can elevate the flavor of your bread.
– Practice Scoring: Scoring the dough properly not only adds visual appeal but also controls how the bread expands during baking.
Recipe Variation
Explore these variations to make your Crusty Italian Bread unique:
1. Herb-Infused Bread: Add dried herbs like oregano or basil to the dough for a fragrant twist.
2. Cheese-Stuffed Loaf: Fold in shredded cheese (like Parmesan) before the first rise for a cheesy delight.
3. Olive Bread: Incorporate chopped olives into the dough for a savory Mediterranean flavor profile.
4. Whole Wheat Option: Substitute half of the all-purpose flour with whole wheat flour for a heartier loaf.
5. Sesame or Poppy Seed Topping: Brush the loaf with olive oil before baking and sprinkle seeds on top for added texture.
Freezing and Storage
– Storage: Keep your bread at room temperature in a paper bag to maintain its crustiness. Avoid plastic, which can make it soggy.
– Freezing: Wrap the bread tightly in plastic wrap and aluminum foil. It can be frozen for up to 3 months. To serve, thaw it at room temperature and reheat in the oven for that fresh-baked taste.
Special Equipment
While you can make Crusty Italian Bread with basic kitchen tools, these can enhance your baking experience:
– Mixing Bowl: A large bowl for mixing and kneading the dough.
– Baking Sheet or Baking Stone: Essential for baking the bread.
– Kitchen Scale: For precise measurement, especially for flour.
– Dough Scraper: Helpful for handling and shaping dough.
– Bread Knife: Essential for slicing the finished loaf without crushing it.
Frequently Asked Questions
Can I use instant yeast instead of active dry yeast?
Yes, you can use instant yeast. Just mix it directly with the flour without needing to proof it first.
Why is my bread dense?
A dense loaf may result from not kneading the dough enough or insufficient rising time. Ensure proper gluten development for a light texture.
Can I bake this bread in a bread machine?
Yes, follow the bread machine’s instructions for measurements and settings, adjusting for the rising times accordingly.
What should I do if my dough doesn’t rise?
Ensure your yeast is fresh and that you’re letting the dough rise in a warm, draft-free location.
How can I tell if the bread is fully cooked?
The bread should be golden brown, and when tapped on the bottom, it should sound hollow.
Conclusion
Baking your own Crusty Italian Bread is a rewarding endeavor that invites you to engage your senses. With its enchanting aroma and delightful texture, this bread is more than just food—it’s a connection to culinary traditions and an expression of creativity.
As you create and share your homemade bread, you’ll find joy in the process and satisfaction in the outcome. May your kitchen be filled with the wonderful scent of freshly baked Crusty Italian Bread, and may your meals be enriched by this artisan delight!
Crusty Italian Bread: The Incredible Ultimate Recipe for 2023
- Total Time: 0 hours
Ingredients
– 4 cups all-purpose flour
– 1 ½ cups warm water (about 110°F or 43°C)
– 2 teaspoons active dry yeast
– 2 teaspoons salt
– 1 tablespoon sugar
– 1 tablespoon olive oil (optional)
Instructions
To create Crusty Italian Bread, follow these simple steps. Patience is key; each step builds upon the last to create something truly wonderful.
1. Activate Yeast:
– In a small bowl, combine warm water, sugar, and yeast. Let it sit for about 5-10 minutes until frothy.
2. Mix Ingredients:
– In a large mixing bowl, whisk together the flour and salt. Make a well in the center.
3. Combine Wet and Dry:
– Pour the yeast mixture into the well in the flour. Mix until a rough dough begins to form.
4. Knead the Dough:
– Transfer the dough to a lightly floured surface. Knead for about 10 minutes until smooth and elastic.
5. First Rise:
– Place the dough in a lightly oiled bowl. Cover with a damp cloth and let it rise in a warm area for about 1-2 hours, or until doubled in size.
6. Shape the Dough:
– Punch the risen dough down gently to release air. Shape it into a round or oval loaf.
7. Second Rise:
– Place the shaped dough on a floured baking sheet or a parchment-lined baking stone. Cover and let it rise for another 30-60 minutes.
8. Preheat the Oven:
– About 30 minutes before baking, preheat your oven to 450°F (230°C). Place an empty baking tray on the bottom rack, which will help create steam.
9. Score the Loaf:
– Just before baking, use a sharp knife or a razor blade to score the top of the dough. This allows it to expand while baking.
10. Bake:
– Place the bread in the oven and carefully add a cup of hot water to the empty tray below. Bake for 30-35 minutes, or until the crust is golden brown and sounds hollow when tapped.
11. Cool:
– Remove the bread from the oven and allow it to cool on a wire rack for at least 30 minutes before slicing.
By following these steps, you will find the process both enjoyable and rewarding. Each step enhances the flavors and textures, culminating in a beautiful crusty loaf.
- Prep Time: 15 minutes
- Cook Time: 30-35 minutes
Nutrition
- Serving Size: 12
- Calories: 120 kcal per slice
- Fat: 1g
- Protein: 4g