Introduction
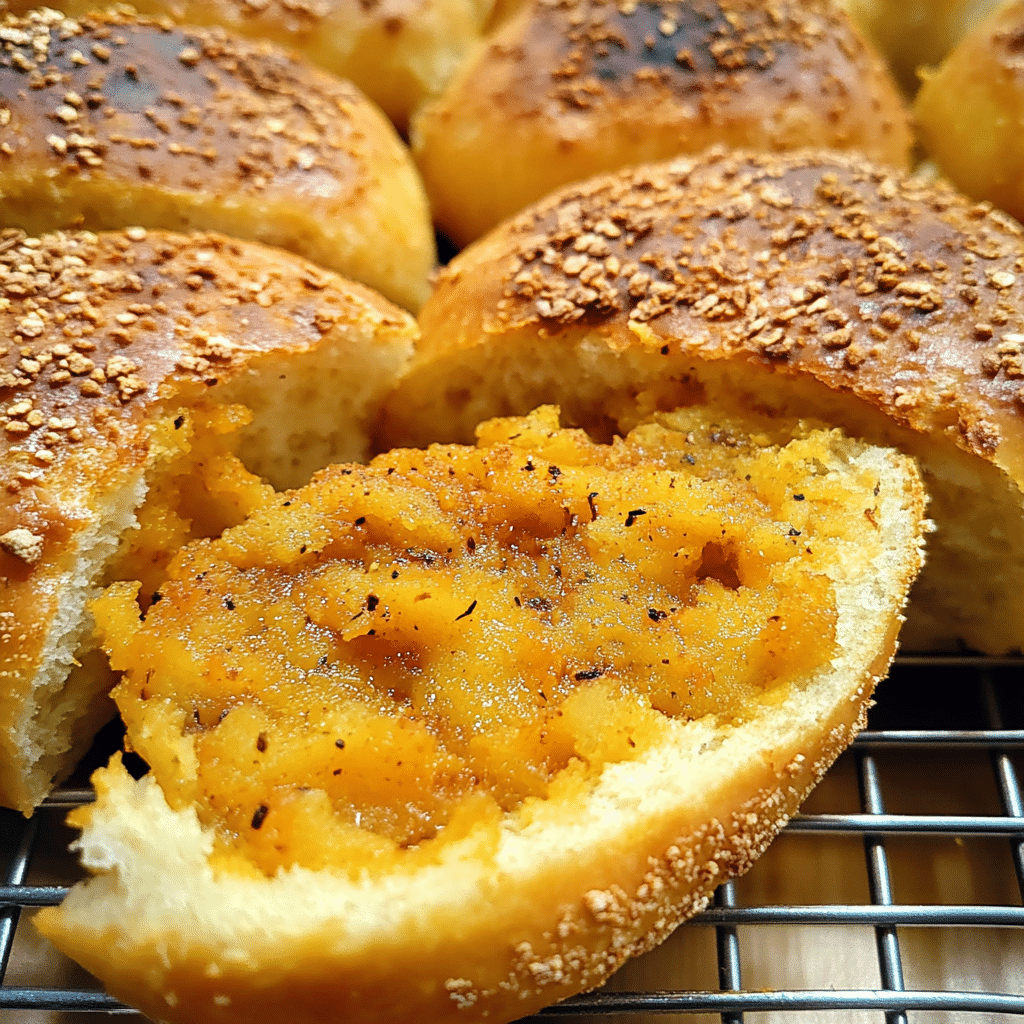
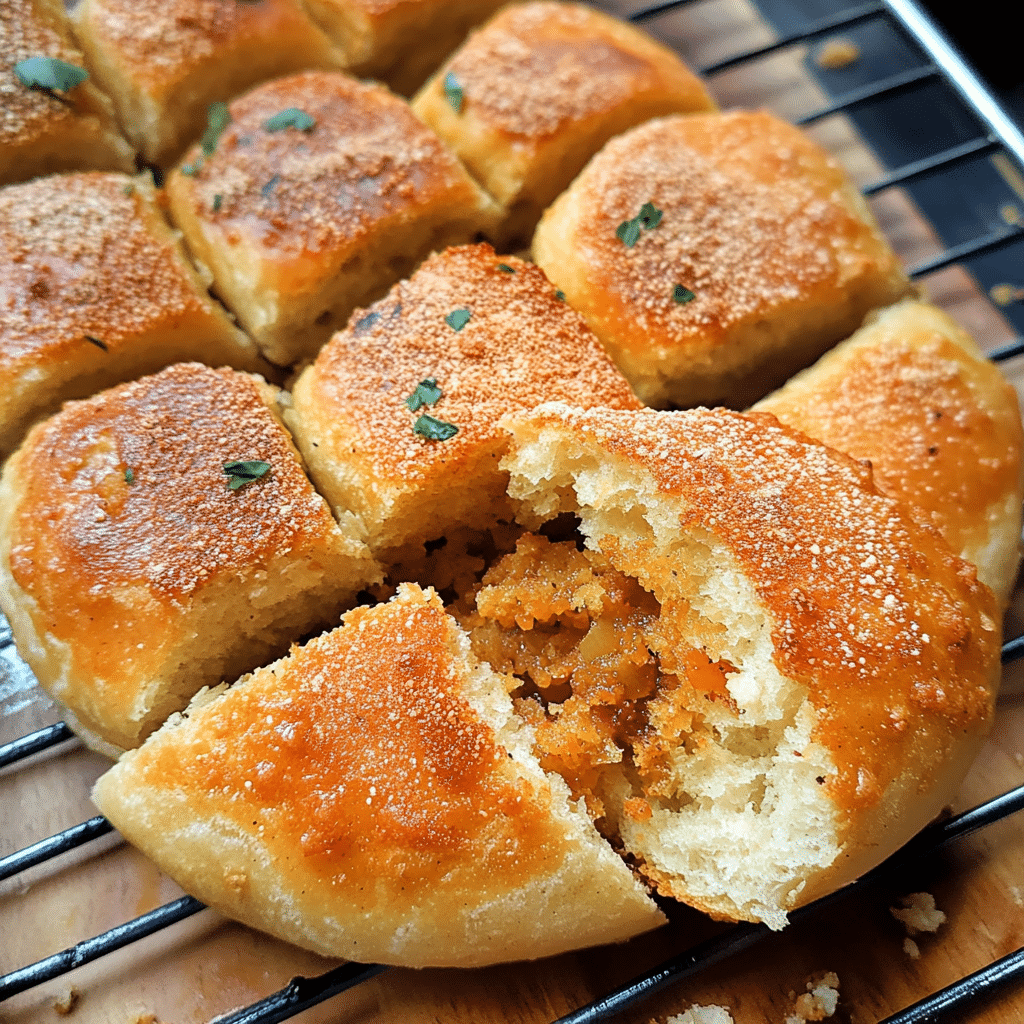
Curry Bread, or “Karē Pan,” is the ultimate savory snack that combines the rich, spiced flavors of curry with the satisfying crunch of golden fried bread. This handheld treat is a perfect fusion of hearty curry filling encased in a soft, fluffy bread crust that’s fried to perfection. Every bite offers a delightful contrast—crispy on the outside, warm and flavorful on the inside. It’s comfort food you can hold in your hand, delivering bold, satisfying flavors in every bite.
Curry Bread holds a special place in my food journey. I first tasted it at a local Japanese bakery, and it immediately became a favorite. The aroma of freshly fried bread and the spiced curry filling is simply irresistible. Making it at home allows for endless customization—whether you prefer a mild, creamy curry or a spicy, robust one, the filling can be tailored to your taste. The process of kneading the dough, filling it with curry, and frying it to a golden brown makes the experience as enjoyable as the final product.
Curry Bread is perfect for a snack, light lunch, or even a party appetizer that’s sure to impress. Serve it with a side of pickles or a crisp salad for balance, or enjoy it all on its own for a burst of flavor. Whether you’re new to this delightful snack or a longtime fan, Curry Bread is the kind of food that turns any day into a deliciously special occasion.
Perfect for:
- Snack lovers
- Fans of Japanese cuisine
- Curry enthusiasts
- Brunch gatherings
- Exploring fusion recipes
Why You’ll Love This Recipe
Here’s why Curry Bread is a recipe you’ll keep coming back to:
- Fusion Perfection: Combines the aromatic flavors of curry with the satisfying crunch of fried bread.
- Versatile: Customize the filling with your favorite curry—vegetarian, chicken, or beef.
- Great for Meal Prep: Make a batch and freeze for later, ensuring you always have a quick snack on hand.
- Authentic Bakery Flavor: Recreate the taste of your favorite Japanese bakery at home.
- Crowd-Pleaser: Loved by kids and adults alike, it’s a guaranteed hit at any gathering.
Preparation and Cooking Time
- Total Time: 2 hours 30 minutes
- Preparation Time: 45 minutes
- Cooking Time: 1 hour
- Resting Time (for dough): 45 minutes
- Servings: 8 pieces
- Calories per serving: Approximately 350-400 calories
- Key Nutrients: Carbohydrates: 45g, Protein: 8g, Fat: 15g
Ingredients
For the Dough:
- 2 ½ cups all-purpose flour
- 2 tablespoons sugar
- 1 teaspoon salt
- 2 teaspoons instant yeast
- 1 large egg
- ¾ cup warm milk (about 110°F)
- 2 tablespoons unsalted butter, softened
For the Curry Filling:
- 1 tablespoon vegetable oil
- 1 small onion, finely chopped
- 1 small carrot, finely diced
- 1 small potato, peeled and diced
- 150g (5 oz) ground beef or chicken (optional)
- 2 tablespoons Japanese curry roux (store-bought or homemade)
- ½ cup water
- Salt and pepper, to taste
For Coating and Frying:
- 1 cup panko breadcrumbs
- 2 large eggs, beaten
- 1 cup all-purpose flour
- Vegetable oil, for frying
Ingredient Highlights
- Japanese Curry Roux: The key to the filling’s flavor, this rich and spiced curry base creates the perfect consistency.
- Panko Breadcrumbs: Ensures a light, crispy exterior that absorbs less oil during frying.
- Soft Dough: The slightly sweet dough balances the savory curry filling beautifully.
- Versatile Filling: Can be adjusted to your dietary preferences, from vegetarian to protein-packed.
Step-by-Step Instructions
Prepare the Dough:
- Mix the Ingredients: In a large mixing bowl, combine flour, sugar, salt, and yeast. Add the egg and warm milk, then mix until a dough forms.
- Knead the Dough: Knead on a lightly floured surface or in a stand mixer with a dough hook for 8-10 minutes until smooth and elastic.
- Add Butter: Gradually knead in the softened butter until fully incorporated.
- Let It Rise: Place the dough in a lightly greased bowl, cover with a damp cloth, and let it rise in a warm place for 45 minutes or until doubled in size.
Prepare the Curry Filling:
- Sauté the Vegetables: Heat oil in a skillet over medium heat. Sauté onions, carrots, and potatoes until softened.
- Cook the Protein (Optional): Add ground meat and cook until browned.
- Make the Curry: Stir in curry roux and water, simmering until thickened. Adjust seasoning with salt and pepper. Let cool completely.
Assemble the Curry Bread:
- Divide the Dough: Punch down the risen dough and divide it into 8 equal portions. Roll each piece into a ball.
- Fill the Dough: Flatten each ball into a circle, place a spoonful of curry filling in the center, and seal the edges tightly. Shape into a round or oval.
- Coat the Bread: Lightly roll each filled dough in flour, dip in beaten egg, and coat with panko breadcrumbs.
Fry the Curry Bread:
- Heat the Oil: Heat vegetable oil in a deep fryer or large pot to 350°F (175°C).
- Fry Until Golden: Fry 2-3 pieces at a time, turning occasionally, until golden brown and crisp (about 3-4 minutes). Remove and drain on paper towels.
How to Serve
Curry Bread is best enjoyed fresh and warm. Here are some serving ideas:
- Classic Snack: Serve as is with a side of ketchup or spicy mayo for dipping.
- With Soup or Salad: Pair with a light soup or salad for a complete meal.
- As a Party Appetizer: Cut into halves or quarters for bite-sized party snacks.
- Packed Lunch: Enjoy as part of a bento box or packed lunch for a portable, satisfying meal.
Additional Tips
- Cool the Filling: Ensure the curry filling is completely cool before assembling to prevent the dough from becoming soggy.
- Seal Properly: Pinch the edges tightly to avoid leaks during frying.
- Don’t Overcrowd the Fryer: Fry in small batches for even cooking and a crispy texture.
- Baking Option: For a lighter version, bake at 375°F (190°C) for 20-25 minutes, brushing with oil beforehand.
- Freeze for Later: Freeze uncooked, breaded curry bread and fry directly from frozen when ready.
Recipe Variations
Here are 10 creative twists to try with your Curry Bread:
- Vegetarian Curry Bread: Use lentils or chickpeas instead of meat for the filling.
- Cheese-Stuffed Curry Bread: Add a small cube of mozzarella to the filling for a gooey surprise.
- Sweet Potato Curry Bread: Substitute potatoes with sweet potatoes for a sweeter flavor.
- Spicy Curry Bread: Add chili flakes or hot sauce to the filling for extra heat.
- Air-Fried Curry Bread: Cook in an air fryer at 375°F for 15 minutes, flipping halfway.
- Baked Curry Bread: Brush with egg wash and bake instead of frying for a healthier alternative.
- Seafood Curry Bread: Use shrimp or crab meat in the curry filling for a coastal twist.
- Fusion Style: Incorporate Indian-style curry or Thai green curry in the filling for a global spin.
- Mini Curry Bread: Make smaller portions for bite-sized snacks or appetizers.
- Gluten-Free Curry Bread: Use gluten-free flour and breadcrumbs to accommodate dietary restrictions.
Freezing and Storage
- Freezing: Bread the filled dough and freeze in an airtight container. Fry directly from frozen, adding 1-2 minutes to the frying time.
- Storage: Store cooked Curry Bread in an airtight container at room temperature for up to 2 days or refrigerate for up to 5 days. Reheat in an oven or air fryer for best results.
Special Equipment
Here are some tools to help you make perfect Curry Bread:
- Stand Mixer: Speeds up kneading for a soft and elastic dough.
- Rolling Pin: Helps evenly flatten the dough for filling.
- Deep Fry Thermometer: Ensures oil is at the right temperature for frying.
- Mixing Bowls: For preparing dough and coating ingredients.
- Slotted Spoon: Ideal for removing fried bread from hot oil.
- Cooling Rack: Keeps the bread crispy while draining excess oil.
- Sharp Knife: Ensures precise chopping of vegetables for the filling.
- Silicone Mat: Prevents dough from sticking during shaping.
- Oil Splash Guard: Keeps your kitchen clean during frying.
- Measuring Cups and Spoons: For accurate measurements of ingredients.
FAQ Section
- Can I use pre-made curry for the filling?
Yes, leftover curry works perfectly. Just ensure it’s thick enough to prevent leaks. - Can I bake instead of fry?
Absolutely. Bake at 375°F, brushing with oil or egg wash for a golden finish. - What’s the best oil for frying?
Neutral oils like vegetable, canola, or sunflower oil work best. - How do I make the filling less spicy?
Use mild curry roux or add a touch of cream or coconut milk to mellow the heat. - Can I use whole wheat flour for the dough?
Yes, but the texture will be denser. Consider mixing it with all-purpose flour for better results. - Can I use an air fryer?
Yes, preheat your air fryer to 375°F and cook for 12-15 minutes, flipping halfway through. - What other fillings can I use?
Try curry made with tofu, lentils, or even sweet fillings like custard for a unique twist. - How do I store leftover bread?
Store in an airtight container and reheat in an oven or air fryer to restore crispiness. - Is Curry Bread kid-friendly?
Yes! Kids love its crispy texture and mild curry flavor.
Conclusion
Curry Bread is a show-stopping combination of bold flavors and comforting textures that brings the warmth and richness of curry into an irresistible baked treat. The fluffy, golden bread encases a savory filling that’s bursting with aromatic spices, making every bite a delicious journey of taste and texture.
What sets this recipe apart is its versatility; whether you’re preparing it as a hearty snack, a crowd-pleasing appetizer, or a unique addition to your dinner table, Curry Bread never fails to impress. Serve it with a crisp side salad, a dollop of cooling yogurt, or enjoy it all on its own—it’s a recipe that adapts beautifully to any occasion.
Perfect for sharing or savoring solo, Curry Bread is a celebration of comfort food with a twist. I can’t wait for you to bake and enjoy this flavorful creation! Be sure to share your results and tag me on social media—I’d love to see your delicious take on it. Happy baking and bon appétit!