Introduction
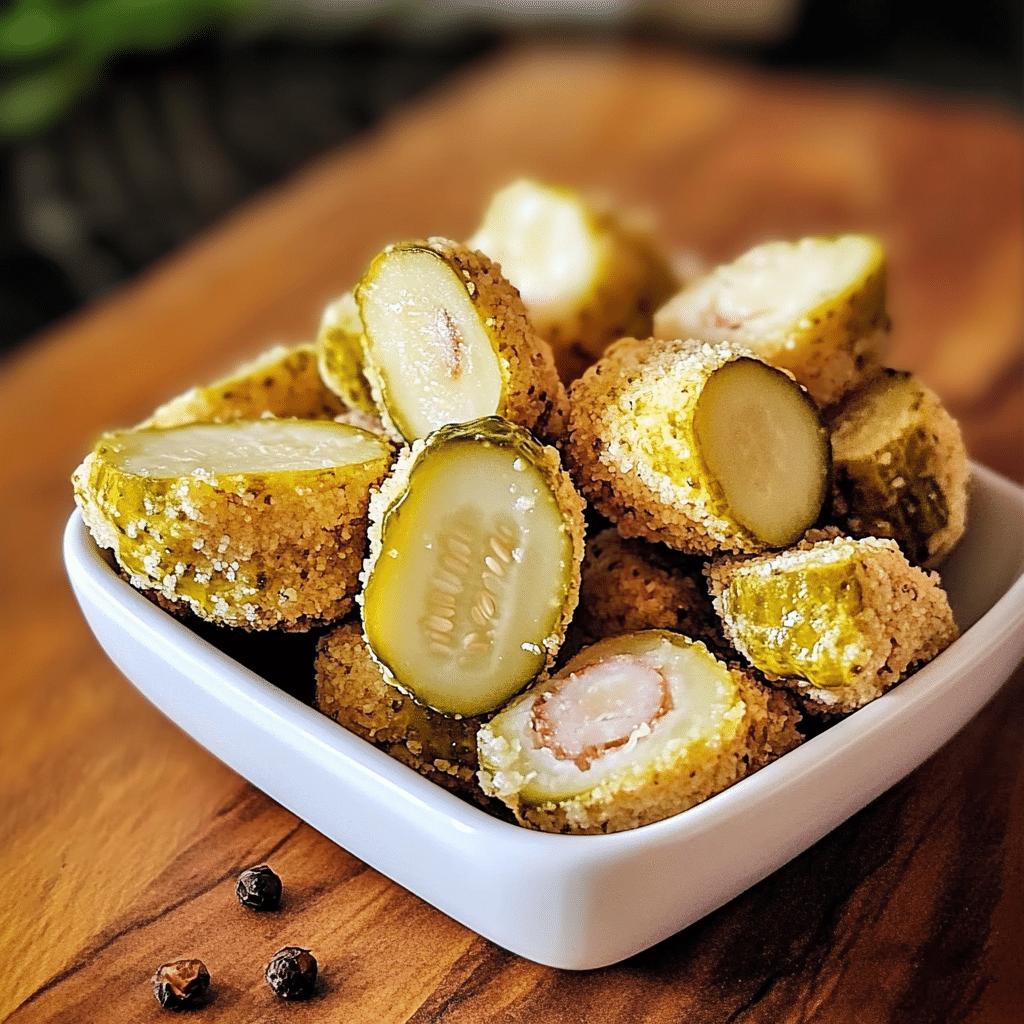
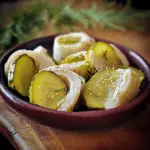
Dill Pickle Bites are the perfect snack for those who crave something tangy, savory, and totally addictive. These crispy bites feature the bold, zesty flavor of dill pickles wrapped in a crunchy, golden coating. Every bite is a delightful combination of sharp pickle tang and a satisfying crunch that’s sure to keep you coming back for more. The contrast of the cool, briny pickle and the warm, crispy breading is simply irresistible.
These Dill Pickle Bites remind me of summer days spent with friends at picnics or barbecues. I first made them for a party, and they were an instant hit. The blend of dill seasoning and the perfect crispy outer layer made everyone reach for more. There’s something so comforting about enjoying the tang of dill pickles in a new way—crispy, yet still retaining all of the pickle’s signature sharpness.
They’re great for snacking, but also work as an appetizer or party treat. Pair them with a creamy ranch or spicy dipping sauce for an extra kick. Dill Pickle Bites are the kind of snack that turns any moment into a celebration, offering a satisfying crunch and a burst of flavor in every bite. If you’re looking to add some bold flavor to your snack game, these bites are the way to go!
Perfect for:
- Game day snacks
- Appetizers at parties
- Movie night munchies
- Picnic treats
- Anyone who loves pickles
Why You’ll Love This Dill Pickle Bites
Here’s why will become your go-to snack:
- Crispy and Crunchy: A golden, crispy coating with a satisfying crunch.
- Tangy Flavor: The pickles provide a zesty, vinegary bite that’s irresistible.
- Easy to Make: With just a few ingredients, you can whip up this snack in no time.
- Kid-Friendly: A snack that both kids and adults will enjoy.
- Perfect for Any Occasion: Whether you’re hosting a party or just need a quick snack, these are always a crowd-pleaser.
Preparation and Cooking Time
- Total Time: 25 minutes
- Preparation Time: 10 minutes
- Cooking Time: 15 minutes
- Servings: 4 servings
- Calories per serving: Approximately 200-250 calories
- Key Nutrients: Protein: 3g, Carbs: 25g, Fat: 15g
Ingredients
Here’s what you need to make Dill Pickle Bites:
- 12-15 large dill pickle spears (sliced into 4-5 pieces each)
- 1 cup all-purpose flour
- 1 teaspoon garlic powder
- 1 teaspoon onion powder
- ½ teaspoon paprika
- 1 teaspoon dried dill weed
- Salt and pepper, to taste
- 2 large eggs
- 1 cup breadcrumbs (preferably panko for extra crunch)
- 1 tablespoon olive oil (for greasing)
- Ranch dressing or your favorite dipping sauce (optional)
Ingredient Highlights
- Dill Pickles: The tangy, vinegary flavor of dill pickles is the heart of this snack. Use your favorite variety for the best taste.
- Flour & Breadcrumbs: These provide the crispy, crunchy coating that makes the bites so irresistible.
- Spices: Garlic powder, onion powder, paprika, and dried dill enhance the flavor of the coating and complement the tanginess of the pickles.
- Eggs: The egg wash helps the breadcrumbs stick to the pickles, ensuring a crispy, golden exterior.
Step-by-Step Instructions
Here’s how to make:
Prepare the Pickles:
- Drain the Pickles: Drain the pickle spears and pat them dry with paper towels to remove excess moisture.
- Cut the Pickles: Slice each pickle spear into 4-5 bite-sized pieces.
Coat the Pickles:
- Prepare the Flour Mixture: In a shallow dish, combine the flour, garlic powder, onion powder, paprika, dill weed, salt, and pepper.
- Prepare the Egg Wash: In another shallow dish, beat the eggs.
- Prepare the Breadcrumbs: In a third shallow dish, add the breadcrumbs.
Dredge the Pickles:
- Coat the Pickles: Dip each pickle piece into the flour mixture, ensuring it’s fully coated. Then dip it into the egg wash, and finally coat it with breadcrumbs. Repeat for each pickle piece.
Cook the Pickles:
- Heat the Oil: Heat olive oil in a large skillet over medium-high heat.
- Fry the Pickles: Once the oil is hot, fry the coated pickle bites in batches for 2-3 minutes on each side, or until they’re golden brown and crispy.
- Drain: Remove the pickles from the skillet and place them on a plate lined with paper towels to drain excess oil.
Serve:
- Serve Immediately: Serve the crispy Dill Pickle Bites hot with ranch dressing or your favorite dipping sauce. Enjoy!
How to Serve Dill Pickle Bites
ersatile snack that can be served in different ways:
- With Dipping Sauce: Serve with ranch dressing, spicy mustard, or even a creamy dill dip for added flavor.
- On a Platter: Arrange the bites on a platter with some fresh vegetables or chips for a fun party spread.
- With a Side of Fries: For a more filling snack, serve alongside crispy fries or potato wedges.
- As an Appetizer: Perfect for serving at parties as a savory, bite-sized appetizer.
Additional Tips for Dill Pickle Bites
For the best Dill Pickle Bites, follow these tips:
- Don’t Overcrowd the Pan: Fry the pickle bites in batches to avoid overcrowding the pan, which can make them soggy.
- Use Panko Breadcrumbs: For extra crunch, use panko breadcrumbs, which give a lighter, crispier texture.
- Keep Them Warm: If making in advance, keep the fried pickle bites warm in a low oven (around 200°F) until serving.
- Add a Twist: For extra flavor, sprinkle some grated Parmesan cheese over the pickle bites before frying.
- Dry the Pickles Well: Ensure the pickles are thoroughly dried to help the coating adhere better and achieve a crispier finish.
Recipe Variations for Dill Pickle Bites
Try these variations to customize your Dill Pickle Bites:
- Spicy Dill Pickle Bites: Add a pinch of cayenne pepper or red pepper flakes to the breadcrumb mixture for a spicy kick.
- Cheesy Dill Pickle Bites: Mix shredded cheddar or mozzarella cheese into the breadcrumbs for a cheesy coating.
- Air-Fried Version: For a lighter, healthier option, air-fry the pickle bites at 400°F for about 8-10 minutes, flipping halfway through.
- Vegan Dill Pickle Bites: Use plant-based breadcrumbs and a flax egg (1 tablespoon flaxseed meal mixed with 3 tablespoons water) instead of eggs.
- Baked Dill Pickle Bites: For a baked version, place the coated pickle pieces on a baking sheet and bake at 425°F for 15-20 minutes, flipping halfway through.
- Zesty Dill Pickle Bites: Add a teaspoon of hot sauce or dill pickle juice to the flour mixture for extra tangy flavor.
Freezing and Storage for Dill Pickle Bites
- Freezing: Freeze un-cooked, coated pickle bites in a single layer on a baking sheet for 1-2 hours. Then transfer them to a freezer bag for up to 2 months. When ready to cook, fry directly from frozen, adding an extra minute or two to the cooking time.
- Storage: Store leftover Dill Pickle Bites in an airtight container in the fridge for up to 2-3 days. Reheat in the oven at 350°F for 5-10 minutes to regain their crispiness.
Special Equipment for Dill Pickle Bites
You’ll need these items for making Dill Pickle Bites:
- Shallow Dishes: For the flour, egg wash, and breadcrumbs.
- Large Skillet: To fry the pickle bites evenly.
- Paper Towels: For draining excess oil.
- Tongs: To flip and remove the pickle bites from the skillet.
- Baking Sheet: If you’re freezing or reheating the bites.
- Small Whisk or Fork: To beat the eggs for the egg wash.
- Large Plate or Platter: For serving the pickle bites.
FAQ Section for Dill Pickle Bites
- Can I make Dill Pickle Bites ahead of time?
Yes, you can prep the pickles by coating them and freezing them until you’re ready to fry. - Can I bake the pickle bites instead of frying them?
Yes, for a healthier option, bake the pickle bites at 425°F for 15-20 minutes, flipping halfway through. - What type of pickles should I use?
Use large dill pickle spears for the best flavor and texture. You can also use smaller pickle slices if you prefer. - How do I make these spicier?
Add cayenne pepper, hot sauce, or red pepper flakes to the breadcrumbs or flour mixture for a spicy kick. - Can I use gluten-free breadcrumbs?
Yes, you can substitute gluten-free breadcrumbs for a gluten-free version of this recipe. - How do I make these vegan?
Use a flax egg (1 tablespoon flaxseed meal mixed with 3 tablespoons water) and plant-based breadcrumbs to make these bites vegan. - Can I air fry the Dill Pickle Bites?
Yes, air frying is a great alternative. Cook at 400°F for about 8-10 minutes, flipping halfway through. - Can I use sweet pickles for this recipe?
Sweet pickles can be used, but the flavor will be much sweeter and less tangy than traditional dill pickles. - Can I serve these with a different dip?
Yes! Besides ranch, you can try spicy mustard, honey mustard, or a creamy dill dip for extra flavor. - Can I prepare the coating in advance?
Yes, you can prepare the flour mixture, egg wash, and breadcrumbs ahead of time and store them in the fridge until ready to use.
Dill Pickle Bites
- Total Time: 25 minutes
- Yield: 4 servings 1x
Description
Dill Pickle Bites are the perfect snack for those who crave something tangy, savory, and totally addictive. These crispy bites feature the bold, zesty flavor of dill pickles wrapped in a crunchy, golden coating. Every bite is a delightful combination of sharp pickle tang and a satisfying crunch that’s sure to keep you coming back for more. The contrast of the cool, briny pickle and the warm, crispy breading is simply irresistible.
Ingredients
- 12–15 large dill pickle spears (sliced into 4–5 pieces each)
- 1 cup all-purpose flour
- 1 teaspoon garlic powder
- 1 teaspoon onion powder
- ½ teaspoon paprika
- 1 teaspoon dried dill weed
- Salt and pepper, to taste
- 2 large eggs
- 1 cup breadcrumbs (preferably panko for extra crunch)
- 1 tablespoon olive oil (for greasing)
- Ranch dressing or your favorite dipping sauce (optional)
Instructions
Prepare the Pickles:
- Drain the Pickles: Drain the pickle spears and pat them dry with paper towels to remove excess moisture.
- Cut the Pickles: Slice each pickle spear into 4-5 bite-sized pieces.
Coat the Pickles:
- Prepare the Flour Mixture: In a shallow dish, combine the flour, garlic powder, onion powder, paprika, dill weed, salt, and pepper.
- Prepare the Egg Wash: In another shallow dish, beat the eggs.
- Prepare the Breadcrumbs: In a third shallow dish, add the breadcrumbs.
Dredge the Pickles:
- Coat the Pickles: Dip each pickle piece into the flour mixture, ensuring it’s fully coated. Then dip it into the egg wash, and finally coat it with breadcrumbs. Repeat for each pickle piece.
Cook the Pickles:
- Heat the Oil: Heat olive oil in a large skillet over medium-high heat.
- Fry the Pickles: Once the oil is hot, fry the coated pickle bites in batches for 2-3 minutes on each side, or until they’re golden brown and crispy.
- Drain: Remove the pickles from the skillet and place them on a plate lined with paper towels to drain excess oil.
Serve:
- Serve Immediately: Serve the crispy Dill Pickle Bites hot with ranch dressing or your favorite dipping sauce. Enjoy!
- Prep Time: 10 minutes
- Cook Time: 15 minutes
Nutrition
- Calories: 200-250 kcal
- Fat: 15g
- Carbohydrates: 25g
- Protein: 3g
Conclusion
Dill Pickle Bites are a delightful combination of tangy, crunchy, and savory flavors that will have you reaching for more with each bite. These bites perfectly capture the essence of the beloved dill pickle, pairing its sharpness with a crispy exterior and a tender, zesty interior. What makes them truly irresistible is their versatility—they work as an appetizer, snack, or side dish, complementing a variety of meals from burgers to sandwiches, or even enjoyed on their own for a quick and satisfying treat. Whether you’re a pickle enthusiast or just looking to try something new, Dill Pickle Bites will quickly become a go-to favorite. Give them a try, and prepare for a flavorful experience that will keep you coming back for more!