
Easter Bunny Coconut Tails are the perfect recipe for anyone looking to add a fun and festive touch to their holiday spread. This dessert not only delights the eyes but also tantalizes the taste buds. Imagine a fluffy coconut base shaped like a tail, covered in rich chocolate and sprinkled with colorful toppings. It’s not just a dessert; it’s an experience that brings joy and nostalgia to the Easter celebration.
When you think about Easter, you might envision joyful egg hunts, vibrant decorations, and themed treats. The Easter Bunny Coconut Tails serve as a delightful homage to that spirit. Kids and adults alike will find these treats irresistible. They are a wonderful way to bring family and friends together, evoking the charm of shared traditions and laughter.
In this article, we will explore this amazing recipe in detail. You will discover why this treat stands out, the required preparation and cooking times, and a detailed list of ingredients. Additionally, I’ll walk you through step-by-step instructions to make these delightful coconut tails. By the time you finish reading, you’ll be ready to make a treat that will have everyone hopping with excitement!
Why You’ll Love This Recipe
There are numerous reasons to love the Easter Bunny Coconut Tails, ranging from their delightful flavor to their eye-catching presentation. Here are a few highlights of what makes this treat so special:
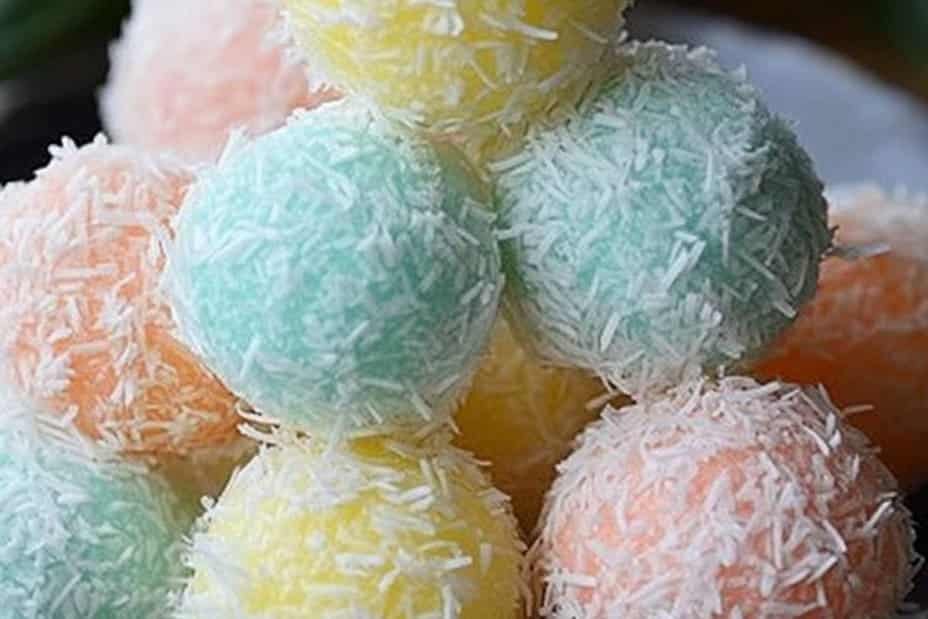
1. Visual Appeal: The whimsical design of the tails, complete with chocolate and coconut, makes them perfect for Easter festivities.
2. Coconut Flavor: If you love the tropical flavor of coconut, this treat delivers with a deliciously moist base.
3. Kid-Friendly Fun: Kids will enjoy not only eating them but also helping to create these delightful snacks during family gatherings.
4. Simple Ingredients: Many of the ingredients are common pantry staples, making this recipe accessible and easy to put together.
5. Versatile Decorations: You can customize the topping with various candies or sprinkles to suit your theme or personal preferences.
6. Perfect for Large Gatherings: With minimal effort, you can create a large batch, making them suitable for parties and gatherings.
These attributes contribute to making the Easter Bunny Coconut Tails a hit at any Easter celebration, ensuring that guests will come back for more!
Preparation and Cooking Time
Getting ready to make Easter Bunny Coconut Tails is easy and straightforward. Here’s a breakdown of the time you’ll need:
– Preparation Time: 30 minutes
– Cooking Time: 20 minutes
– Cooling Time: 30 minutes
– Total Time: Approximately 1 hour and 20 minutes
These times can vary based on your baking skills and kitchen equipment, but they offer a solid framework for planning your baking session.
Ingredients
– 2 cups sweetened shredded coconut
– 1 cup all-purpose flour
– 1/2 cup granulated sugar
– 1 teaspoon baking powder
– 1/4 teaspoon salt
– 1/2 cup unsalted butter, softened
– 2 large eggs
– 1 teaspoon vanilla extract
– 8 ounces semi-sweet chocolate, melted
– 1 cup colorful candy sprinkles (optional, for decoration)
– Edible eyes (optional, for decorating)
Step-by-Step Instructions
Follow these simple steps to create your Easter Bunny Coconut Tails:
1. Preheat Oven: Preheat your oven to 350°F (175°C) and prepare a baking sheet by lining it with parchment paper.
2. Mix Dry Ingredients: In a mixing bowl, combine the all-purpose flour, baking powder, and salt. Set aside.
3. Cream Butter and Sugar: In another large bowl, beat the softened butter and granulated sugar together until it’s light and fluffy.
4. Add Eggs and Vanilla: Mix in the eggs one at a time, followed by the vanilla extract, until fully incorporated.
5. Combine Mixtures: Gradually add the dry mixture to the wet ingredients, mixing until just combined.
6. Add Coconut: Gently fold in the shredded coconut, ensuring it’s evenly distributed.
7. Shape the Mixture: With your hands, take small portions of the batter and shape them into oval tails. Place them on the prepared baking sheet.
8. Bake: Bake in the preheated oven for 20 minutes or until the tops are golden brown.
9. Cool: Remove from the oven and allow the coconut tails to cool on the baking sheet for about 10 minutes. Then, transfer them to a wire rack to cool completely.
10. Dip in Chocolate: Once cooled, take each tail and dip one end into the melted chocolate.
11. Add Sprinkles: Immediately sprinkle colorful candy sprinkles on the chocolate to add a festive touch. You can also attach edible eyes for extra charm.
12. Let Set: Allow the chocolate to set completely at room temperature or place them in the refrigerator for faster setting.
How to Serve
Serving your Easter Bunny Coconut Tails can make them even more enjoyable. Here are some tips:
1. Presentation: Arrange them on a beautiful platter, perhaps with a colorful tablecloth or Easter decorations to enhance the display.
2. Accompaniments: Pair with fresh fruit, whipped cream, or a scoop of vanilla ice cream for a fun dessert combo.
3. Interactive Treat: Encourage kids to create their own designs using different toppings and sprinkles.
4. Portion Control: For gatherings, consider cutting the tails in half for smaller portions, allowing guests to enjoy a taste without feeling overwhelmed.
5. Beverage Pairing: Serve with lemonade, iced tea, or a light soda for a refreshing complement to your treats.
With these serving suggestions, your Easter Bunny Coconut Tails will surely be a highlight of the celebration, bringing smiles and satisfaction to everyone involved!
In conclusion, these delightful treats not only capture the spirit of Easter but also offer a fun way to engage with family and friends. So gather your ingredients, prep your kitchen, and hop into the joyous spirit of this festive season with your deliciously crafted Easter Bunny Coconut Tails!
Additional Tips
– Use Fresh Coconut: For a more authentic flavor, try using fresh coconut in place of the shredded variety. It enhances the overall taste remarkably.
– Experiment with Flavors: You can incorporate different flavors like almond or coconut extract to give the tails an extra twist.
– Keep it Fun: Let kids decorate their own Coconut Tails with a variety of toppings. It can be a delightful, hands-on experience.
– Try Different Chocolates: Feel free to use white chocolate, dark chocolate, or even flavored chocolate for dipping to create unique variations.
Recipe Variation
Get creative with your Easter Bunny Coconut Tails! Here are some fun variations:
1. Chocolate Coconut Tails: Mix cocoa powder into the batter to create a chocolate-flavored base.
2. Fruit-Flavored Tails: Add zest from oranges or lemons to the coconut mixture for a fruity kick.
3. Nutty Addition: Incorporate chopped nuts like almonds or pecans into the batter for added texture and flavor.
4. Seasonal Twist: During other holidays, you can change the decorations to match festive themes, using themed sprinkles or colored chocolates.
Freezing and Storage
– Storage: Keep your Easter Bunny Coconut Tails in an airtight container in the fridge for optimal freshness. They should remain delicious for up to 5 days.
– Freezing: If you want to prepare them ahead of time, freeze the tails. Wrap each in plastic wrap, then place them in a freezer-safe container. They can last up to 3 months. Just make sure to allow them to thaw at room temperature before serving.
Special Equipment
Ensure you have the essential tools ready for making these delightful treats:
– Baking sheets lined with parchment paper
– Mixing bowls of varying sizes
– Electric mixer or whisk for better batter consistency
– Wire rack for cooling
– Measuring cups and spoons for accuracy in ingredients
Frequently Asked Questions
Can I substitute the eggs in this recipe?
Yes! If you need a vegan option, you can replace each egg with 1/4 cup of applesauce or a flaxseed meal mixture (1 tablespoon of flaxseed meal mixed with 2.5 tablespoons of water).
How do I know when my Coconut Tails are done baking?
They should be golden brown on top and a toothpick inserted should come out clean.
Can I make these ahead of time?
Absolutely! You can make the tails a day in advance. Just remember to store them properly to keep them fresh.
Is there an alternative to shredded coconut?
If you’re not a fan of coconut, you can try using finely crushed graham crackers for a different texture or flavor profile.
What can I use instead of semi-sweet chocolate?
You can use dark chocolate for a slight bitterness or white chocolate for a sweeter alternative.
Conclusion
Easter Bunny Coconut Tails are a fun and festive treat that not only makes your holiday table come alive but also brings people together through creativity and flavor. By incorporating simple ingredients and following straightforward steps, you’ll be able to impress your family and friends with these enchanting desserts. So go ahead, gather your ingredients, and make this year’s Easter celebration one to remember with these delightful tails!

Easter Bunny Coconut Tails: An Amazing Ultimate Treat for 2023
- Total Time: 50 minutes
Ingredients
– 2 cups sweetened shredded coconut
– 1 cup all-purpose flour
– 1/2 cup granulated sugar
– 1 teaspoon baking powder
– 1/4 teaspoon salt
– 1/2 cup unsalted butter, softened
– 2 large eggs
– 1 teaspoon vanilla extract
– 8 ounces semi-sweet chocolate, melted
– 1 cup colorful candy sprinkles (optional, for decoration)
– Edible eyes (optional, for decorating)
Instructions
Follow these simple steps to create your Easter Bunny Coconut Tails:
1. Preheat Oven: Preheat your oven to 350°F (175°C) and prepare a baking sheet by lining it with parchment paper.
2. Mix Dry Ingredients: In a mixing bowl, combine the all-purpose flour, baking powder, and salt. Set aside.
3. Cream Butter and Sugar: In another large bowl, beat the softened butter and granulated sugar together until it’s light and fluffy.
4. Add Eggs and Vanilla: Mix in the eggs one at a time, followed by the vanilla extract, until fully incorporated.
5. Combine Mixtures: Gradually add the dry mixture to the wet ingredients, mixing until just combined.
6. Add Coconut: Gently fold in the shredded coconut, ensuring it’s evenly distributed.
7. Shape the Mixture: With your hands, take small portions of the batter and shape them into oval tails. Place them on the prepared baking sheet.
8. Bake: Bake in the preheated oven for 20 minutes or until the tops are golden brown.
9. Cool: Remove from the oven and allow the coconut tails to cool on the baking sheet for about 10 minutes. Then, transfer them to a wire rack to cool completely.
10. Dip in Chocolate: Once cooled, take each tail and dip one end into the melted chocolate.
11. Add Sprinkles: Immediately sprinkle colorful candy sprinkles on the chocolate to add a festive touch. You can also attach edible eyes for extra charm.
12. Let Set: Allow the chocolate to set completely at room temperature or place them in the refrigerator for faster setting.
- Prep Time: 30 minutes
- Cook Time: 20 minutes
Nutrition
- Serving Size: 12
- Calories: 220 kcal
- Fat: 10g
- Protein: 2g


