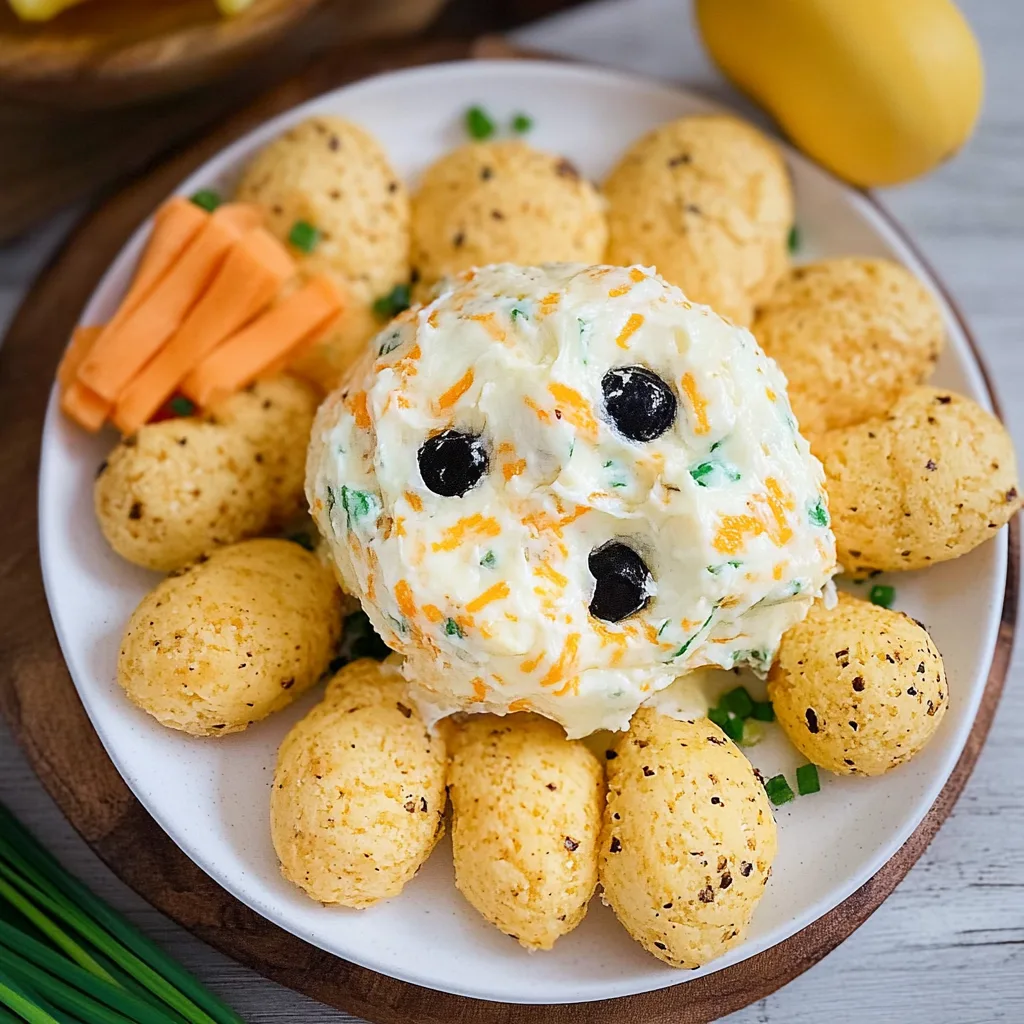
Easter Cheese Ball is a delightful appetizer that brings joy to any festive gathering. This cheese ball is not just an ordinary dish; it is a centerpiece that adds fun and flavor to your holiday table. With its creamy texture and rich flavors, this appetizer captures the essence of celebration during Easter. Whether you’re hosting a family gathering or a brunch with friends, an Easter Cheese Ball is guaranteed to impress.
The beauty of this recipe lies in its versatility. You can customize it to suit any taste preference, making it an ideal choice for a diverse crowd. From savory to sweet, this incredible dish can transform your Easter menu into something truly memorable. Imagine the smiles on your guests’ faces as they indulge in this delightful treat. The crunchy nuts, the smooth cream cheese, and the tantalizing seasonings create an unforgettable experience that everyone will enjoy.
In this article, you will discover everything you need to know about crafting the perfect Easter Cheese Ball, including why you’ll love this recipe, preparation and cooking times, a detailed ingredient list, step-by-step instructions, and serving tips. Get ready to delight your family and friends with this amazing recipe that becomes the star of the show!
Why You’ll Love This Recipe
Easter Cheese Ball has so much to offer beyond just a delicious flavor profile. Here are some compelling reasons why you’ll fall in love with this recipe:
1. Easy Preparation – This dish requires minimal cooking skills, making it accessible for everyone.
2. Customizable Ingredients – You can easily adjust the ingredients to fit dietary needs or flavor preferences.
3. Impressive Presentation – Shaped like an egg, this cheese ball will wow your guests visually.
4. Perfect for Sharing – This appetizer is great for gatherings, encouraging guests to mingle and converse.
5. Make-Ahead Convenience – Prepare it a day in advance and store it in the fridge, allowing flavors to meld beautifully.
6. Delicious Pairings – Serve with crackers, fruits, or veggies for a delightful combination of flavors and textures.
With these fantastic features, it’s easy to see why the Easter Cheese Ball is a favorite during holiday festivities. It brings everyone together, blending flavors, laughter, and fun, making it a must-have on your Easter menu.
Preparation and Cooking Time
Creating the perfect Easter Cheese Ball is quick and easy. Here’s a breakdown of the preparation time involved:
– Preparation Time: 15 minutes
– Chilling Time: 2 hours (to allow the flavors to develop)
– Total Time: Approximately 2 hours and 15 minutes
These times can vary slightly depending on your experience in the kitchen, but this framework provides a good estimate for planning.
Ingredients
– 16 oz cream cheese, softened
– 1 cup shredded sharp cheddar cheese
– 1 cup cooked bacon, chopped (optional)
– 1/2 cup finely chopped green onions
– 1/2 cup finely diced red bell pepper
– 1 tsp garlic powder
– 1 tsp onion powder
– 1 tsp Worcestershire sauce
– 1/2 cup chopped nuts (walnuts, pecans, or almonds)
– 1/4 cup dried cranberries or raisins (optional for sweetness)
– Additional herbs for garnish (e.g., parsley or chives)
Step-by-Step Instructions
Follow these simple steps to create your incredible Easter Cheese Ball:
1. Prepare Ingredients: Gather all your ingredients and ensure the cream cheese is softened for easy mixing.
2. Mix Base: In a large mixing bowl, combine the softened cream cheese, shredded cheddar cheese, cooked bacon (if using), green onions, red bell pepper, garlic powder, onion powder, and Worcestershire sauce.
3. Blend Well: Use a spatula or a hand mixer to thoroughly combine all the ingredients until well mixed and creamy.
4. Shape the Cheese Ball: Form the cheese mixture into a ball shape. If preferred, you can shape it into an egg-like shape to fit the Easter theme.
5. Coat with Nuts: Spread the chopped nuts on a large plate. Roll the cheese ball in the nuts until fully coated.
6. Chill: Place the cheese ball on a serving platter and cover it with plastic wrap. Refrigerate for at least 2 hours to allow the flavors to meld.
7. Garnish: Once chilled, you can garnish the cheese ball with additional herbs, if desired.
These easy steps guide you toward crafting a delightful Easter Cheese Ball that will surely be a hit among your guests.
How to Serve
Serving your Easter Cheese Ball can be a delightful experience. Here’s how to enhance the presentation and overall enjoyment:
1. Choose the Right Platter: A colorful or decorative platter can make the cheese ball visually appealing.
2. Accompaniments: Serve with an assortment of crackers, sliced baguette, or a variety of fresh vegetables. This creates a wonderful balance of flavors and textures.
3. Add Fresh Fruits: Incorporate fresh fruits like grapes, apple slices, or berries for a sweet contrast against the savory cheese ball.
4. Provide Spreads: Consider offering honey or a sweet chutney on the side for guests who enjoy a sweeter pairing with their cheese.
5. Label for Variety: If you create multiple variations of this cheese ball, label each one to inform guests of the different flavors.
6. Fun Garnishes: Use edible flowers or colorful herbs for an extra festive touch that aligns with the Easter theme.
By taking these serving tips into account, you’ll create a memorable experience that elevates your Easter Cheese Ball from mere appetizer to an unforgettable centerpiece at your holiday celebration. Enjoy the flavors, company, and festivity this wonderful dish brings to your table!
As you create and serve your Easter Cheese Ball, remember that the best moments often happen around shared food. This dish is sure to become a cherished tradition at your Easter gatherings for years to come!
Additional Tips
– Use Fresh Ingredients: Fresh cream cheese and quality cheeses will significantly enhance the flavor of your Easter Cheese Ball. Always check the date on dairy products.
– Soften Cream Cheese: For a smooth and creamy texture, allow the cream cheese to sit at room temperature for at least 30 minutes before mixing.
– Experiment with Spices: Add your favorite spices, such as smoked paprika or cayenne pepper, to give the cheese ball an extra kick.
– Chill Longer for Better Flavor: If you have time, chilling the cheese ball overnight allows the flavors to develop even more, making it even tastier.
– Make a Smaller Version: If you’re hosting a small gathering, consider making a smaller cheese ball. You can easily halve the recipe.
Recipe Variation
Spice up your Easter Cheese Ball with these creative variations:
1. Herbed Cheese Ball: Add fresh herbs like dill, parsley, or basil to the cheese mixture for a fresh, garden flavor.
2. Sweet & Savory: Incorporate some finely chopped figs or apricots into the mixture for a touch of sweetness that complements the savory flavors.
3. Spicy Cheese Ball: Mix in finely chopped jalapeños or add a few dashes of your favorite hot sauce for a spicy twist.
4. Smoked Salmon Variation: For a sophisticated touch, include chopped smoked salmon and cream cheese. Garnish with capers for additional flavor.
5. Mediterranean Style: Replace some of the ingredients with feta cheese, sun-dried tomatoes, and olives for a Mediterranean-inspired cheese ball.
Freezing and Storage
– Storage: Keep any leftovers in an airtight container in the refrigerator. It should stay fresh for about 5-7 days.
– Freezing: You can freeze an uncoated cheese ball for up to 3 months. Wrap it tightly with plastic wrap and aluminum foil to prevent freezer burn. Thaw it overnight in the refrigerator before serving.
Special Equipment
While you don’t need much to create your Easter Cheese Ball, having these items on hand can make the process smoother:
– Mixing bowl
– Spatula or electric mixer for blending the ingredients
– Plastic wrap for chilling
– A platter for serving
– Measuring cups and spoons
Frequently Asked Questions
Can I use low-fat cream cheese?
Yes, low-fat cream cheese can be used, but it may result in a slightly different texture.
How do I know if the cheese ball is ready?
It should be firm to the touch and slightly chilled all the way through.
Can I make this cheese ball gluten-free?
Certainly! Just ensure that any additional ingredients, like crackers or dressing, are gluten-free.
How far in advance can I make the cheese ball?
You can prepare it up to two days ahead of time. Just ensure it’s properly stored in the fridge.
What can I serve with an Easter Cheese Ball?
Crackers, pretzels, fresh veggies, or even slices of baguette pair beautifully with the cheese ball.
Conclusion
The Easter Cheese Ball is a delightful addition to your holiday celebrations. With its versatility and easy preparation, it can quickly become a favorite among guests. Not only does it offer a creamy, savory flavor, but it also invites creativity through various ingredient combinations. Whether you’re hosting an intimate dinner or a large family gathering, this cheese ball is sure to please everyone at the table. So gather your ingredients, invite your loved ones, and make your Easter festivities a memorable occasion with this irresistible dish!

Easter Cheese Ball: An Incredible Ultimate Recipe with 5 Variations
- Total Time: 15 minutes
Ingredients
– 16 oz cream cheese, softened
– 1 cup shredded sharp cheddar cheese
– 1 cup cooked bacon, chopped (optional)
– 1/2 cup finely chopped green onions
– 1/2 cup finely diced red bell pepper
– 1 tsp garlic powder
– 1 tsp onion powder
– 1 tsp Worcestershire sauce
– 1/2 cup chopped nuts (walnuts, pecans, or almonds)
– 1/4 cup dried cranberries or raisins (optional for sweetness)
– Additional herbs for garnish (e.g., parsley or chives)
Instructions
Follow these simple steps to create your incredible Easter Cheese Ball:
1. Prepare Ingredients: Gather all your ingredients and ensure the cream cheese is softened for easy mixing.
2. Mix Base: In a large mixing bowl, combine the softened cream cheese, shredded cheddar cheese, cooked bacon (if using), green onions, red bell pepper, garlic powder, onion powder, and Worcestershire sauce.
3. Blend Well: Use a spatula or a hand mixer to thoroughly combine all the ingredients until well mixed and creamy.
4. Shape the Cheese Ball: Form the cheese mixture into a ball shape. If preferred, you can shape it into an egg-like shape to fit the Easter theme.
5. Coat with Nuts: Spread the chopped nuts on a large plate. Roll the cheese ball in the nuts until fully coated.
6. Chill: Place the cheese ball on a serving platter and cover it with plastic wrap. Refrigerate for at least 2 hours to allow the flavors to meld.
7. Garnish: Once chilled, you can garnish the cheese ball with additional herbs, if desired.
These easy steps guide you toward crafting a delightful Easter Cheese Ball that will surely be a hit among your guests.
- Prep Time: 15 minutes
- Cook Time: 0 minutes
Nutrition
- Serving Size: 12
- Calories: 250 kcal
- Fat: 20g
- Protein: 10g