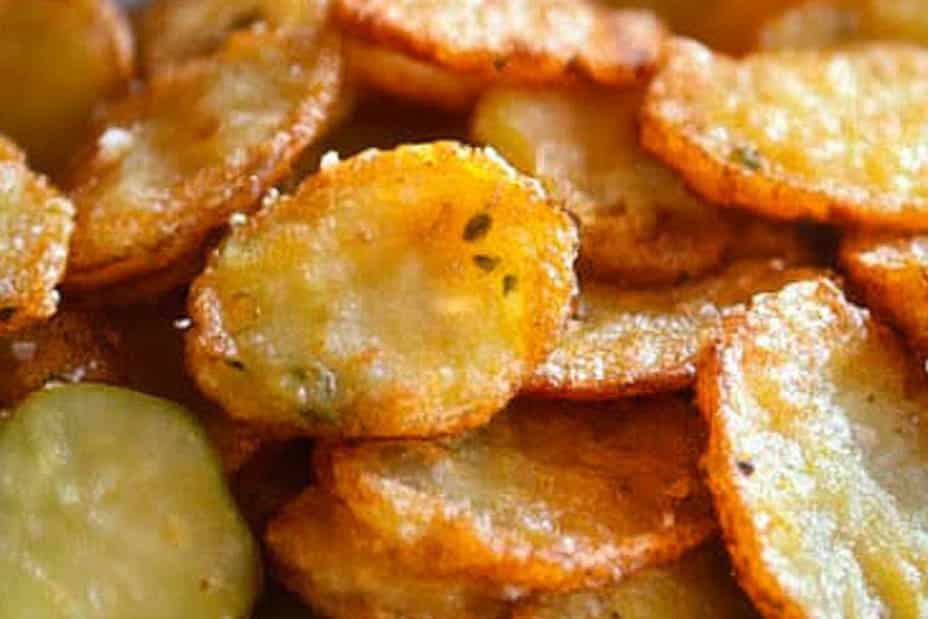
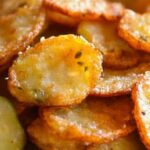
Fried pickles: crispy, tangy, and totally irresistible. If you’ve never experienced the delight of this Southern appetizer, you’re in for a real treat. These golden-brown, crunchy bites are the perfect combination of tangy flavors from the pickles and the satisfying crunch of a perfectly fried batter. Whether served at a backyard barbecue, casual gatherings, or as a delicious snack at home, fried pickles bring joy to any occasion.
Imagine biting into a crispy fried pickle—its crunchiness giving way to the juicy, tart pickle inside. There’s something simply amazing about that contrast. This recipe will take you through the simple process of creating fried pickles that are sure to impress your family and friends. With each bite, you’ll savor the rich flavors that perfectly balance salty, sour, and savory notes.
In this article, we’ll explore why you’ll love this amazing fried pickle recipe, how to prepare and cook them to perfection, and best of all, how to serve them. So roll up your sleeves and get ready to create an irresistible snack that will have everyone coming back for more!
Why You’ll Love This Recipe
Fried pickles offer a delightful twist to the traditional pickle snack. They are packed with flavor and create an unforgettable dining experience. Here are several reasons why you’ll love this recipe:
1. Easy to Make: This recipe is straightforward and doesn’t require advanced cooking skills. You can enjoy delicious fried pickles without feeling overwhelmed.
2. Quick Preparation: With minimal prep and cooking time, this snack can be ready in under 30 minutes.
3. Party Favorite: These crispy bites are always a hit at gatherings, making them perfect for parties and game day snacks.
4. Dip-Friendly: Fried pickles are fantastic with various dips, including ranch, blue cheese, or spicy aioli.
5. Customizable: Feel free to experiment with different spices in the batter or use different types of pickles for unique flavors.
6. Irresistibly Crunchy: The crispy coating provides a satisfying crunch with every bite that keeps you coming back for more.
You’ll surely win over everyone with this ultimate fried pickle recipe, making every gathering a delightful occasion.
Preparation and Cooking Time
Making fried pickles is quick and easy. Here is a breakdown of the expected time for creating this tasty treat:
– Preparation Time: 15 minutes
– Cooking Time: 10-15 minutes
– Total Time: Approximately 25-30 minutes
This unbeatable time frame allows you to whip up an amazing snack for any occasion!
Ingredients
– 1 jar dill pickles (sliced or whole, depending on preference)
– 1 cup all-purpose flour
– 1 teaspoon garlic powder
– 1 teaspoon onion powder
– 1 teaspoon cayenne pepper (optional)
– 1 teaspoon paprika
– 1 teaspoon salt
– ½ teaspoon black pepper
– 1 cup buttermilk
– 1 cup cornmeal
– Oil for frying (vegetable or canola oil)
– Optional: Dipping sauce (ranch dressing, spicy mayo, etc.)
Step-by-Step Instructions
Follow these simple steps to create your own crispy fried pickles:
1. Preparation: Begin by draining the pickles and patting them dry with paper towels. This helps excess moisture, preventing sogginess.
2. Mix the Dry Ingredients: In a large bowl, combine the flour, garlic powder, onion powder, cayenne pepper, paprika, salt, and black pepper.
3. Prepare the Buttermilk Mixture: In another bowl, pour the buttermilk for dipping the pickles.
4. Add Cornmeal: Pour the cornmeal into a shallow dish for coating the pickles.
5. Coat the Pickles:
– First, dip each pickle slice into the buttermilk, ensuring it’s fully coated.
– Next, transfer the pickle to the flour mixture, coating it well.
– Finally, dip the coated pickle back into the buttermilk followed by the cornmeal, ensuring it’s completely covered.
6. Heat the Oil: In a deep skillet or frying pan, heat about 1-2 inches of oil over medium-high heat. It’s ready when a small drop of batter sizzles in the oil.
7. Fry the Pickles: Working in batches, carefully place coated pickles into the hot oil. Fry them for about 2-3 minutes or until they are golden brown.
8. Remove and Drain: Use a slotted spoon to remove the fried pickles, placing them on a plate lined with paper towels to drain excess oil.
9. Repeat: Continue frying the remaining pickles, maintaining the oil temperature for even frying.
10. Serve Warm: Garnish with fresh herbs or serve with your favorite dipping sauce.
With these simple steps, you’ll have a deliciously crispy batch of fried pickles ready to serve!
How to Serve
To enhance the experience of your fried pickles, consider the following serving suggestions:
1. Presentation: Arrange the fried pickles on a large platter for an inviting display. Adding some fresh herbs can elevate the presentation further.
2. Accompaniments: Serve with a variety of dips, such as ranch dressing, spicy mayo, or honey mustard to cater to diverse tastes.
3. Pairing: They pair exceptionally well with cold drinks like sweet tea, beer, or soft drinks, making them an enjoyable snack or appetizer.
4. Garnish: Consider garnishing with chopped fresh dill or parsley for an added touch of flavor and color.
By thoughtfully considering how you serve your fried pickles, you can create an unforgettable experience that keeps everyone coming back for more.
In conclusion, fried pickles are an amazing culinary treat that combines crispy textures and tangy flavors. With this ultimate recipe, you can easily recreate this beloved Southern snack in your own kitchen. Enjoy the mouthwatering experience of fried pickles, and let the crunchiness and tanginess bring smiles to everyone around you!
Additional Tips
– Use Fresh Pickles: For the best flavor, opt for fresh dill pickles rather than store-bought varieties. This enhances the taste and provides a much better crunch.
– Adjust Spices to Taste: You can modify the spices in the batter based on your preference. Consider adding more cayenne for a spicy kick, or switch up the paprika for a smokier flavor.
– Fry at the Right Temperature: Maintaining the oil temperature is crucial for achieving a crispy texture. If the oil is too hot, the pickles will burn; if it’s too cool, they will become oily.
– Double-Dip for Extra Crunch: For an extra crunchy coating, consider double-dipping the pickles in the buttermilk and then in the flour and cornmeal mixtures.
– Experiment with Cheese: Adding grated Parmesan or cheddar to the dry mixture can provide an extra burst of flavor.
Recipe Variation
Feel free to explore these variations for unique twists on the classic fried pickles:
1. Spicy Fried Pickles: Add more cayenne pepper to the batter or toss fried pickles in a spicy seasoning blend immediately after frying.
2. Cheesy Fried Pickles: Mix shredded cheese into the cornmeal for a cheesy crust that melts in your mouth.
3. Sweet Pickles: Try using bread and butter pickles instead of dill for a sweeter take on this dish.
4. Vegetable Tempura Style: Create a vegetable version by dipping slices of zucchini or green beans in the same batter.
5. Air-Fried Option: For a healthier version, try air-frying the coated pickles for fewer calories while still enjoying the crunch.
Freezing and Storage
– Storage: Fried pickles are best enjoyed immediately. However, if you have leftovers, store them in an airtight container in the refrigerator for up to three days.
– Freezing: You can freeze the fried pickles for up to three months. Spread them out on a baking sheet first to freeze individually, then transfer to a freezer bag. Reheat in an oven or air fryer for best results.
Special Equipment
You may need the following tools to create the fried pickles perfectly:
– Deep Fryer or Heavy Skillet: Essential for frying the pickles at the right temperature.
– Slotted Spoon: Useful for removing fried pickles from the oil.
– Mixing Bowls: For combining the wet and dry ingredients.
– Rolling Pin: In case you want to crush spices or certain coatings.
– Paper Towels: For draining excess oil after frying.
Frequently Asked Questions
Can I use sweet pickles for this recipe?
Yes, sweet pickles can be used for a different flavor profile that contrasts nicely with the salty batter.
How do I ensure my fried pickles stay crispy?
Make sure to drain the pickles thoroughly and use hot oil for frying. Serve immediately after frying to maintain their crispiness.
Can I make fried pickles ahead of time?
It’s best to serve them right after frying, but if you must prep in advance, reheat them in an oven to revive their crunchiness.
Is there a gluten-free option?
Absolutely! Substitute the all-purpose flour with a gluten-free flour blend to make this recipe suitable for those with gluten intolerance.
What dips pair well with fried pickles?
Ranch dressing, blue cheese, spicy mayo, or even a homemade This would elevate the taste experience.
Conclusion
Fried pickles are a delightful and irresistible snack that brings a vibrant crunch and tangy taste to any gathering. With this ultimate recipe, you can create a mouthwatering dish that’s sure to become a favorite among friends and family. So gather your ingredients, roll up your sleeves, and dive into the satisfaction of making crispy fried pickles at home. They are perfect for parties, game days, or just enjoying a quiet evening with a delicious treat!
Fried Pickles: An Amazing Ultimate Recipe for Irresistible Crunch
- Total Time: 0 hours
Ingredients
– 1 jar dill pickles (sliced or whole, depending on preference)
– 1 cup all-purpose flour
– 1 teaspoon garlic powder
– 1 teaspoon onion powder
– 1 teaspoon cayenne pepper (optional)
– 1 teaspoon paprika
– 1 teaspoon salt
– ½ teaspoon black pepper
– 1 cup buttermilk
– 1 cup cornmeal
– Oil for frying (vegetable or canola oil)
– Optional: Dipping sauce (ranch dressing, spicy mayo, etc.)
Instructions
Follow these simple steps to create your own crispy fried pickles:
1. Preparation: Begin by draining the pickles and patting them dry with paper towels. This helps excess moisture, preventing sogginess.
2. Mix the Dry Ingredients: In a large bowl, combine the flour, garlic powder, onion powder, cayenne pepper, paprika, salt, and black pepper.
3. Prepare the Buttermilk Mixture: In another bowl, pour the buttermilk for dipping the pickles.
4. Add Cornmeal: Pour the cornmeal into a shallow dish for coating the pickles.
5. Coat the Pickles:
– First, dip each pickle slice into the buttermilk, ensuring it’s fully coated.
– Next, transfer the pickle to the flour mixture, coating it well.
– Finally, dip the coated pickle back into the buttermilk followed by the cornmeal, ensuring it’s completely covered.
6. Heat the Oil: In a deep skillet or frying pan, heat about 1-2 inches of oil over medium-high heat. It’s ready when a small drop of batter sizzles in the oil.
7. Fry the Pickles: Working in batches, carefully place coated pickles into the hot oil. Fry them for about 2-3 minutes or until they are golden brown.
8. Remove and Drain: Use a slotted spoon to remove the fried pickles, placing them on a plate lined with paper towels to drain excess oil.
9. Repeat: Continue frying the remaining pickles, maintaining the oil temperature for even frying.
10. Serve Warm: Garnish with fresh herbs or serve with your favorite dipping sauce.
With these simple steps, you’ll have a deliciously crispy batch of fried pickles ready to serve!
- Prep Time: 15 minutes
- Cook Time: 10-15 minutes
Nutrition
- Serving Size: 4-6 servings
- Calories: 200 kcal (approx. per serving)
- Fat: 8g (approx.)
- Protein: 4g (approx.)