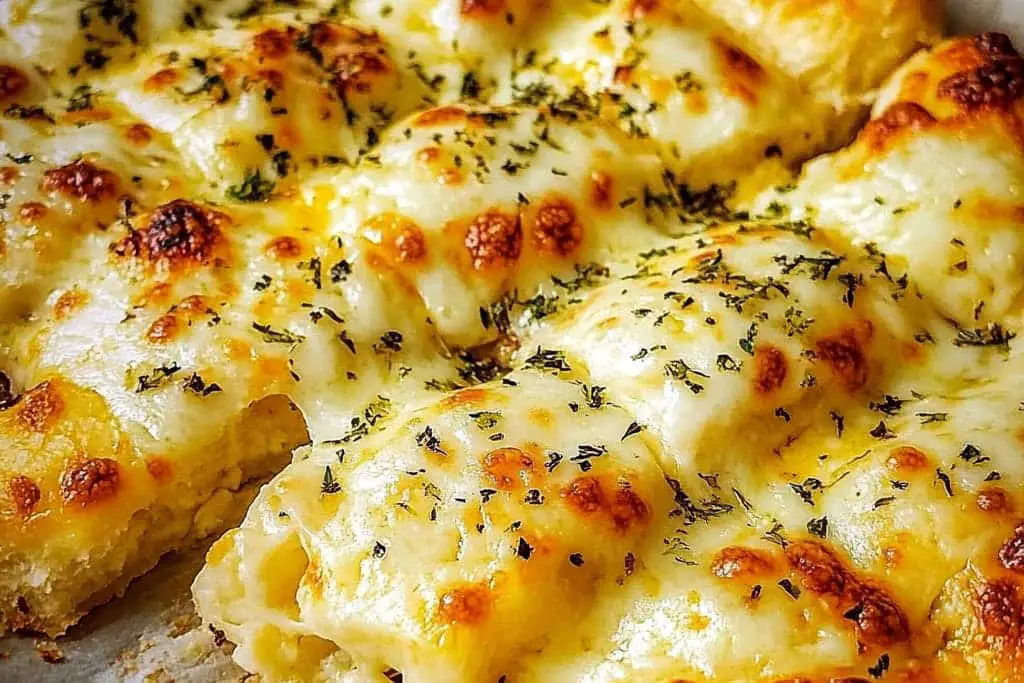
Homemade Cheesy Garlic Breadsticks are an amazing and ultimate sidekick for dinner. These delicious breadsticks are more than just a side; they can elevate your meals and leave your guests yearning for more. With a blissful combination of garlic, cheese, and the perfect bread texture, these sticks provide the ideal accompaniment to various dishes, from pasta and salads to soups and stews. Whether you’re hosting a dinner party or just enjoying a family meal, these breadsticks are guaranteed to impress everyone at the table.
Imagine biting into a warm, gooey, cheesy garlic breadstick, fresh out of the oven. The aroma fills your kitchen and hints a promise of delightful flavors. The texture is perfectly chewy on the inside, while the outside boasts a magnificent golden brown crust. Each bite delivers an explosion of cheesy goodness, making these breadsticks not only a side but a true star of any meal.
In this article, we’ll explore the incredible simplicity of making homemade cheesy garlic breadsticks, why this recipe will become your go-to, and step-by-step instructions that ensure perfect results every time. So, roll up your sleeves and prepare to delightful your taste buds with this culinary masterpiece.
Why You’ll Love This Recipe
Homemade Cheesy Garlic Breadsticks are more than just a great addition to your dinner spread; they bring plenty of excitement to your dining experience! Here’s why you’ll love this recipe:
1. Simple Ingredients: Most ingredients are pantry staples, making it easy to whip up whenever you wish.
2. Quick Prep Time: You can prepare these breadsticks in no time, which is perfect for busy evenings.
3. Irresistible Flavor: The combination of garlic and gooey cheese creates an addictive flavor profile that everyone will love.
4. Customizable Options: Feel free to experiment with different cheeses, herbs, or even toppings to suit your taste.
5. Perfect for Sharing: These cheesy delights are perfect for gatherings—everyone loves a good breadstick!
6. Easy to Follow: The straightforward instructions make this recipe accessible for cooks of all skill levels.
With so many reasons to adore this recipe, you can understand why these homemade cheesy garlic breadsticks are destined to become a regular feature on your dinner table.
Preparation and Cooking Time
Creating your own Homemade Cheesy Garlic Breadsticks does not require extensive time in the kitchen. The preparation and cooking time break down as follows:
– Preparation Time: 15 minutes
– Cooking Time: 15-20 minutes
– Total Time: Approximately 30-35 minutes
This quick turnaround means you can enjoy fresh, warm cheesy garlic breadsticks almost instantly!
Ingredients
– 2 cups all-purpose flour
– 1 tablespoon sugar
– 1 teaspoon salt
– 1 tablespoon instant yeast
– ¾ cup warm water (110°F/45°C)
– 2 tablespoons olive oil
– 2 garlic cloves, minced
– 1 cup mozzarella cheese, shredded
– ¼ cup grated Parmesan cheese
– 1 teaspoon Italian seasoning (optional)
– Fresh parsley, chopped (for garnish)
Step-by-Step Instructions
Making Homemade Cheesy Garlic Breadsticks is an easy and enjoyable process. Follow these steps for satisfying results:
1. Prepare the Dough: In a large mixing bowl, combine the warm water and sugar. Sprinkle the yeast on top and let it sit for about 5-10 minutes until it’s frothy.
2. Add Ingredients: Add the olive oil, flour, and salt to the yeast mixture. Use a wooden spoon or your hands to mix until a sticky dough forms.
3. Knead the Dough: Turn the dough out onto a floured surface. Knead the dough for about 5-7 minutes until it’s smooth and elastic.
4. First Rise: Place the dough in a greased bowl, cover it with a kitchen towel, and let it rise in a warm spot for approximately 30 minutes, or until doubled in size.
5. Preheat the Oven: Preheat your oven to 400°F (200°C) and line a baking sheet with parchment paper.
6. Shape the Breadsticks: Once the dough has risen, punch it down and roll it out into a rectangle about ½ inch thick. Cut the dough into strips using a pizza cutter or a knife.
7. Add Garlic and Cheese: In a small bowl, combine the minced garlic, mozzarella, and Parmesan. Sprinkle this mixture over the strips of dough.
8. Final Rise: Cover the shaped breadsticks with a towel and let them rise for an additional 10-15 minutes.
9. Bake: Bake the breadsticks in the preheated oven for 15-20 minutes or until they are golden brown and the cheese has melted.
10. Garnish and Serve: Remove from the oven and sprinkle with fresh parsley and Italian seasoning, if desired. Serve hot!
How to Serve
Serving Homemade Cheesy Garlic Breadsticks can enhance the overall dining experience. Here are some ideas to make the most of your dish:
1. Pairing Suggestions: These breadsticks go wonderfully with marinara sauce, alfredo sauce, or a creamy dip for added flavor.
2. Presentation: Arrange the breadsticks on a serving platter, garnished with freshly chopped herbs for an eye-catching display.
3. Accompanying Dishes: Serve alongside your favorite pasta, a fresh salad, or hearty soup to complement the meal.
4. Leftover Storage: If you have leftovers, store them in an airtight container in the refrigerator. Reheat in the oven for a crispy finish.
With these thoughtful suggestions, your Homemade Cheesy Garlic Breadsticks will be the highlight of your dinner, enticing guests and leaving them looking forward to the next meal. Enjoy this ultimate sidekick and treat your taste buds to an unforgettable experience!
Additional Tips
– Use Fresh Garlic: For an intense flavor, use fresh garlic cloves instead of garlic powder. The taste will be much more vibrant and aromatic.
– Add a Touch of Heat: If you enjoy spice, consider adding some crushed red pepper flakes or a dash of cayenne pepper to the garlic mixture for a kick.
– Experiment with Cheeses: While mozzarella is a classic choice, blending in some gouda, cheddar, or even pepper jack can take your breadsticks to the next level.
– Brush with Garlic Butter: For an extra layer of flavor, brush the baked breadsticks with a mixture of melted butter and minced garlic before serving.
– Try Different Herbs: Fresh basil, chives, or rosemary can replace or complement Italian seasoning, giving a unique twist to each batch.
Recipe Variation
Feel free to experiment with the basic recipe. Here are some ideas to try:
1. Cheesy Herb Breadsticks: Mix fresh herbs, like dill or basil, into the dough for a fragrant addition.
2. Stuffed Breadsticks: Cheese lovers can stuff the breadsticks with diced pepperoni or cooked spinach before baking.
3. Sweet Version: For a twist, drizzle melted chocolate or a sweet glaze over the breadsticks after baking—perfect for dessert!
4. Gluten-Free Option: Substitute the all-purpose flour with a gluten-free flour blend to accommodate dietary restrictions.
Freezing and Storage
– Storage: Keep the breadsticks in an airtight container at room temperature for 2-3 days. This will help retain their soft texture.
– Freezing: You can freeze the uncooked dough or baked breadsticks. Wrap them tightly in plastic wrap or aluminum foil, and place them in a freezer-safe container. They can last up to 3 months.
– Reheating: Bake from frozen at 400°F (200°C) for about 15-20 minutes or until heated through to enjoy a freshly baked taste.
Special Equipment
While you don’t need fancy equipment, a few helpful tools will ensure your breadsticks turn out perfect:
– Mixing Bowls: You’ll need a couple of different sizes for mixing your dough and ingredients.
– Wooden Spoon or Dough Scraper: This will make mixing and kneading easier and more efficient.
– Baking Sheet: A flat baking sheet lined with parchment paper is ideal for even baking.
– Pizza Cutter: This handy tool is great for cutting the dough into uniform strips.
Frequently Asked Questions
Can I use active dry yeast instead of instant yeast?
Yes, if using active dry yeast, activate it in warm water with sugar before adding it to the mixture.
How can I make these breadsticks ahead of time?
Prepare the dough and let it rise. After shaping, you can refrigerate the dough (covered) overnight. Allow it to come to room temperature and rise before baking.
What if I don’t have mozzarella cheese?
You can substitute mozzarella with provolone, gouda, or even cheddar. Each will provide a unique flavor experience.
How do I know when my breadsticks are done?
The breadsticks are ready when they turn golden brown and the cheese is bubbling.
Can I make these breadsticks vegan?
Yes, you can substitute the butter with olive oil and replace the cheese with plant-based alternatives to suit a vegan diet.
Conclusion
Homemade Cheesy Garlic Breadsticks are not just a side dish; they are an experience that can transform your dinner table. Their delightful flavors and aromas make them a standout companion for any meal. With the ability to customize and experiment with ingredients, these breadsticks ensure there’s something for everyone. Whether you serve them alongside pasta, soups, or simply enjoy them on their own, they are bound to steal the spotlight. Indulge in the process, and savor each delicious bite.
Homemade Cheesy Garlic Breadsticks: The Ultimate Amazing Sidekick for Dinner
- Total Time: 0 hours
Ingredients
– 2 cups all-purpose flour
– 1 tablespoon sugar
– 1 teaspoon salt
– 1 tablespoon instant yeast
– ¾ cup warm water (110°F/45°C)
– 2 tablespoons olive oil
– 2 garlic cloves, minced
– 1 cup mozzarella cheese, shredded
– ¼ cup grated Parmesan cheese
– 1 teaspoon Italian seasoning (optional)
– Fresh parsley, chopped (for garnish)
Instructions
Making Homemade Cheesy Garlic Breadsticks is an easy and enjoyable process. Follow these steps for satisfying results:
1. Prepare the Dough: In a large mixing bowl, combine the warm water and sugar. Sprinkle the yeast on top and let it sit for about 5-10 minutes until it’s frothy.
2. Add Ingredients: Add the olive oil, flour, and salt to the yeast mixture. Use a wooden spoon or your hands to mix until a sticky dough forms.
3. Knead the Dough: Turn the dough out onto a floured surface. Knead the dough for about 5-7 minutes until it’s smooth and elastic.
4. First Rise: Place the dough in a greased bowl, cover it with a kitchen towel, and let it rise in a warm spot for approximately 30 minutes, or until doubled in size.
5. Preheat the Oven: Preheat your oven to 400°F (200°C) and line a baking sheet with parchment paper.
6. Shape the Breadsticks: Once the dough has risen, punch it down and roll it out into a rectangle about ½ inch thick. Cut the dough into strips using a pizza cutter or a knife.
7. Add Garlic and Cheese: In a small bowl, combine the minced garlic, mozzarella, and Parmesan. Sprinkle this mixture over the strips of dough.
8. Final Rise: Cover the shaped breadsticks with a towel and let them rise for an additional 10-15 minutes.
9. Bake: Bake the breadsticks in the preheated oven for 15-20 minutes or until they are golden brown and the cheese has melted.
10. Garnish and Serve: Remove from the oven and sprinkle with fresh parsley and Italian seasoning, if desired. Serve hot!
- Prep Time: 15 minutes
- Cook Time: 15-20 minutes
Nutrition
- Serving Size: 8 breadsticks
- Calories: 180 kcal
- Fat: 7g
- Protein: 5g