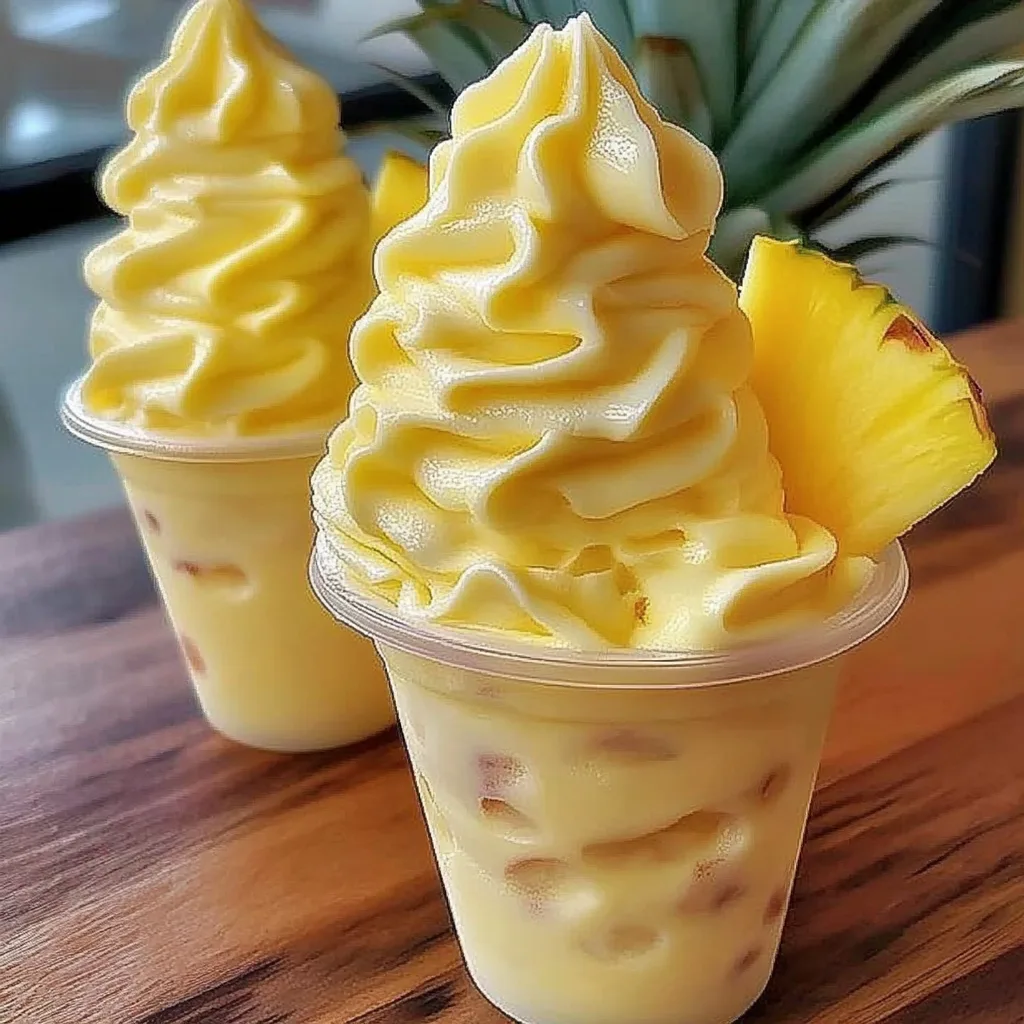
Homemade Pineapple Soft Serve Ice Cream is the ultimate treat for warm summer days! Imagine a creamy, refreshing scoop of sweet pineapple, perfectly balanced with a hint of tanginess. It’s not just a dessert; it’s a celebration of tropical flavors that will leave you craving more. This recipe is easy to make and a fun activity for families or friends to enjoy together. By making it at home, you can ensure that it’s fresh, flavorful, and tailored to your liking.
This delightful soft serve transports you to a beachside paradise without ever leaving your kitchen. Each spoonful offers a taste of paradise, appealing to both kids and adults alike. If you’ve been looking for a way to cool off while indulging your sweet tooth, look no further. Not only is this pineapple soft serve delicious, but it’s also a healthier alternative to conventional ice creams loaded with sugar and artificial flavors.
So why choose store-bought options filled with preservatives when you can whip up something so fresh and vibrant right in your kitchen? In this guide, we’ll explore why you’ll love this recipe, share preparation and cooking times, and provide step-by-step instructions to create the most delicious pineapple soft serve you’ve ever tasted!
Why You’ll Love This Recipe
Homemade Pineapple Soft Serve Ice Cream delights your taste buds and can bring everyone together. Here are some reasons why you’ll absolutely love it:
1. Refreshing Flavor: The tropical essence of pineapple is refreshing, making this soft serve perfect for warm weather.
2. Easy to Make: With just a few ingredients and a blender, this recipe is perfect for both novice and experienced cooks.
3. Healthier Option: Compared to traditional ice creams, this recipe uses fresh fruit and yogurt, making it a guilt-free indulgence.
4. Customizable: You can easily adjust the sweetness or add other fruits to create variations that suit your taste.
5. Fun Activity: Making ice cream at home can be a fun and interactive activity for families or gatherings with friends.
6. Perfect for Any Occasion: Whether it’s a birthday party, summer barbecue, or a simple family dessert, this soft serve is always a hit.
These factors come together to create a dessert that is not only extraordinary in flavor but also embodies joy and togetherness. You’ll be amazed at how something so simple can bring people closer!
Preparation and Cooking Time
The total time required for preparing Homemade Pineapple Soft Serve Ice Cream is approximately 15-20 minutes of active time, plus chilling time. Here’s a detailed breakdown of the time involved:
– Preparation Time: 10 minutes
– Chilling Time: 1-2 hours (to freeze the mixture)
– Serving Time: 5 minutes
This straightforward process allows you to enjoy a fresh, delightful treat without spending all day in the kitchen.
Ingredients
– 2 cups ripe pineapple chunks (fresh or frozen)
– 1 cup Greek yogurt (plain or vanilla)
– ½ cup honey or maple syrup (adjust based on sweetness preference)
– 1 teaspoon vanilla extract
– A pinch of salt
Step-by-Step Instructions
Creating your Homemade Pineapple Soft Serve Ice Cream is simple. Follow these easy steps:
1. Prepare the Pineapple: If using fresh pineapple, peel, core, and chop it into chunks. If using frozen pineapple, ensure it’s slightly softened for easier blending.
2. Blend Ingredients: In a blender, combine the pineapple chunks, Greek yogurt, honey or maple syrup, vanilla extract, and a pinch of salt. Blend until smooth and creamy.
3. Taste and Adjust: Taste the mixture and adjust the sweetness if necessary. Add more honey or syrup if desired.
4. Chill the Mixture: Transfer the blended mixture into an airtight container. Cover it and place it in the freezer for at least 1-2 hours to firm up.
5. Serve the Soft Serve: Once the mixture is chilled, scoop it out with an ice cream scoop or spoon. For a perfect soft-serve consistency, let it sit at room temperature for a few minutes before serving.
6. Garnish if Desired: Optionally, garnish with fresh pineapple slices, coconut flakes, or a cherry on top for presentation.
Following these simple steps will lead you to an incredible dessert experience!
How to Serve
To enhance the enjoyment of your Homemade Pineapple Soft Serve Ice Cream, consider the following serving tips:
1. Presentation Matters: Serve in chilled bowls or cups. A colorful presentation elevates the experience.
2. Sprinkle Toppings: Add toppings like toasted coconut flakes, chopped nuts, or granola for extra texture and flavor.
3. Pair with Others: Serve alongside other tropical delights, such as coconut sorbet or tropical fruits.
4. Create a Sundae: Transform your soft serve into a sundae by adding a drizzle of chocolate or caramel sauce and whipped cream.
5. Enjoy with Friends: Gather your family or friends to share this delicious homemade ice cream experience. The joy of sharing makes it even sweeter!
With these serving suggestions, your Homemade Pineapple Soft Serve Ice Cream will surely be a delightful centerpiece for any gathering!
In conclusion, making your own Homemade Pineapple Soft Serve Ice Cream is an incredibly satisfying and joyful experience. With just a few ingredients and simple steps, you can treat yourself and your loved ones to a refreshing and healthier dessert. So grab your blender and get started on this tropical delight today! You won’t regret it—every indulgent bite will remind you of summer bliss!
Additional Tips
– Select Ripe Pineapples: For the best flavor, use ripe pineapples. They add a natural sweetness that enhances your soft serve.
– Experiment with Sweetness: Alter the amount of honey or maple syrup according to your preference. More sweetener can enhance the tropical flavor.
– Chill Your Ingredients: If you want a creamier texture, consider chilling the Greek yogurt before blending.
– Add a Splash of Coconut Milk: For a stronger tropical flavor, try incorporating a splash of coconut milk for added creaminess.
– Garnish Creatively: Use mint leaves or edible flowers for a visually appealing presentation, making your dessert beautiful and inviting.
Recipe Variation
Enjoying variety is easy with this soft serve recipe. Here are some fun variations to consider:
1. Mixed Fruit Soft Serve: Combine pineapple with other fruits like mango, bananas, or strawberries to create a fruity medley.
2. Coconut Pineapple: For a coconut twist, add shredded coconut to the blend for added texture and flavor.
3. Vegan Alternative: Substitute Greek yogurt with a dairy-free yogurt alternative to create a vegan version of this treat.
4. Spiced Pineapple Soft Serve: Add a pinch of cinnamon or nutmeg for a warm, spicy kick to your refreshing ice cream.
Freezing and Storage
– Storage: Transfer the soft serve into an airtight container. It will keep in the freezer for up to a week while maintaining its flavor.
– Re-Serving: If the soft serve hardens, allow it to sit at room temperature for a few minutes before scooping. This will make it easier to serve.
Special Equipment
For crafting your Homemade Pineapple Soft Serve Ice Cream, the following equipment is recommended:
– High-Powered Blender: A good blender will ensure your ingredients are mixed thoroughly for a smooth texture.
– Airtight Container: Needed for storing the soft serve while it freezes.
– Ice Cream Scoop: For serving the soft serve effortlessly.
– Measuring Cups and Spoons: Ensure accurate ingredient amounts to achieve the best flavor balance.
Frequently Asked Questions
Can I use canned pineapple for this recipe?
Yes, canned pineapple can be used, but make sure to choose a variety without added sugar for the healthiest option.
How do I achieve a creamier texture?
Using chilled Greek yogurt and ensuring that your mixture is well-blended can help achieve that creamy consistency.
Is this recipe suitable for kids?
Absolutely! This is a kid-friendly recipe that is fun to make and eat, plus it’s healthier than many commercial ice creams.
Can I make this soft serve without a blender?
While a blender is recommended for a smooth texture, you can mash the pineapple and mix by hand, though it may not achieve the same creaminess.
How do I store leftovers?
You can store it in an airtight container in the freezer. Let it sit out for a few minutes before scooping to make serving easier.
Conclusion
Homemade Pineapple Soft Serve Ice Cream is not just a delicious dessert. It’s a summer celebration that you and your loved ones can enjoy together. This tropical delight offers a refreshing flavor, easy preparation, and endless possibilities for customization. Whether it’s a special occasion or just a treat for yourself, making this soft serve is an enjoyable process that results in a delightful dessert experience. So gather your ingredients and get ready to indulge in a batch of homemade happiness.

Homemade Pineapple Soft Serve Ice Cream: An Incredible Ultimate Recipe
- Total Time: 0 hours
Ingredients
– 2 cups ripe pineapple chunks (fresh or frozen)
– 1 cup Greek yogurt (plain or vanilla)
– ½ cup honey or maple syrup (adjust based on sweetness preference)
– 1 teaspoon vanilla extract
– A pinch of salt
Instructions
Creating your Homemade Pineapple Soft Serve Ice Cream is simple. Follow these easy steps:
1. Prepare the Pineapple: If using fresh pineapple, peel, core, and chop it into chunks. If using frozen pineapple, ensure it’s slightly softened for easier blending.
2. Blend Ingredients: In a blender, combine the pineapple chunks, Greek yogurt, honey or maple syrup, vanilla extract, and a pinch of salt. Blend until smooth and creamy.
3. Taste and Adjust: Taste the mixture and adjust the sweetness if necessary. Add more honey or syrup if desired.
4. Chill the Mixture: Transfer the blended mixture into an airtight container. Cover it and place it in the freezer for at least 1-2 hours to firm up.
5. Serve the Soft Serve: Once the mixture is chilled, scoop it out with an ice cream scoop or spoon. For a perfect soft-serve consistency, let it sit at room temperature for a few minutes before serving.
6. Garnish if Desired: Optionally, garnish with fresh pineapple slices, coconut flakes, or a cherry on top for presentation.
Following these simple steps will lead you to an incredible dessert experience!
- Prep Time: 15 minutes
- Cook Time: 1-2 hours (chilling)
Nutrition
- Serving Size: 4
- Calories: 130 kcal
- Fat: 2g
- Protein: 3g