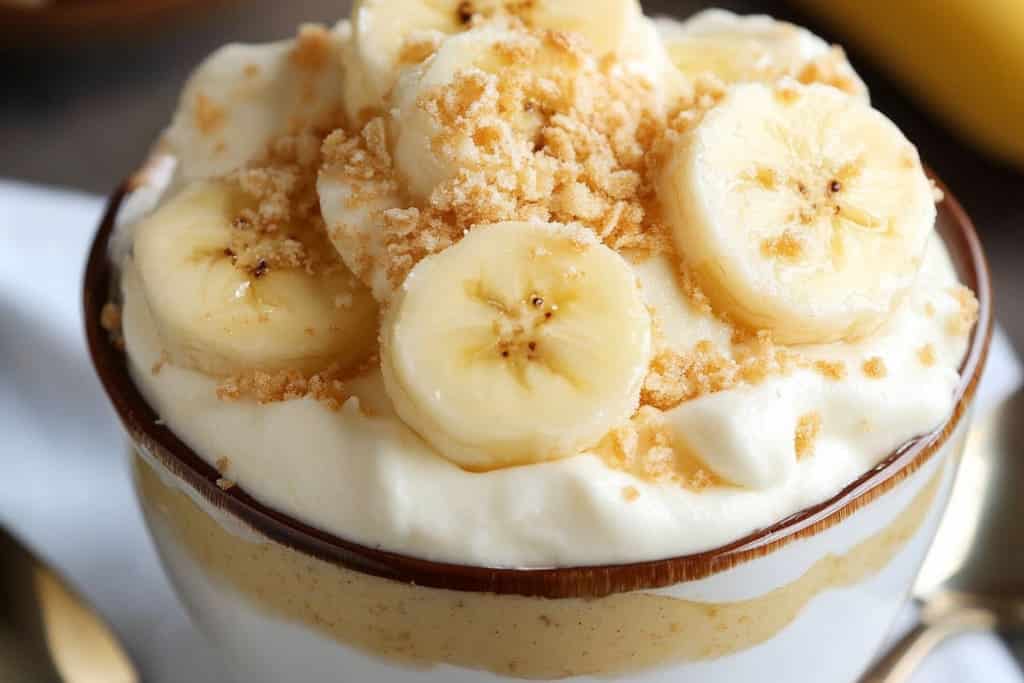
Not Yo’ Mama’s Banana Pudding is a delightful twist on a classic dessert that will change how you think about this beloved dish. This version takes the traditional banana pudding and elevates it to new heights. With an amazing combination of flavors and textures, you won’t be able to resist going back for seconds. This isn’t just another dessert; it is a creation meant to impress your guests and bring comfort to family gatherings.
Imagine a creamy custard, perfectly ripe bananas, and crunchy cookies all mingling happily in a serving dish, topped off with a dollop of whipping cream. Each bite delivers a wave of nostalgia while offering a refreshing twist. This dessert will make you nostalgic for childhood gatherings but also provide a fun and modern update that everyone will enjoy.
If you’ve been searching for a unique dessert that stands out from the rest, look no further. In this article, you’ll discover why you will love this recipe, the preparation and cooking times involved, the necessary ingredients, step-by-step instructions, and tips on how to serve this incredible dessert. So, get ready to impress your family and friends with Not Yo’ Mama’s Banana Pudding!
Why You’ll Love This Recipe
Not Yo’ Mama’s Banana Pudding offers a delightful blend of flavors that make it a standout choice for any occasion. Here are some reasons you’ll fall head over heels for this version of banana pudding:
1. Creative Twist: This recipe reinvents the classic to keep things exciting.
2. Simple Ingredients: Most of the ingredients can be found in your pantry, making shopping easy.
3. Crowd-Pleasing Treat: Perfect for gatherings, potlucks, or family dinners, ensuring everyone will leave happy.
4. Customizable Flavors: You can easily swap ingredients, like using different cookies or adding spices, to suit your taste.
5. Quick Assembly: This dessert doesn’t require hours in the kitchen, making it great for last-minute cravings.
6. Nostalgic Yet Modern: Every bite strikes a balance between cherished memories and contemporary flavor profiles.
With these highlights, it’s no wonder this dessert is gaining popularity. The layers of deliciousness will have everyone asking for your secret recipe!
Preparation and Cooking Time
Creating Not Yo’ Mama’s Banana Pudding is relatively quick, making it an accessible option for those busy days. Here’s the breakdown of the time required to whip up this amazing dish:
– Preparation Time: 20 minutes
– Cooking Time: 0 minutes (the pudding sets in the fridge)
– Chill Time: 4 hours (or overnight for best results)
In total, you can expect to spend around 20 minutes of active time, but don’t forget about the chilling time for that creamy texture.
Ingredients
– 2 cups heavy whipping cream
– 1 cup sweetened condensed milk
– 1 teaspoon vanilla extract
– 1 teaspoon instant banana pudding mix
– 4 ripe bananas, sliced
– 1 box vanilla wafers or graham crackers
– 1 cup crushed cookies, for topping (optional)
– Fresh mint leaves, for garnish (optional)
Step-By-Step Instructions
Follow these easy steps to create your Not Yo’ Mama’s Banana Pudding:
1. Prepare the Cream Mixture: In a mixing bowl, whip the heavy cream until soft peaks form.
2. Add Condensed Milk: Gradually fold in the sweetened condensed milk into the whipped cream.
3. Incorporate Vanilla: Add the vanilla extract and instant banana pudding powder, mixing until completely blended.
4. Layer Cookies: In a large serving dish, place a layer of vanilla wafers or graham crackers at the bottom.
5. Add Bananas: Next, layer on half of the sliced bananas over the cookies.
6. Spread Cream Mixture: Add half of the whipped cream mixture on top of the bananas, spreading it evenly.
7. Repeat Layers: Repeat the layering process with the remaining cookies, bananas, and cream mixture, ending with the cream layer on top.
8. Crushed Cookies: If desired, sprinkle crushed cookies on top of the final cream layer for added crunch.
9. Chill: Cover the dish with plastic wrap and place it in the refrigerator for at least 4 hours, or overnight.
10. Garnish: Before serving, add fresh mint leaves on top to make it even more appealing.
These straightforward steps will guide you in crafting an incredible version of banana pudding that everyone will adore!
How to Serve
Making Not Yo’ Mama’s Banana Pudding a delightful experience goes beyond just preparing it. Here are some serving suggestions to maximize its appeal:
1. Presentation: Serve in a clear glass dish to showcase the beautiful layers of pudding, bananas, and cookies.
2. Serving Size: Use a large spoon to serve generous portions, encouraging seconds and thirds.
3. Garnishing: Enhance the visual appeal with additional slices of banana or a dollop of whipped cream right before serving.
4. Beverage Pairing: This dessert pairs wonderfully with coffee, sweet tea, or a light dessert wine.
5. Make it a Feast: Serve alongside other desserts for a buffet-style gathering, creating a stunning spread that everyone will love.
Following these suggestions will elevate your serving experience, ensuring everyone has a memorable taste of Not Yo’ Mama’s Banana Pudding.
This remarkable twist on a classic dessert is not only simple to prepare but also a definite show-stopper. Get ready to create memories with each luscious bite, tantalizing everyone with the amazing flavors and textures of your Banana Pudding creation! Whether it’s a family get-together or a casual picnic, this dessert will be the talk of the table, providing fun and delicious experiences for all.
Additional Tips
– Use Fresh Bananas: For the best flavor, opt for ripe, but not overripe, bananas. They provide the perfect sweetness and texture.
– Whip Cream to Stiff Peaks: Ensure the cream is whipped to stiff peaks for a fluffier consistency. This helps the pudding hold its shape better.
– Layering Technique: Alternate layers of cream and bananas to create a beautiful presentation and balanced flavor in each serving.
– Consider a Flavor Boost: Add a splash of rum or banana liqueur to the cream mixture for an adult twist.
– Serve Chilled: Always serve this dessert cold for the best taste and texture.
Recipe Variation
Feel free to get creative with this recipe! Here are some fun variations to try:
1. Chocolate Banana Pudding: Use chocolate pudding mix instead of banana pudding mix for a chocolatey delight.
2. Nutty Addition: Incorporate chopped nuts like walnuts or pecans for added crunch and flavor.
3. Coconut Twist: Add shredded coconut to the layers for a tropical flair.
4. Vegan Version: Replace heavy cream with coconut cream and use dairy-free cookies for a plant-based option.
5. Layer of Flavored Gelatin: Add a layer of fruit-flavored gelatin for a vibrant and colorful touch.
Freezing and Storage
– Storage: Keep your Not Yo’ Mama’s Banana Pudding covered in the refrigerator. It should last about 3-4 days while maintaining its delightful creamy texture.
– Freezing: For best quality, it’s recommended to avoid freezing banana pudding. However, if necessary, you can freeze individual servings. Be sure to wrap them tightly to avoid freezer burn. Consume within 1 month for the best taste.
Special Equipment
You won’t need many specialized tools to create this delicious dessert. Here are a few essentials:
– Mixing Bowls: A set of mixing bowls for whipping cream and combining ingredients.
– Electric Mixer: A hand or stand mixer will ensure the cream reaches stiff peaks efficiently.
– Spatula: A rubber spatula will help in folding ingredients gently without deflating the whipped cream.
– Serving Dish: Use a clear glass dish to showcase the beautiful layers or any large serving bowl you have at hand.
– Plastic Wrap: Cover the pudding with plastic wrap to prevent it from absorbing odors in the fridge.
Frequently Asked Questions
Can I use a different type of cookie?
Absolutely! While vanilla wafers are traditional, you can experiment with graham crackers, chocolate cookies, or even ginger snaps for a unique flavor.
How long does the pudding need to set?
For the best results, chill the pudding for at least 4 hours. Overnight chilling is ideal for a well-set dessert.
Can I make this dessert gluten-free?
Yes, choose gluten-free cookies to accommodate gluten sensitivities.
What can I do if my cream doesn’t whip up?
Make sure your mixing bowl and beaters are completely clean and dry. Also, use cold heavy cream for the best results.
Is Not Yo’ Mama’s Banana Pudding suitable for parties?
Definitely! It’s a crowd-pleaser and easy to serve for gatherings and potlucks.
Conclusion
Not Yo’ Mama’s Banana Pudding is the ultimate dessert that brings nostalgia with a modern flair. Its creamy texture, layered flavors, and delightful crunch make it an instant hit. Easy to prepare and impressive to serve, it’s a wholesome treat that will be cherished at any gathering. Whip up this show-stopper dessert and watch as it quickly becomes a family favorite.

Not Yo’ Mama’s Banana Pudding: An Incredible Ultimate Recipe
- Total Time: 20 minutes
Ingredients
– 2 cups heavy whipping cream
– 1 cup sweetened condensed milk
– 1 teaspoon vanilla extract
– 1 teaspoon instant banana pudding mix
– 4 ripe bananas, sliced
– 1 box vanilla wafers or graham crackers
– 1 cup crushed cookies, for topping (optional)
– Fresh mint leaves, for garnish (optional)
Instructions
Follow these easy steps to create your Not Yo’ Mama’s Banana Pudding:
1. Prepare the Cream Mixture: In a mixing bowl, whip the heavy cream until soft peaks form.
2. Add Condensed Milk: Gradually fold in the sweetened condensed milk into the whipped cream.
3. Incorporate Vanilla: Add the vanilla extract and instant banana pudding powder, mixing until completely blended.
4. Layer Cookies: In a large serving dish, place a layer of vanilla wafers or graham crackers at the bottom.
5. Add Bananas: Next, layer on half of the sliced bananas over the cookies.
6. Spread Cream Mixture: Add half of the whipped cream mixture on top of the bananas, spreading it evenly.
7. Repeat Layers: Repeat the layering process with the remaining cookies, bananas, and cream mixture, ending with the cream layer on top.
8. Crushed Cookies: If desired, sprinkle crushed cookies on top of the final cream layer for added crunch.
9. Chill: Cover the dish with plastic wrap and place it in the refrigerator for at least 4 hours, or overnight.
10. Garnish: Before serving, add fresh mint leaves on top to make it even more appealing.
These straightforward steps will guide you in crafting an incredible version of banana pudding that everyone will adore!
- Prep Time: 20 minutes
- Cook Time: 0 minutes
Nutrition
- Serving Size: 8
- Calories: 360 kcal
- Fat: 20g
- Protein: 4g