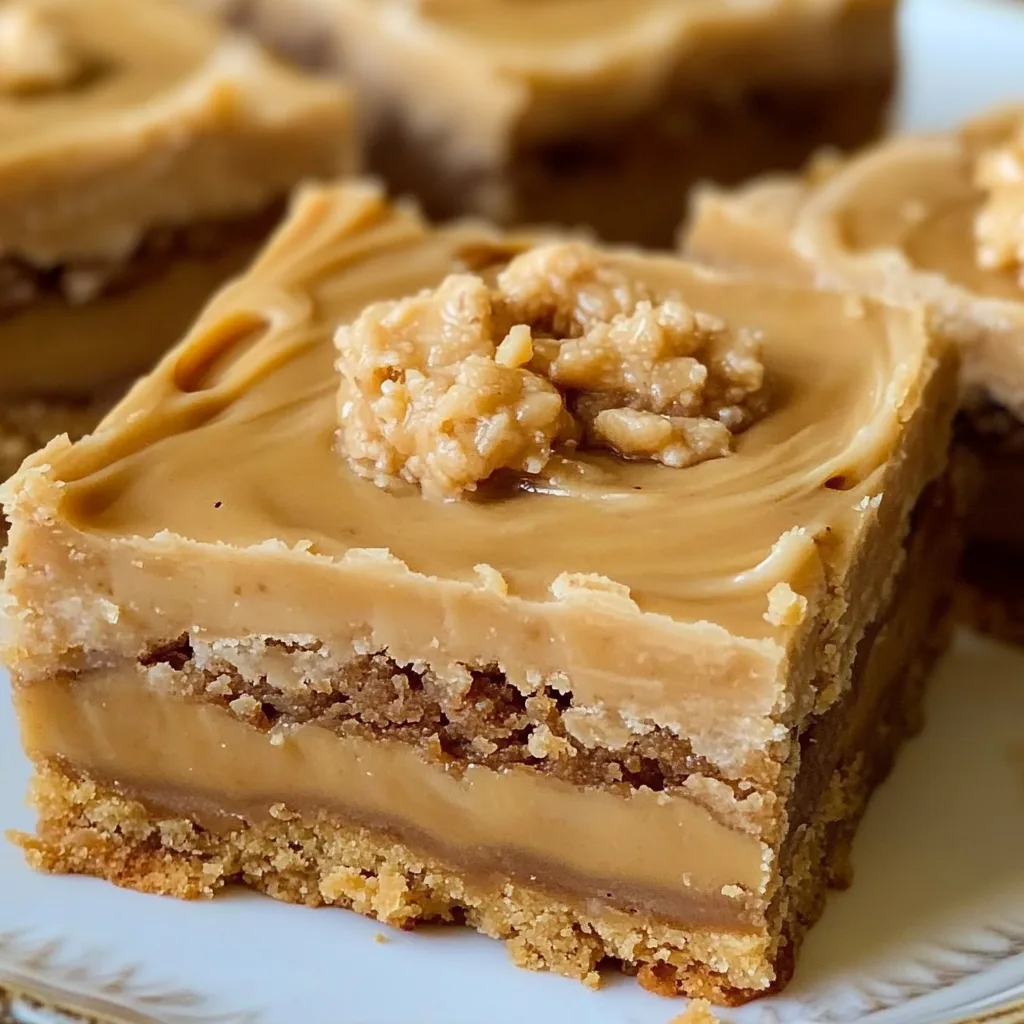
Peanut Butter Lunch Lady Cookie Bars are a nostalgic treat that combines crispy edges and a chewy center, invoking feelings of warmth and comfort. These bars are not just delicious; they are an experience that takes you back to school days when lunch ladies served up tasty delights from the cafeteria. Packed with the rich flavor of peanut butter and a hint of sweetness, this recipe is sure to become a cherished favorite in your household.
If you love peanut butter, these cookie bars are bound to become your new obsession. The first bite reveals a perfectly balanced blend of textures – soft and chewy, with just the right crunch from chocolate chips sprinkled throughout. These bars are perfect for any occasion, whether it’s a family gathering, school lunch, or simply a sweet craving. In this article, we will explore why you’ll love this recipe, share preparation and cooking times, and provide step-by-step instructions to help you whip up these amazing Peanut Butter Lunch Lady Cookie Bars effortlessly.
Get ready to indulge in something sweet; the incredible flavors of Peanut Butter Lunch Lady Cookie Bars are sure to impress not just you, but everyone fortunate enough to share them.
Why You’ll Love This Recipe
Peanut Butter Lunch Lady Cookie Bars offer a delightful mix of flavors and textures that will leave your taste buds dancing. Here are some compelling reasons why you’ll adore this recipe:
1. Simple Ingredients – Most of the ingredients are pantry staples you might already have at home.
2. Easy to Make – With straightforward instructions, even novice bakers can succeed at making these bars.
3. Perfect for Sharing – These bars are ideal for parties, bake sales, or just satisfying a sweet tooth.
4. Customizable – Feel free to add nuts, extra chocolate, or even oats to suit your taste.
5. Delicious Flavor – The rich peanut butter flavor shines through, supported by a blend of sweet chocolate.
6. Quick to Prepare – With only a short baking time, you’ll have these delicious bars ready in no time.
Each reason adds a layer of appeal to this recipe, making it a staple in your dessert repertoire. You’ll find that every bite is filled with delightful nostalgia, bringing back the charm of homemade school snacks.
Preparation and Cooking Time
Making Peanut Butter Lunch Lady Cookie Bars is quick and straightforward. Here’s a breakdown of the time you will need:
– Preparation Time: 15 minutes
– Cooking Time: 20-25 minutes
– Cooling Time: 15-20 minutes
In total, you’re looking at roughly 55 minutes to satisfy that peanut butter craving!
Ingredients
– 1 cup creamy peanut butter
– 1 cup granulated sugar
– 1 cup packed brown sugar
– 1 cup unsalted butter, softened
– 2 large eggs
– 2 teaspoons vanilla extract
– 3 cups all-purpose flour
– 1 teaspoon baking soda
– 1 teaspoon baking powder
– ½ teaspoon salt
– 1 cup chocolate chips (semi-sweet or milk chocolate)
Step-by-Step Instructions
Creating these Peanut Butter Lunch Lady Cookie Bars is simple and enjoyable; follow these steps to make your delicious bars:
1. Preheat the Oven: Begin by preheating your oven to 350°F (175°C). Grease a 13×9-inch baking dish or line it with parchment paper for easy removal.
2. Mix Wet Ingredients: In a large mixing bowl, combine the softened butter, granulated sugar, brown sugar, and creamy peanut butter. Use an electric mixer to blend them together until light and fluffy—about 2-3 minutes.
3. Add Eggs and Vanilla: Beat in the eggs, one at a time, ensuring each is well incorporated before adding the next. Mix in the vanilla extract until smooth.
4. Combine Dry Ingredients: In a separate bowl, whisk together the flour, baking soda, baking powder, and salt.
5. Combine Wet and Dry Mixtures: Gradually add the dry ingredients to the wet mixture, stirring until just combined. Avoid overmixing; a few lumps are okay.
6. Add Chocolate Chips: Fold in the chocolate chips until they are evenly distributed throughout the batter.
7. Transfer to Baking Dish: Pour the batter into the prepared baking dish. Use a spatula to spread it evenly across the pan.
8. Bake: Place the dish in the oven and bake for 20-25 minutes. The edges should be golden brown while the center remains soft. A toothpick inserted in the center should come out clean or with a few moist crumbs.
9. Cool: Once baked, remove the dish from the oven and let it cool in the pan for about 15-20 minutes. Then, transfer the bars to a wire rack to cool completely before cutting.
10. Serve: Once cool, slice them into squares or rectangles, whichever you prefer.
Following these steps will ensure your Peanut Butter Lunch Lady Cookie Bars turn out perfectly every time.
How to Serve
Serving Peanut Butter Lunch Lady Cookie Bars can enhance the overall experience. Here are some ideas to consider:
1. Presentation: Arrange the bars on a colorful platter or cake stand to make the dessert visually appealing.
2. Pairings: Consider pairing these cookie bars with a scoop of vanilla ice cream or whipped cream for an extra indulgence.
3. Garnishing: Drizzle melted chocolate on top or sprinkle crushed peanuts for added texture and flavor.
4. Storage: These bars can be stored in an airtight container at room temperature for up to a week, ensuring they remain soft and chewy.
By presenting these Peanut Butter Lunch Lady Cookie Bars thoughtfully, you’re sure to impress your guests with both taste and style.
In conclusion, Peanut Butter Lunch Lady Cookie Bars are not only a delightful treat but also a quick and easy recipe for any occasion. With their wonderful flavors and nostalgic essence, they’ll surely be a hit with your family and friends. Enjoy baking and savoring every delicious bite!
Additional Tips
– Use Room Temperature Ingredients: For the best results, ensure your butter and eggs are at room temperature. This helps create a uniform batter.
– Don’t Overmix: When combining wet and dry ingredients, mix just until incorporated. Overmixing can lead to tough bars.
– Test for Doneness: Keep an eye on your bars while baking. The edges should be golden brown, and the center should be set but soft. Remember, they will continue to firm up as they cool.
– Experiment with Add-ins: Consider adding a swirl of peanut butter on top before baking or a sprinkle of sea salt for a contrasting flavor.
– Enhance Presentation: For a touch of sophistication, dust the cooled cookie bars with powdered sugar before serving.
Recipe Variation
Feel free to get creative with your Peanut Butter Lunch Lady Cookie Bars. Here are a few variations to try:
1. Add-Ins Galore: Incorporate chopped nuts, such as peanuts or walnuts, for added crunch. You could also mix in butterscotch chips for a delightful twist.
2. Oatmeal Peanut Butter Bars: Replace a cup of flour with rolled oats for a heartier version. This adds texture and fiber.
3. Peanut Butter Chocolate Swirl: Before baking, dollop some peanut butter on the batter and swirl it in for a marbled appearance and intensified flavor.
4. Vegan Alternative: Substitute eggs with flaxseed meal (1 tablespoon of flaxseed mixed with 2.5 tablespoons of water) and use a plant-based butter to create a vegan-friendly version.
Freezing and Storage
– Storage: Keep your Peanut Butter Lunch Lady Cookie Bars in an airtight container at room temperature. They stay delicious for about a week.
– Freezing: To freeze, allow the bars to cool completely. Cut them into squares, then wrap each piece tightly in plastic wrap or foil. Place them in a freezer-safe bag. They can be frozen for up to 3 months. Thaw at room temperature before enjoying.
Special Equipment
To make your baking experience smoother, gather these essential tools:
– Mixing bowls (large and medium)
– Electric mixer (or a whisk for a workout!)
– Measuring cups and spoons
– 9×13 inch baking pan
– Parchment paper or cooking spray for easy removal
Frequently Asked Questions
Can I use crunchy peanut butter instead of creamy?
Yes, while creamy peanut butter provides a smooth texture, crunchy peanut butter can enhance the bar’s overall crunchiness.
How do I know when the bars are finished baking?
Look for golden edges and a slightly soft center. A toothpick inserted into the center should come out with a few moist crumbs.
Can I skip the chocolate chips?
Certainly! If you prefer, you can omit the chocolate chips or replace them with dried fruit or your choice of mix-ins.
Can these bars be made gluten-free?
Yes, you can substitute all-purpose flour with a gluten-free flour blend to create a gluten-free version of these cookie bars.
How should I reheat them if they’re cold?
To enjoy them warm, you can place the bars in the microwave for a few seconds or gently heat them in the oven for a few minutes.
Conclusion
Peanut Butter Lunch Lady Cookie Bars are an easy-to-make treat that brings back sweet memories while delivering delicious flavors. With their combination of chewy and crunchy textures, they are perfect for any occasion. Easy to prepare and customize, these bars are sure to delight family and friends alike. Enjoy the nostalgia and the mouthwatering goodness of these delightful bars as you share them with loved ones!

Peanut Butter Lunch Lady Cookie Bars: An Incredible Ultimate Recipe
- Total Time: 0 hours
Ingredients
– 1 cup creamy peanut butter
– 1 cup granulated sugar
– 1 cup packed brown sugar
– 1 cup unsalted butter, softened
– 2 large eggs
– 2 teaspoons vanilla extract
– 3 cups all-purpose flour
– 1 teaspoon baking soda
– 1 teaspoon baking powder
– ½ teaspoon salt
– 1 cup chocolate chips (semi-sweet or milk chocolate)
Instructions
Creating these Peanut Butter Lunch Lady Cookie Bars is simple and enjoyable; follow these steps to make your delicious bars:
1. Preheat the Oven: Begin by preheating your oven to 350°F (175°C). Grease a 13×9-inch baking dish or line it with parchment paper for easy removal.
2. Mix Wet Ingredients: In a large mixing bowl, combine the softened butter, granulated sugar, brown sugar, and creamy peanut butter. Use an electric mixer to blend them together until light and fluffy—about 2-3 minutes.
3. Add Eggs and Vanilla: Beat in the eggs, one at a time, ensuring each is well incorporated before adding the next. Mix in the vanilla extract until smooth.
4. Combine Dry Ingredients: In a separate bowl, whisk together the flour, baking soda, baking powder, and salt.
5. Combine Wet and Dry Mixtures: Gradually add the dry ingredients to the wet mixture, stirring until just combined. Avoid overmixing; a few lumps are okay.
6. Add Chocolate Chips: Fold in the chocolate chips until they are evenly distributed throughout the batter.
7. Transfer to Baking Dish: Pour the batter into the prepared baking dish. Use a spatula to spread it evenly across the pan.
8. Bake: Place the dish in the oven and bake for 20-25 minutes. The edges should be golden brown while the center remains soft. A toothpick inserted in the center should come out clean or with a few moist crumbs.
9. Cool: Once baked, remove the dish from the oven and let it cool in the pan for about 15-20 minutes. Then, transfer the bars to a wire rack to cool completely before cutting.
10. Serve: Once cool, slice them into squares or rectangles, whichever you prefer.
Following these steps will ensure your Peanut Butter Lunch Lady Cookie Bars turn out perfectly every time.
- Prep Time: 15 minutes
- Cook Time: 20-25 minutes
Nutrition
- Serving Size: 24 squares
- Calories: 300 kcal
- Fat: 15g
- Protein: 5g