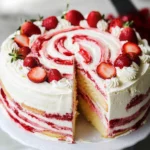
Strawberry Shortcake Layer Cake is a delightful treat that will have you singing its praises. This amazing dessert is a classic, loved by many for its light, fluffy layers and fresh strawberry flavor. Ideal for birthdays, summer picnics, and any celebration that calls for something sweet, this cake offers a perfect balance of textures and flavors. The moist vanilla layers contrast beautifully with the luscious whipped cream and juicy strawberries, making it a showstopper on any dessert table.
Imagine cutting into a beautifully layered cake, revealing vibrant red strawberries nestled between soft cake layers. Each bite brings a wave of sweetness that’s complemented by the fluffy cream, creating a dessert experience that is nothing short of incredible. Whether you are an experienced baker or just starting out, this recipe will guide you effortlessly toward creating the ultimate Strawberry Shortcake Layer Cake that will leave your friends and family in awe.
In the following sections, we’ll explore why this Strawberry Shortcake Layer Cake is the perfect dessert, how to prepare it efficiently, and what ingredients you’ll need. By the end, you’ll not only be prepared to create this stunning cake but also to serve it in a way that impresses everyone. So, let’s get started and make your next gathering a memorable one!
Why You’ll Love This Recipe
Strawberry Shortcake Layer Cake isn’t just any dessert; it brings joy and flavor that is hard to resist. Here are several reasons why you will appreciate this recipe:
1. Fresh Ingredients – You’ll be using fresh strawberries, which enhance the flavor and make the cake refreshing.
2. Versatile – The recipe can be adapted to include other fruits or flavors, making it enjoyable year-round.
3. Impressive Presentation – It’s stunning to look at, making it the centerpiece of any gathering.
4. Simple Steps – The instructions are straightforward, suitable for bakers of any skill level.
5. Perfect for Celebrations – This cake is ideal for birthdays, anniversaries, or simple get-togethers.
6. Delicious Layers – The combination of fluffy cake, sweet strawberries, and whipped cream is a match made in heaven.
These points highlight why making this cake will not just fill your stomach but also warm your heart. Each bite is a celebration of flavor that makes it a beloved dessert for many.
Preparation and Cooking Time
To create this Strawberry Shortcake Layer Cake, you’ll need to allocate some time for preparation and baking. Here’s a breakdown of the estimated time required:
– Preparation Time: 30 minutes
– Cooking Time: 25-30 minutes
– Cooling Time: 1 hour
– Assembly Time: 20 minutes
In total, you should expect to spend about 2 hours from start to finish. This estimate gives you plenty of time to be thorough and enjoy the process.
Ingredients
– 2 ½ cups all-purpose flour
– 1 ½ cups granulated sugar
– ½ cup unsalted butter, softened
– 1 cup whole milk
– 3 large eggs
– 2 ½ teaspoons baking powder
– 1 teaspoon vanilla extract
– 1/2 teaspoon salt
– 2 cups fresh strawberries, sliced
– 2 cups heavy whipping cream
– ¼ cup powdered sugar (for sweetening cream)
– 1 teaspoon vanilla extract (for whipped cream)
– Additional strawberries for garnishing (optional)
Step-by-Step Instructions
Creating the Strawberry Shortcake Layer Cake is easy if you follow these simple steps:
1. Preheat the Oven: Preheat your oven to 350°F (175°C) and grease and flour three 8-inch round cake pans.
2. Mix Dry Ingredients: In a bowl, combine the flour, baking powder, and salt.
3. Cream Butter and Sugar: In another large bowl, cream together the softened butter and granulated sugar until fluffy.
4. Add Eggs and Vanilla: Beat in the eggs one at a time and add the vanilla extract, mixing until smooth.
5. Combine Mixtures: Gradually add the dry ingredients to the wet mixture, alternating with the milk, and mix until just combined.
6. Divide and Pour: Split the batter evenly among the prepared cake pans.
7. Bake Cakes: Bake in the preheated oven for 25-30 minutes, or until a toothpick inserted in the center comes out clean.
8. Cool the Cakes: Remove from the oven and allow the cakes to cool in the pans for 10 minutes before transferring to wire racks to cool completely.
9. Prepare Whipped Cream: In a large bowl, beat the heavy whipping cream with the powdered sugar and vanilla extract until soft peaks form.
10. Assemble the Layer Cake: Once the cakes are cool, place the first layer on a serving platter. Spread a layer of whipped cream on top, followed by a generous layer of sliced strawberries.
11. Repeat Layers: Add the second cake layer and repeat the process with whipped cream and strawberries. Top with the final cake layer.
12. Finish with Cream: Frost the top and sides of the cake with the remaining whipped cream, and decorate with whole strawberries for presentation.
These simple steps will lead you to a delightful Strawberry Shortcake Layer Cake that looks as good as it tastes. Enjoy the process, and don’t rush!
How to Serve
To make your Strawberry Shortcake Layer Cake truly memorable, consider these serving suggestions:
1. Presentation: Place the cake on an elegant cake stand for a beautiful display. A simple decoration can add a touch of class.
2. Slice and Serve: Use a sharp knife to cut clean slices. Each serving should highlight the layers of cake, cream, and strawberries.
3. Accompaniments: Serve with extra whipped cream or a scoop of vanilla ice cream for those who want a little extra indulgence.
4. Beverage Pairing: This cake pairs wonderfully with iced tea, a refreshing lemonade, or even a glass of Champagne for a special occasion.
5. Garnishes: Consider adding a sprinkle of fresh mint leaves for a pop of color and freshness on the plate.
By paying attention to how you serve the Strawberry Shortcake Layer Cake, you’re not just serving dessert—you’re creating a delightful experience that your guests will remember. Enjoy sharing this treat with family and friends!
Additional Tips
– Use Fresh Strawberries: For the best flavor and texture, make sure to use ripe, juicy strawberries in this recipe.
– Whip Cream to Stiff Peaks: When making whipped cream, beat until stiff peaks form. This will help prevent the cream from sagging and keeps your layers intact.
– Chill Your Bowl and Whisk: To achieve the best whipped cream, chill your mixing bowl and whisk in the refrigerator before whipping.
– Balance Sweetness: Taste the whipped cream before using it. Adjust the sweetness by adding more powdered sugar if desired, especially if your strawberries are tart.
– Decorate Thoughtfully: Use whole strawberries or even mint leaves on top as a beautiful garnish that adds both color and flavor.
Recipe Variation
Never hesitate to add your own twist! Here are a few variations to consider:
1. Strawberry and Blueberry Delight: Incorporate fresh blueberries for an added burst of flavor and color. Alternate layers with strawberries and blueberries for visual appeal.
2. Chocolate Strawberry Shortcake: Create a chocolate cake by substituting half of the all-purpose flour with cocoa powder. The rich chocolate pairs delightfully with the strawberries.
3. Lemon-Infused Cake: Add lemon zest and a tablespoon of lemon juice to the cake batter for a refreshing citrus note that complements the strawberries perfectly.
4. Vegan Version: Substitute eggs with flaxseed meal mixed with water and use almond or soy milk in place of whole milk. Use coconut cream for the whipped topping.
Freezing and Storage
– Refrigeration: Store the layered cake in the fridge to keep it fresh for about 3-4 days. Tightly cover it with plastic wrap or place it in an airtight container.
– Freezing: You can freeze the cake in portions. Wrap individual slices in plastic wrap and place them in a freezer bag. This will help protect against freezer burn, and the cake can last up to 3 months.
Special Equipment
To make your baking experience smoother, gather some essential equipment:
– Mixing Bowls: Have a set of varying sizes for mixing the dry and wet ingredients.
– Electric Mixer: A hand or stand mixer will save you significant time while preparing your batter and whipped cream.
– Cake Pans: Three 8-inch round cake pans are needed for layering your cake.
– Offset Spatula: This will help you spread whipped cream evenly across the layers.
– Cake Stand: For an elegant presentation when serving your Strawberry Shortcake Layer Cake.
Frequently Asked Questions
How do I know if the cake is done baking?
Insert a toothpick into the center of the cake; if it comes out clean or with a few crumbs, your cake is baked perfectly.
Can I prepare this cake in advance?
Absolutely! You can assemble the layers a day before serving. Just cover it well and store it in the refrigerator.
Is this Strawberry Shortcake Layer Cake gluten-free?
Yes, you can substitute the all-purpose flour with a gluten-free flour blend to make it gluten-free.
Can I replace heavy whipping cream?
You can use non-dairy alternatives like coconut cream or whipped coconut milk for a dairy-free option.
Can I use frozen strawberries?
While fresh strawberries yield the best flavor, if using frozen, be sure to thaw and drain them well to prevent excess liquid in your cake layers.
Conclusion
The Strawberry Shortcake Layer Cake is more than a dessert; it’s a celebration of flavors that brings joy to any occasion. With its soft cake layers, sweet strawberries, and airy whipped cream, this cake captures the essence of warm summer days and joyful gatherings. Whether you’re making it for a birthday, a summer picnic, or just to indulge, you can’t go wrong with this delightful recipe. Enjoy every bite, and share it with loved ones for a truly memorable experience.
Strawberry Shortcake Layer Cake: An Amazing Ultimate Recipe
- Total Time: 0 hours
Ingredients
– 2 ½ cups all-purpose flour
– 1 ½ cups granulated sugar
– ½ cup unsalted butter, softened
– 1 cup whole milk
– 3 large eggs
– 2 ½ teaspoons baking powder
– 1 teaspoon vanilla extract
– 1/2 teaspoon salt
– 2 cups fresh strawberries, sliced
– 2 cups heavy whipping cream
– ¼ cup powdered sugar (for sweetening cream)
– 1 teaspoon vanilla extract (for whipped cream)
– Additional strawberries for garnishing (optional)
Instructions
Creating the Strawberry Shortcake Layer Cake is easy if you follow these simple steps:
1. Preheat the Oven: Preheat your oven to 350°F (175°C) and grease and flour three 8-inch round cake pans.
2. Mix Dry Ingredients: In a bowl, combine the flour, baking powder, and salt.
3. Cream Butter and Sugar: In another large bowl, cream together the softened butter and granulated sugar until fluffy.
4. Add Eggs and Vanilla: Beat in the eggs one at a time and add the vanilla extract, mixing until smooth.
5. Combine Mixtures: Gradually add the dry ingredients to the wet mixture, alternating with the milk, and mix until just combined.
6. Divide and Pour: Split the batter evenly among the prepared cake pans.
7. Bake Cakes: Bake in the preheated oven for 25-30 minutes, or until a toothpick inserted in the center comes out clean.
8. Cool the Cakes: Remove from the oven and allow the cakes to cool in the pans for 10 minutes before transferring to wire racks to cool completely.
9. Prepare Whipped Cream: In a large bowl, beat the heavy whipping cream with the powdered sugar and vanilla extract until soft peaks form.
10. Assemble the Layer Cake: Once the cakes are cool, place the first layer on a serving platter. Spread a layer of whipped cream on top, followed by a generous layer of sliced strawberries.
11. Repeat Layers: Add the second cake layer and repeat the process with whipped cream and strawberries. Top with the final cake layer.
12. Finish with Cream: Frost the top and sides of the cake with the remaining whipped cream, and decorate with whole strawberries for presentation.
These simple steps will lead you to a delightful Strawberry Shortcake Layer Cake that looks as good as it tastes. Enjoy the process, and don’t rush!
- Prep Time: 30 minutes
- Cook Time: 25-30 minutes
Nutrition
- Serving Size: 12 slices
- Calories: 350 kcal
- Fat: 18g
- Protein: 4g