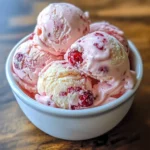
Strawberry Vanilla Bean Ice Cream is the perfect combination of fresh summer flavors and creamy texture that tantalizes the taste buds. This delightful treat embodies the essence of comfort and joy, making it an essential indulgence on a hot day. Imagine sinking your spoon into a bowl of this luscious ice cream, where the sweet tartness of strawberries melds beautifully with the aromatic notes of vanilla bean. It’s a flavor explosion that can brighten any occasion!
If you’ve ever indulged in a scoop of fresh Strawberry Vanilla Bean Ice Cream, you’ll understand why it’s a favorite among ice cream lovers. The way the fruity goodness swirls with the rich, creamy base creates a synthesis of flavors that dances on your palate. This recipe allows you to recreate that amazing experience right in your kitchen. Whether you’re looking to wow guests at a summer gathering or simply want a refreshing treat to enjoy at home, this recipe is sure to impress.
In the following sections, we’ll explore why this Strawberry Vanilla Bean Ice Cream is a must-try, how to prepare it, and the ease of making it from scratch. Let’s dive into this incredible journey of homemade ice cream, where quality ingredients come together for a delightful dessert that everyone will love.
Why You’ll Love This Recipe
Strawberry Vanilla Bean Ice Cream isn’t just another dessert; it’s an enchanting experience. Here are some reasons why this recipe will win your heart:
1. Fresh Ingredients: Using real strawberries and pure vanilla bean elevates the flavor, making every scoop a burst of freshness.
2. Simple to Make: The recipe is straightforward, perfect for both novice and seasoned ice cream makers.
3. Customizable: You can adjust sweetness, add mix-ins, or even experiment with flavors to personalize your ice cream.
4. No Ice Cream Machine Needed: This recipe offers a no-churn option for those without an ice cream maker, making it accessible to everyone.
5. Perfect for Any Occasion: Be it birthdays, picnics, or cozy family nights, this dessert fits right in anytime without fail.
6. Delightful Presentation: Serve it in a sundae dish or atop a warm slice of pie for an impressive presentation.
With these factors in mind, it’s clear why Strawberry Vanilla Bean Ice Cream is beloved by many. It’s not only about satisfaction; it’s about creating memories and sharing laughter over delicious homemade ice cream.
Preparation and Cooking Time
Creating Strawberry Vanilla Bean Ice Cream requires minimal time but offers maximum joy. Here’s the breakdown of preparation and chilling time:
– Preparation Time: 20 minutes
– Chilling Time: 4-6 hours (or overnight for best results)
This recipe is perfect for planning ahead—a refreshing dessert ready to impress!
Ingredients
– 2 cups fresh strawberries, hulled and sliced
– ¾ cup granulated sugar
– 1 cup heavy cream
– 1 cup whole milk
– 1 tablespoon pure vanilla extract
– Seeds from 1 vanilla bean (optional but recommended)
– A pinch of salt
– 1 teaspoon lemon juice (to enhance strawberry flavor)
Step-by-Step Instructions
Making your own Strawberry Vanilla Bean Ice Cream at home is as easy as following these simple steps:
1. Prepare Strawberries: In a medium bowl, combine the sliced strawberries with ½ cup of granulated sugar and the lemon juice. Let them sit for about 15 minutes to release their juices.
2. Mash Strawberries: Once the strawberries are soft, mash them slightly with a fork or potato masher until you reach your desired consistency—smooth or a little chunky.
3. Mix Cream Base: In a separate large bowl, whisk together the heavy cream, whole milk, remaining ¼ cup of granulated sugar, vanilla extract, and salt until the sugar is fully dissolved.
4. Combine: Add the mashed strawberries with their juices to the cream mixture. If using, add the vanilla bean seeds at this point for extra flavor.
5. Chill O: Cover the mixture and refrigerate for about 2 hours to let the flavors meld together.
6. Churn (if using an ice cream machine): Pour the chilled mixture into your ice cream maker, following the manufacturer’s instructions for churning. Typically, this takes about 20-25 minutes.
7. No Churn Option: If you don’t have an ice cream maker, pour the mixture into a large, freezer-safe bowl. Place it in the freezer and stir every 30 minutes for the first 2-3 hours to break up ice crystals.
8. Transfer: Once the ice cream is thick and creamy (after churning or manually stirring), transfer it to an airtight container.
9. Freeze: Cover and freeze for an additional 2-4 hours to firm it up.
10. Serve!: Before serving, let the ice cream sit at room temperature for 5-10 minutes for easier scooping.
How to Serve
When it comes to serving Strawberry Vanilla Bean Ice Cream, a little creativity can make your presentation truly shine:
1. Classic Cones: Serve scoops in waffle or sugar cones for a nostalgic treat.
2. Sundae Style: Top with whipped cream, fresh strawberries, and a drizzle of chocolate or caramel sauce for a decadent indulgence.
3. Milkshake: Blend a scoop or two with milk for a creamy milkshake option that’s sure to please.
4. Pair with Desserts: Serve alongside slices of cake, pie, or warm brownies for a delightful contrast of temperatures and flavors.
5. Ice Cream Sandwiches: Use cookies or brownies to make impressive ice cream sandwiches for a fun twist.
By following these serving suggestions, you’ll elevate your Strawberry Vanilla Bean Ice Cream experience, ensuring it becomes a favorite in your household for many summers to come!
Additional Tips
– Use Ripe Strawberries: Select ripe, sweet strawberries for a richer flavor and natural sweetness.
– Chill the Bowl: If you have time, chill the mixing bowl used for whipping the cream to help it whip up lighter and fluffier.
– Experiment with Sweeteners: If you prefer alternative sweeteners, consider using agave, honey, or coconut sugar for a different taste.
– Add Mix-Ins: For added texture, consider folding in chocolate chips, crushed nuts, or other fruits before freezing.
Recipe Variation
Explore these exciting variations of Strawberry Vanilla Bean Ice Cream:
1. Strawberry Swirl: Reserve some whole strawberries and fold them into the ice cream mixture before freezing for a chunky effect.
2. Balsamic Reduction: Drizzle a balsamic reduction over the ice cream for a gourmet twist.
3. Almond Extract: Swap half of the vanilla extract with almond extract to enhance the flavor profile.
4. Mint Strawberry: Add a teaspoon of fresh mint extract for a refreshing minty flavor.
Freezing and Storage
– Storage: Keep your Strawberry Vanilla Bean Ice Cream in an airtight container in the freezer. It can last for about 2-3 weeks if properly stored.
– Serving After Freezing: Before scooping, let the ice cream sit at room temperature for about 5-10 minutes. This helps soften the texture, making it easier to serve.
Special Equipment
You don’t need complex tools to make this ice cream, but a few essentials can make the process smoother:
– Mixing bowls
– Whisk or electric mixer
– Ice cream maker (optional)
– Freezer-safe container
– Fork or potato masher for mashing strawberries
Frequently Asked Questions
Can I use frozen strawberries?
Yes, frozen strawberries can be used; just make sure to thaw and drain excess water before mashing.
Do I need an ice cream maker?
No, this recipe includes a no-churn option. You can make it easily without an ice cream maker.
Can I make this dairy-free?
Absolutely! Use coconut milk or almond milk and dairy-free heavy cream alternatives for a vegan version.
What can I serve this ice cream with?
Pairs wonderfully with sponge cake, shortcake, or alongside a fresh berry salad.
How do I get a creamier texture?
Ensure to mix well while churning, or use the no-churn method to stir every 30 minutes for the first few hours.
Conclusion
Strawberry Vanilla Bean Ice Cream is not only a delicious treat but also a wonderful way to make memories with family and friends. Its creamy texture and delightful balance of flavors create the perfect summer indulgence. With just a few simple steps and quality ingredients, you can enjoy homemade ice cream that rivals any store-bought option. So take the plunge this summer and let the joy of making your own ice cream begin!
Strawberry Vanilla Bean Ice Cream: An Amazing Ultimate Recipe
- Total Time: 15 minutes
Ingredients
– 2 cups fresh strawberries, hulled and sliced
– ¾ cup granulated sugar
– 1 cup heavy cream
– 1 cup whole milk
– 1 tablespoon pure vanilla extract
– Seeds from 1 vanilla bean (optional but recommended)
– A pinch of salt
– 1 teaspoon lemon juice (to enhance strawberry flavor)
Instructions
Making your own Strawberry Vanilla Bean Ice Cream at home is as easy as following these simple steps:
1. Prepare Strawberries: In a medium bowl, combine the sliced strawberries with ½ cup of granulated sugar and the lemon juice. Let them sit for about 15 minutes to release their juices.
2. Mash Strawberries: Once the strawberries are soft, mash them slightly with a fork or potato masher until you reach your desired consistency—smooth or a little chunky.
3. Mix Cream Base: In a separate large bowl, whisk together the heavy cream, whole milk, remaining ¼ cup of granulated sugar, vanilla extract, and salt until the sugar is fully dissolved.
4. Combine: Add the mashed strawberries with their juices to the cream mixture. If using, add the vanilla bean seeds at this point for extra flavor.
5. Chill O: Cover the mixture and refrigerate for about 2 hours to let the flavors meld together.
6. Churn (if using an ice cream machine): Pour the chilled mixture into your ice cream maker, following the manufacturer’s instructions for churning. Typically, this takes about 20-25 minutes.
7. No Churn Option: If you don’t have an ice cream maker, pour the mixture into a large, freezer-safe bowl. Place it in the freezer and stir every 30 minutes for the first 2-3 hours to break up ice crystals.
8. Transfer: Once the ice cream is thick and creamy (after churning or manually stirring), transfer it to an airtight container.
9. Freeze: Cover and freeze for an additional 2-4 hours to firm it up.
10. Serve!: Before serving, let the ice cream sit at room temperature for 5-10 minutes for easier scooping.
- Prep Time: 15 minutes
- Cook Time: 0 minutes
Nutrition
- Serving Size: 4
- Calories: 250 kcal
- Fat: 15g
- Protein: 3g