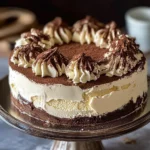
Tiramisu Ice Cream Cake is an amazing dessert that brings together the heavenly flavors of classic tiramisu and creamy ice cream. It combines the rich taste of coffee, the smoothness of mascarpone cheese, and the delightful crunch of ladyfingers, all layered in a luscious ice cream cake. This dessert isn’t just a treat; it’s an experience that celebrates indulgence and flavor. Whether you are looking to impress guests at a gathering or simply want to savor a delicious dessert, Tiramisu Ice Cream Cake will undoubtedly elevate your dessert game.
Imagine a warm summer afternoon, and you’re enjoying a slice of this delightful cake, the coolness of the ice cream mingling perfectly with the rich coffee layers. Tiramisu Ice Cream Cake is especially perfect for those who adore coffee-flavored goodies but want a refreshing twist. It’s not only visually stunning with its layered presentation but also incredible in taste, leaving those who indulge in it asking for seconds.
This guide will take you through the delightful journey of preparing your Tiramisu Ice Cream Cake. From understanding why this recipe will quickly become a family favorite to a detailed step-by-step guide, you won’t miss a thing. Let’s dive into the world of this divine dessert and discover the tricks to making it a showstopper at any occasion.
Why You’ll Love This Recipe
Tiramisu Ice Cream Cake is not just ordinary; it’s filled with flavors and textures that tantalize your taste buds. Here are several reasons why you will adore this incredible recipe:
1. Perfect for Coffee Lovers: If you can’t get enough of coffee, this cake will be your go-to dessert.
2. No-Bake Delight: Unlike traditional baked cakes, this recipe requires no oven, making it ideal for hot days.
3. Layered Harmony: The combination of ice cream, coffee, and mascarpone creates an unforgettable taste sensation.
4. Effortless Preparation: Clear instructions make it accessible for everyone, regardless of baking skill level.
5. Visually Impressive: The layered look of the cake will wow your guests, making it perfect for any celebration.
6. Customizable: You can easily adjust the layers or flavors to match your preferences or dietary needs.
With such versatility and deliciousness, it’s easy to see why Tiramisu Ice Cream Cake has become a favored dessert worldwide.
Preparation and Cooking Time
The total time to prepare Tiramisu Ice Cream Cake is approximately 3 hours and 30 minutes, which includes both preparation and freezing. Here’s a breakdown of the time involved:
– Preparation Time: 30 minutes
– Freezing Time: 3 hours
– Total Time: 3 hours and 30 minutes
These times might vary based on how quickly you work in the kitchen, but this outline should help you stay on track.
Ingredients
– 2 cups heavy cream
– 1 cup mascarpone cheese
– 1 cup espresso or strong coffee, cooled
– ½ cup sugar
– 1 teaspoon vanilla extract
– 1 package of ladyfingers or sponge cake
– ¼ cup coffee liqueur (optional)
– Unsweetened cocoa powder, for dusting
– Chocolate shavings, for garnish (optional)
Step-by-Step Instructions
Creating your own Tiramisu Ice Cream Cake involves several easy steps. Follow these instructions to ensure success:
1. Prepare the Coffee Mixture: In a shallow dish, mix the cooled espresso with the coffee liqueur if using. Set aside.
2. Whip the Cream: In a large mixing bowl, beat the heavy cream until soft peaks form.
3. Combine Mascarpone: In another bowl, combine the mascarpone cheese, sugar, and vanilla extract. Mix well until smooth.
4. Fold Together: Gently fold the whipped cream into the mascarpone mixture until fully combined without deflating the cream.
5. Layer the Ladyfingers: Quickly dip the ladyfingers in the coffee mixture. Ensure they are soaked but not soggy. Layer them in the bottom of a 9×13-inch dish.
6. Spread the Cream Mixture: Spoon half of the mascarpone mixture over the ladyfingers, spreading it evenly.
7. Repeat the Layers: Dip more ladyfingers in the coffee mixture and layer them over the cream. Add the remaining mascarpone mixture on top.
8. Freeze the Cake: Cover the dish with plastic wrap and freeze for at least 3 hours or until firm.
9. Serve the Cake: Once fully frozen, remove from the freezer. Dust with cocoa powder and top with chocolate shavings if desired before slicing and serving.
These steps will guide you in making an amazing Tiramisu Ice Cream Cake that everyone will enjoy!
How to Serve
Serving Tiramisu Ice Cream Cake can enhance the overall experience. Here are some tips for an attractive presentation:
1. Slice with a Warm Knife: Dip a sharp knife into hot water and wipe it dry before cutting the cake. This will ensure clean slices.
2. Plate Presentation: Serve each slice on a beautiful plate and garnish with additional cocoa powder or fresh berries for a pop of color.
3. Beverage Pairing: Offer espresso or coffee on the side to enhance the coffee flavors in the cake.
4. Creative Surprises: Consider serving with a scoop of vanilla or coffee ice cream on the side for added richness.
5. Occasion-Specific Decorations: For special occasions, adorn slices with edible flowers, personalized dessert tags, or themed decorations.
By following these serving tips, you can create a memorable experience that showcases your delicious Tiramisu Ice Cream Cake, making every occasion special.
Enjoy the blissful flavors and invigorating aromas of Tiramisu Ice Cream Cake, and let its charm delight you and your loved ones!
Additional Tips
– Use Quality Ingredients: The flavor of your Tiramisu Ice Cream Cake will greatly benefit from high-quality ingredients, especially the coffee and mascarpone cheese.
– Soak Carefully: When dipping ladyfingers in the coffee mixture, make sure they are well-soaked but not soggy, preserving their structure.
– Chill Before Serving: Allow the cake to rest at room temperature for a few minutes before slicing. This makes it easier to cut through the layers.
– Experiment with Flavors: Feel free to incorporate different flavors, like using flavored coffee or adding a hint of almond extract to the cream mixture.
– Serve with Complementary Sides: Pair each slice with a dollop of whipped cream or a scoop of vanilla ice cream for an extra creamy experience.
Recipe Variation
Get creative with your Tiramisu Ice Cream Cake by exploring these variations:
1. Chocolate Lovers’ Variation: Blend in crushed chocolate cookies or use chocolate-flavored ice cream for an extra rich taste.
2. Berry Delight: Add layers of fresh berries, such as raspberries or strawberries, between the coffee and mascarpone layers for a fruity twist.
3. Nutty Crunch: Incorporate chopped nuts, like hazelnuts or almonds, into the cream mixture for added texture.
4. Gluten-Free Option: Use gluten-free ladyfingers to adapt the recipe for gluten-intolerant guests.
Freezing and Storage
– Storage: Store any leftovers covered in the freezer for up to 3 months to preserve its freshness and flavor.
– Thawing: When ready to enjoy, thaw the cake in the refrigerator for several hours before serving. For quick thawing, let it sit at room temperature for about 15-20 minutes.
Special Equipment
To prepare the Tiramisu Ice Cream Cake effectively, gather the following tools:
– Mixing bowls for combining ingredients.
– Electric mixer for whipping the cream.
– Shallow dish for soaking the ladyfingers in coffee.
– 9×13 inch rectangular baking dish for layering.
– Plastic wrap to cover the cake while freezing.
Frequently Asked Questions
Can I use decaffeinated coffee for this recipe?
Yes, decaffeinated coffee works great for those looking to enjoy the flavor without the caffeine boost.
How long can I keep the cake in the freezer?
When properly wrapped, the Tiramisu Ice Cream Cake can be stored in the freezer for up to 3 months.
Is it possible to make this cake vegan?
While traditional ingredients are not vegan, substituting with almond cream and vegan ladyfingers can yield a delightful vegan version.
Can I reduce the sweetness of the cake?
Absolutely! You can adjust the sugar level in the mascarpone mixture to suit your taste.
Conclusion
Tiramisu Ice Cream Cake is a spectacular dessert fusion perfect for satisfying any sweet tooth while incorporating the timeless flavors of tiramisu. With its creamy layers and delightful coffee notes, it’s bound to impress at any occasion. Whether you’re celebrating a special event or simply treating yourself, this cake will not disappoint. Enjoy the process of making it, and let each slice of this delectable treat bring joy to you and your guests!
Tiramisu Ice Cream Cake: An Incredible Ultimate Recipe
- Total Time: 15 minutes
Ingredients
– 2 cups heavy cream
– 1 cup mascarpone cheese
– 1 cup espresso or strong coffee, cooled
– ½ cup sugar
– 1 teaspoon vanilla extract
– 1 package of ladyfingers or sponge cake
– ¼ cup coffee liqueur (optional)
– Unsweetened cocoa powder, for dusting
– Chocolate shavings, for garnish (optional)
Instructions
Creating your own Tiramisu Ice Cream Cake involves several easy steps. Follow these instructions to ensure success:
1. Prepare the Coffee Mixture: In a shallow dish, mix the cooled espresso with the coffee liqueur if using. Set aside.
2. Whip the Cream: In a large mixing bowl, beat the heavy cream until soft peaks form.
3. Combine Mascarpone: In another bowl, combine the mascarpone cheese, sugar, and vanilla extract. Mix well until smooth.
4. Fold Together: Gently fold the whipped cream into the mascarpone mixture until fully combined without deflating the cream.
5. Layer the Ladyfingers: Quickly dip the ladyfingers in the coffee mixture. Ensure they are soaked but not soggy. Layer them in the bottom of a 9×13-inch dish.
6. Spread the Cream Mixture: Spoon half of the mascarpone mixture over the ladyfingers, spreading it evenly.
7. Repeat the Layers: Dip more ladyfingers in the coffee mixture and layer them over the cream. Add the remaining mascarpone mixture on top.
8. Freeze the Cake: Cover the dish with plastic wrap and freeze for at least 3 hours or until firm.
9. Serve the Cake: Once fully frozen, remove from the freezer. Dust with cocoa powder and top with chocolate shavings if desired before slicing and serving.
These steps will guide you in making an amazing Tiramisu Ice Cream Cake that everyone will enjoy!
- Prep Time: 15 minutes
- Cook Time: 0 minutes
Nutrition
- Serving Size: 12
- Calories: 320 kcal
- Fat: 20g
- Protein: 5g