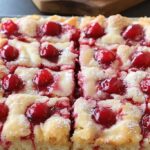
Cherry Bars: A Sweet and Tart Treat for Any Occasion. These delightful bars bring an irresistible combination of sweet and tart cherry flavors that can brighten up any gathering or simply satisfy your sweet tooth. The vibrant red hue of cherries not only makes these bars visually appealing, but also signifies the burst of flavor they pack in every bite. Imagine biting into a chewy, buttery crust topped with a luscious cherry filling that dances on your palate, leaving you wanting more.
If you’ve ever enjoyed a cherry dessert, you know the unique sensations that cherries can evoke. Their natural sweetness combined with a slight tartness creates a flavor profile that many adore. The ease of baking cherry bars makes them ideal for both novice bakers and experienced chefs. In this guide, we will explore why this recipe is a must-try, how to prepare it, and the best ways to serve these delightful treats.
Cherry Bars are perfect for various occasions—be it a summer picnic, a holiday gathering, or a cozy family dessert night. With their simple ingredients and straightforward steps, baking these fabulous bars can be a fun and rewarding experience. Join me as we dive into the wonderful world of Cherry Bars and discover how to make this amazing sweet treat a staple in your dessert repertoire.
Why You’ll Love This Recipe
Cherry Bars are beloved for a multitude of reasons. Here are some highlights that explain their popularity:
1. Simple and Accessible Ingredients: You can find most ingredients in your pantry, making these bars an easy choice for last-minute baking.
2. Perfect Balance of Sweet and Tart: The flavor nirvana of sweet cherries combined with a hint of tartness creates a delightful treat that’s hard to resist.
3. Crowd Pleaser: These bars are sure to impress family and friends with their vibrant flavor and appealing appearance.
4. Versatile Dessert: Perfect for summer brunches, holiday tables, or as a comforting after-dinner treat, Cherry Bars fit any occasion.
5. Easy to Customize: You can tweak the filling with different fruits or toppings to create your signature version.
6. Make Ahead Convenience: Cherry Bars store well, so you can bake them in advance and enjoy them over several days.
These factors make it clear why Cherry Bars are a beloved dessert. They effortlessly combine flavor, simplicity, and versatility, making them an essential recipe in any baker’s collection.
Preparation and Cooking Time
Creating these amazing Cherry Bars is an efficient process, great for busy bakers. Here’s a breakdown of the time required:
– Preparation Time: 15 minutes
– Cooking Time: 30-35 minutes
– Cooling Time: 20 minutes
Altogether, you can expect the entire baking process to take around 1 hour, including cooling time, allowing you to enjoy your bars soon after baking.
Ingredients
– 1 cup all-purpose flour
– 1 cup granulated sugar
– 1/2 cup unsalted butter, melted
– 2 large eggs
– 1 teaspoon vanilla extract
– 1 teaspoon baking powder
– 1/4 teaspoon salt
– 1 1/2 cups fresh or frozen cherries, pitted and halved
– Powdered sugar, for dusting (optional)
Step-by-Step Instructions
Creating these incredible Cherry Bars is straightforward. Simply follow these easy steps:
1. Preheat the Oven: Set your oven to 350°F (175°C) and grease a 9×9-inch baking pan.
2. Mix the Wet Ingredients: In a mixing bowl, combine melted butter, granulated sugar, and eggs. Whisk together until smooth. Add the vanilla extract.
3. Combine Dry Ingredients: In a separate bowl, mix all-purpose flour, baking powder, and salt.
4. Combine Mixtures: Gradually add the dry ingredients to the wet mixture. Stir until just combined. Do not overmix.
5. Add Cherries: Gently fold in the halved cherries, being careful not to break them apart.
6. Pour into the Pan: Spread the batter evenly across the greased baking pan.
7. Bake: Place in the oven and bake for 30-35 minutes or until a toothpick inserted in the center comes out clean.
8. Cool: Remove from the oven and let the bars cool in the pan for about 20 minutes.
9. Cut and Serve: Once cooled, cut into squares and dust with powdered sugar if desired.
By following these straightforward steps, anyone can create Cherry Bars that are both appealing and mouthwatering!
How to Serve
To elevate your Cherry Bars experience, consider the following serving suggestions:
1. Presentation: Arrange squares on a decorative platter for a beautiful display. A sprinkle of powdered sugar adds an elegant touch.
2. Accompaniments: Serve with fresh whipped cream or a scoop of vanilla ice cream to enhance the flavors.
3. Beverage Pairing: Pair these bars with a nice cup of tea or a glass of lemonade for a refreshing twist.
4. Storing Tips: Store any leftovers in an airtight container at room temperature. They can also be refrigerated for extended freshness.
With these tips in mind, you can enjoy your Cherry Bars to the fullest and impress your guests with this delightful treat!
In conclusion, Cherry Bars are a fantastic dessert option that embodies the sweet and tart essence of cherries while offering an easy, adaptable recipe that anyone can master. These bars are perfect for any gathering, showcasing a delightful combination of flavor and simplicity. Happy baking!
Additional Tips
– Use Fresh Cherries: Fresh cherries will enhance the flavor of your Cherry Bars. Look for ripe, firm cherries for the best results.
– Let Bars Cool Completely: Allow the bars to cool completely before cutting to ensure clean edges and neat squares.
– Experiment with Toppings: A drizzle of chocolate or a sprinkle of nuts over the top can add a delightful crunch and flavor contrast.
Recipe Variation
Feel free to try these fun variations of Cherry Bars:
1. Almond-Cherry Bars: Add a teaspoon of almond extract to give the bars a delicious almond flavor that pairs beautifully with cherries.
2. Chocolate Chip Cherry Bars: Stir in half a cup of chocolate chips for a delightful chocolatey twist.
3. Coconut Cherry Bars: Incorporate shredded coconut into the batter for added texture and a tropical flavor.
Freezing and Storage
– Storage: Keep the Cherry Bars in an airtight container at room temperature for up to 3-4 days.
– Freezing: To freeze, wrap individual bars in plastic wrap, then place them in a freezer-safe container. They can last for up to 3 months. Thaw them in the refrigerator before serving.
Special Equipment
To prepare the Cherry Bars efficiently, consider having the following tools on hand:
– Mixing bowls: For combining wet and dry ingredients.
– Whisk: To mix the ingredients until smooth.
– Baking pan: A 9×9-inch square pan is ideal for this recipe.
– Parchment paper: Line the baking pan for easy removal of the bars.
– Knife: A sharp knife for cutting the bars into squares.
Frequently Asked Questions
Can I use canned cherries instead of fresh or frozen?
Yes, you can use canned cherries, but make sure to drain and rinse them well to reduce excess liquid.
How do I know when the bars are done baking?
Insert a toothpick into the center. If it comes out clean or with a few moist crumbs, they are ready.
Can I use a different fruit for this recipe?
Absolutely! You could use blueberries, raspberries, or even peaches for a different flavor.
What if I don’t have all-purpose flour?
You can substitute with whole wheat flour or a gluten-free flour blend, ensuring it fits your dietary needs.
How do I store leftovers?
Store any leftover Cherry Bars in an airtight container at room temperature for up to four days, or refrigerate for longer freshness.
Conclusion
Cherry Bars are a delightful treat that perfectly combines sweet and tart flavors. Their easy preparation and adaptability make them a fantastic option for any occasion. With the tips, variations, and storage guidance provided, you’ll be well-equipped to impress your guests or enjoy a delicious dessert at home. Whether served at a summer picnic or enjoyed as a snack with coffee, these bars promise satisfaction. Happy baking!
Cherry Bars: An Amazing Ultimate Recipe for Everyone
- Total Time: 0 hours
Ingredients
– 1 cup all-purpose flour
– 1 cup granulated sugar
– 1/2 cup unsalted butter, melted
– 2 large eggs
– 1 teaspoon vanilla extract
– 1 teaspoon baking powder
– 1/4 teaspoon salt
– 1 1/2 cups fresh or frozen cherries, pitted and halved
– Powdered sugar, for dusting (optional)
Instructions
Creating these incredible Cherry Bars is straightforward. Simply follow these easy steps:
1. Preheat the Oven: Set your oven to 350°F (175°C) and grease a 9×9-inch baking pan.
2. Mix the Wet Ingredients: In a mixing bowl, combine melted butter, granulated sugar, and eggs. Whisk together until smooth. Add the vanilla extract.
3. Combine Dry Ingredients: In a separate bowl, mix all-purpose flour, baking powder, and salt.
4. Combine Mixtures: Gradually add the dry ingredients to the wet mixture. Stir until just combined. Do not overmix.
5. Add Cherries: Gently fold in the halved cherries, being careful not to break them apart.
6. Pour into the Pan: Spread the batter evenly across the greased baking pan.
7. Bake: Place in the oven and bake for 30-35 minutes or until a toothpick inserted in the center comes out clean.
8. Cool: Remove from the oven and let the bars cool in the pan for about 20 minutes.
9. Cut and Serve: Once cooled, cut into squares and dust with powdered sugar if desired.
By following these straightforward steps, anyone can create Cherry Bars that are both appealing and mouthwatering!
- Prep Time: 15 minutes
- Cook Time: 30-35 minutes
Nutrition
- Serving Size: 16 squares
- Calories: 200 kcal
- Fat: 8g
- Protein: 2g