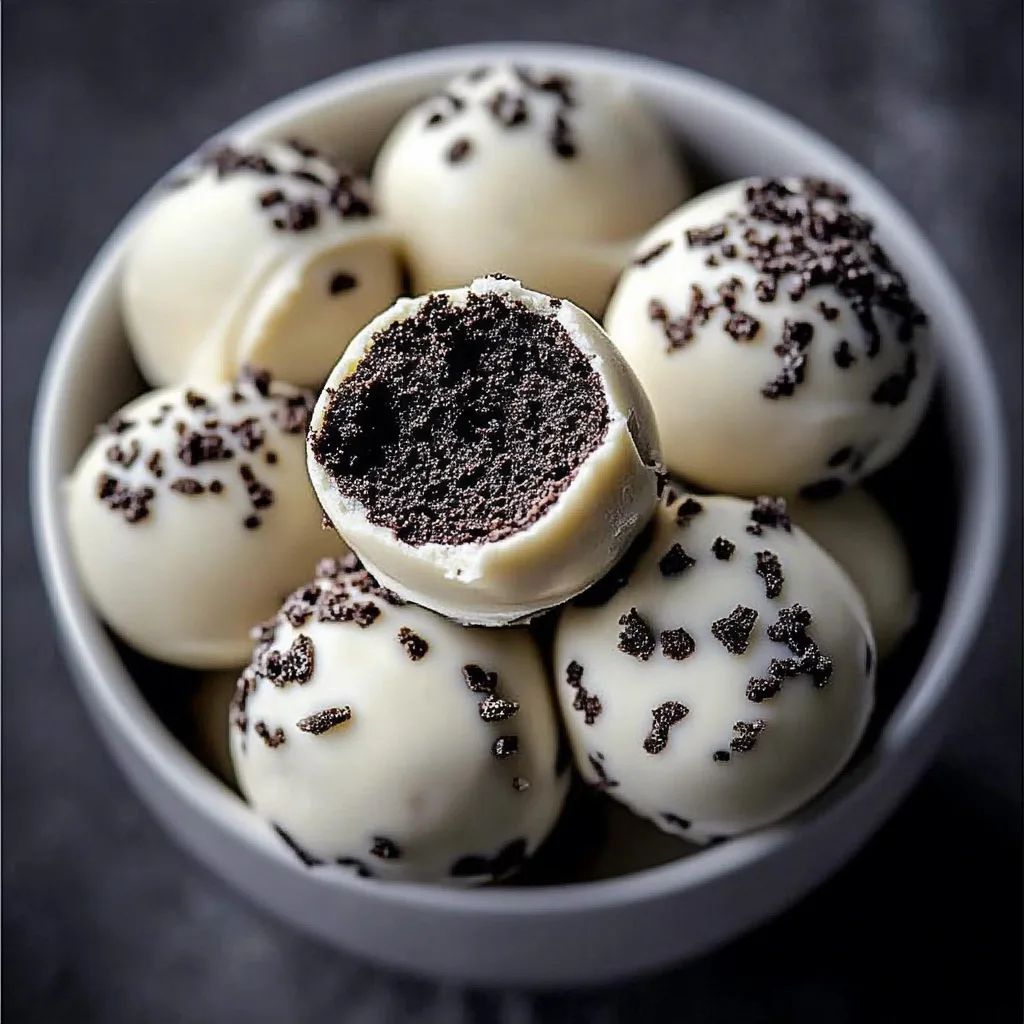
Decadent Oreo Cake Balls are a delightful treat that everyone will love. These irresistible bites combine the richness of chocolate and the classic flavor of Oreos, making for a foot-tapping, mouth-watering experience. Imagine sinking your teeth into a soft, fudgy ball that’s packed full of crushed Oreo cookies, enveloped in a luscious chocolate coating. It’s a sweet indulgence that’s simply too good to resist!
Whether you’re preparing for a party, celebrating a special occasion, or just looking to satisfy a sweet tooth, Decadent Oreo Cake Balls are your go-to dessert. This recipe is straightforward, adaptable, and guarantees satisfaction from everyone who tries them. If you’re ready to impress your family and friends with this amazing treat, read on! We’ll explore why this recipe works, how to prepare it, and tips for serving it beautifully.
Why You’ll Love This Recipe
The beauty of Decadent Oreo Cake Balls lies in their simplicity and flavor. Here are a few compelling reasons to try this fantastic recipe:
1. Minimal Ingredients – You likely have most of the ingredients in your kitchen already.
2. Customizable – You can tweak the flavor by using different types of Oreos or chocolate.
3. Family-Friendly – Kids love these cake balls; they’re perfect for birthday parties.
4. Easily Made Ahead – Prepare them in advance for an event for hassle-free entertaining.
5. Impressive Presentation – Their appearance is boss! These little treats will wow your guests.
6. Easy to Follow – Simple steps make it accessible even for novice bakers.
These reasons capture the essence of why so many people rave about Decadent Oreo Cake Balls. The delightful combination of flavors ensures each bite is pure bliss.
Preparation and Cooking Time
Preparing Decadent Oreo Cake Balls is quick and easy. The total time required to whip these treats up is about 1 hour and 15 minutes. Here’s a handy breakdown:
– Preparation Time: 30 minutes
– Chilling Time: 30 minutes
– Dipping Time: 15 minutes
These times can vary depending on your efficiency in the kitchen, but they give a general guideline to help you plan.
Ingredients
– 1 package of Oreo cookies (14.3 oz)
– 8 oz cream cheese, softened
– 16 oz chocolate or candy melts (milk, dark, or white)
– Sprinkles (optional, for decoration)
– Parchment paper (for easy cleanup)
Step-by-Step Instructions
Creating Decadent Oreo Cake Balls is straightforward and fun. Follow these simple steps:
1. Crush the Oreos: In a food processor, pulse the Oreo cookies until finely crushed. You can also place them in a zip-top bag and crush them with a rolling pin.
2. Combine with Cream Cheese: In a large mixing bowl, combine the crushed Oreos with softened cream cheese. Mix well until fully incorporated; the mixture should be moist and sticky.
3. Form Balls: Scoop out tablespoon-sized amounts of the Oreo mixture and roll them into balls. Place them on a parchment-lined tray.
4. Chill the Balls: Refrigerate the formed balls for at least 30 minutes, or until firm. This makes them easier to dip.
5. Melt the Chocolate: While the Oreo balls chill, melt your chocolate or candy melts in a microwave-safe bowl. Heat in 30-second intervals, stirring in between, until smooth and fully melted.
6. Dip the Balls: Using a fork, dip each chilled Oreo ball into the melted chocolate, tapping off any excess before returning it to the parchment paper.
7. Decorate: While the chocolate is still wet, sprinkle with decoration if desired. Allow the chocolate to set before serving.
With these clear steps, you can effortlessly create these delightful treats!
How to Serve
Serving Decadent Oreo Cake Balls can turn a simple treat into something special. Here are some tips to elevate your serving game:
1. Presentation: Arrange the cake balls on a decorative platter or cake stand for an elegant touch.
2. Garnish Ideas: Use additional crushed Oreos or colorful sprinkles for a fun presentation. Drizzle melted chocolate on top for an artistic flair.
3. Accompaniment: Consider serving alongside coffee, milk, or even a scoop of vanilla ice cream to create a delightful dessert experience.
4. Individual Wrapping: For gifting or party favors, individually wrap each cake ball in clear cellophane tied with a ribbon. It adds a personal touch.
5. Flavor Variations: If you’re feeling adventurous, experiment with different chocolate types or add flavoring extracts, like peppermint or orange, to complement the Oreos.
By paying attention to these serving details, you enhance the overall experience for everyone enjoying your Decadent Oreo Cake Balls! They are not just snacks; they are delightful morsels that bring people together.
Additional Tips
– Use Quality Oreos: For an even richer flavor, opt for Double Stuff Oreos, or try seasonal flavors to switch things up.
– Take Your Time: When melting chocolate, be patient. Heat it slowly to avoid burning.
– Keep Ingredients at Room Temperature: To ensure everything mixes well, let your cream cheese sit out for about 30 minutes before use.
Recipe Variation
Explore these fun alterations to make your Decadent Oreo Cake Balls stand out:
1. Peanut Butter Surprise: Add a tablespoon of creamy peanut butter to the Oreo and cream cheese mixture for a nutty twist.
2. Mint Infusion: Incorporate a few drops of mint extract to the mixture for a refreshing flavor.
3. Colorful Cake Balls: Use colored chocolate melts to create vibrant cake balls for special occasions or holidays.
Freezing and Storage
– Storage: Keep your Decadent Oreo Cake Balls in an airtight container in the refrigerator. This helps maintain their freshness for up to one week.
– Freezing: To freeze, lay the cake balls on a baking sheet until solid. Once firm, transfer them to a zip-top freezer bag. They can last in the freezer for about three months.
Special Equipment
While you can make these cake balls with standard kitchen ware, a few tools may simplify the process:
– Food Processor: For quick crushing of the Oreos.
– Microwave-Safe Bowl: Essential for melting chocolate evenly.
– Cookie Scoop: Helps in forming uniform cake balls.
– Parchment Paper: Keeps your workspace clean and allows for easy cleanup.
Frequently Asked Questions
Can I use a different type of cookie?
Absolutely! Feel free to use any cream-filled cookie you like. Vanilla cookies can provide a lovely base as well.
How do I know when my chocolate is ready?
The chocolate should be smooth and fully melted. Stir between intervals to prevent hot spots.
Can I make these gluten-free?
You can swap regular Oreos for gluten-free Oreos, making this delicious treat suitable for gluten-sensitive individuals.
What if my cake balls are too soft?
If the mixture is too soft, try chilling the mixture for a short time before forming the balls, or add a bit more crushed Oreo to firm them up.
Is there a dairy-free option?
Substituting cream cheese with a non-dairy version and using dairy-free chocolate melts can make this recipe suitable for those avoiding dairy.
Conclusion
Decadent Oreo Cake Balls are the perfect combination of simplicity and indulgence. Their rich flavors, versatile nature, and easy preparation make them an ideal treat for any occasion. Whether served at a party or enjoyed solo, these cake balls are sure to impress. So why not gather your ingredients and create this amazing dessert today? You and your loved ones deserve this sweet indulgence!

Decadent Oreo Cake Balls: The Ultimate 7-Step Recipe
- Total Time: 30 minutes
Ingredients
– 1 package of Oreo cookies (14.3 oz)
– 8 oz cream cheese, softened
– 16 oz chocolate or candy melts (milk, dark, or white)
– Sprinkles (optional, for decoration)
– Parchment paper (for easy cleanup)
Instructions
Creating Decadent Oreo Cake Balls is straightforward and fun. Follow these simple steps:
1. Crush the Oreos: In a food processor, pulse the Oreo cookies until finely crushed. You can also place them in a zip-top bag and crush them with a rolling pin.
2. Combine with Cream Cheese: In a large mixing bowl, combine the crushed Oreos with softened cream cheese. Mix well until fully incorporated; the mixture should be moist and sticky.
3. Form Balls: Scoop out tablespoon-sized amounts of the Oreo mixture and roll them into balls. Place them on a parchment-lined tray.
4. Chill the Balls: Refrigerate the formed balls for at least 30 minutes, or until firm. This makes them easier to dip.
5. Melt the Chocolate: While the Oreo balls chill, melt your chocolate or candy melts in a microwave-safe bowl. Heat in 30-second intervals, stirring in between, until smooth and fully melted.
6. Dip the Balls: Using a fork, dip each chilled Oreo ball into the melted chocolate, tapping off any excess before returning it to the parchment paper.
7. Decorate: While the chocolate is still wet, sprinkle with decoration if desired. Allow the chocolate to set before serving.
With these clear steps, you can effortlessly create these delightful treats!
- Prep Time: 15 minutes
- Cook Time: 15 minutes
Nutrition
- Serving Size: 20 balls
- Calories: 110 kcal per ball
- Fat: 5g
- Protein: 1g