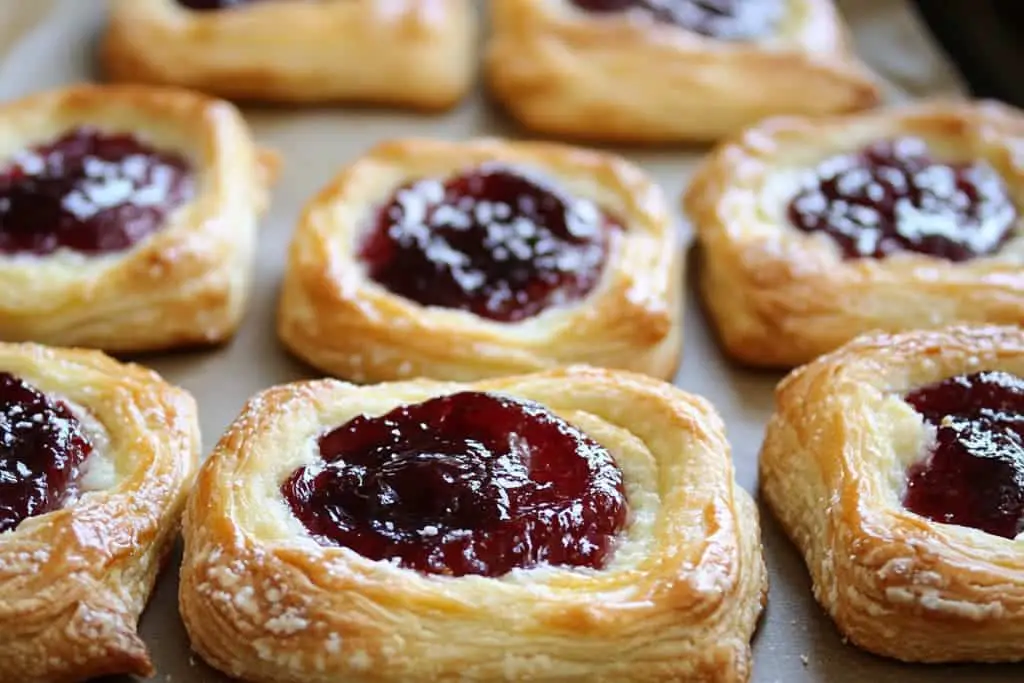
Mini Cherry Cheese Danishes are a delightful pastry that can brighten any day. Treat yourself or loved ones to these tasty confections that embody the perfect blend of sweet and flaky textures. Whether it’s breakfast, brunch, or dessert, these danishes are sure to impress. Their adorable size makes them perfect for sharing, and the vibrant cherry filling is an inviting sight. If you’ve ever had the pleasure of biting into a freshly made Mini Cherry Cheese Danish, you know their magic. Each bite is a burst of flavor, from the creamy cheese filling to the sweet, tart cherries nestled within a flaky pastry.
Let’s explore what makes Mini Cherry Cheese Danishes a must-have recipe and guide you through creating these charming treats. You’ll learn about the preparation, cooking times, and everything you need to make the ultimate version of this beloved pastry. With a little patience and a few key ingredients, you can create these amazing danishes that will surely impress everyone at your next gathering.
Why You’ll Love This Recipe
You will adore making Mini Cherry Cheese Danishes for various wonderful reasons. Here’s why this recipe stands out:
1. Easy to Prepare: The ingredients are simple, and the steps are straightforward, making it accessible for bakers of all skill levels.
2. Perfect for Any Occasion: From breakfast tables to dessert platters, these danishes are versatile for all sorts of gatherings.
3. Impressive Presentation: Their mini size is not only adorable but also allows for an elegant presentation.
4. Delightful Flavor Combination: The cream cheese filling perfectly complements the sweet cherry topping, creating a delicious balance.
5. Great for Meal Prep: These danishes can be made in advance and frozen, allowing you to enjoy them fresh any time.
6. Serve and Share: Their small size makes them perfect for parties or a relaxed family brunch where sharing is encouraged.
With these enticing qualities, it’s no wonder why Mini Cherry Cheese Danishes have earned a place in the hearts of bakers and dessert lovers alike!
Preparation and Cooking Time
To create these delicious Mini Cherry Cheese Danishes, you should plan for the following preparation and cooking times:
– Preparation Time: 20 minutes
– Cooking Time: 25-30 minutes
– Cooling Time: 10 minutes
In total, you’re looking at an hour of preparation to finish these delightful pastries.
Ingredients
– 1 package (8 oz) cream cheese, softened
– 1/2 cup granulated sugar
– 1 teaspoon vanilla extract
– 1 package (1 lb) puff pastry, thawed
– 1 cup cherry pie filling (or fresh cherries)
– 1 egg, beaten (for egg wash)
– Powdered sugar, for dusting (optional)
Step-by-Step Instructions
Follow these simple steps to create your Mini Cherry Cheese Danishes:
1. Preheat the oven: Begin by preheating your oven to 400°F (200°C). Line a baking sheet with parchment paper for easy cleanup.
2. Mix the cream cheese: In a bowl, combine the softened cream cheese, granulated sugar, and vanilla extract. Beat until smooth and creamy.
3. Prepare the puff pastry: Roll out the thawed puff pastry onto a lightly floured surface. Cut it into squares, approximately 4×4 inches each.
4. Add cream cheese mixture: Spoon a generous tablespoon of the cream cheese mixture into the center of each square.
5. Top with cherry filling: Add a spoonful of cherry pie filling on top of the cream cheese layer, being careful not to overfill.
6. Fold and shape: Fold each corner of the pastry square toward the center to create a pinwheel shape. You can also leave the corners open for a more rustic look.
7. Brush with egg wash: Lightly brush the tops of each danish with the beaten egg to create a golden finish during baking.
8. Bake: Place the baking sheet in the preheated oven and bake for 25-30 minutes, or until the pastries are puffed and golden brown.
9. Cool on wire rack: Remove from the oven and let the danishes cool for 10 minutes on a wire rack.
10. Dust with powdered sugar: For an extra touch, dust with powdered sugar before serving.
How to Serve
When serving your Mini Cherry Cheese Danishes, consider the following tips to make the experience even more delightful:
1. Presentation: Arrange them on a decorative platter for an appealing display. Use colorful liners or napkins for added flair.
2. Accompaniments: Pair with a cup of coffee or a glass of cold milk. The combination enhances the flavors and completes the experience.
3. Warm or Cold: These danishes can be enjoyed warm from the oven or served at room temperature, making them versatile for any occasion.
4. Perfect for Gatherings: Consider offering them alongside other pastries or breakfast items for a delightful brunch spread. They will surely be a hit!
Enjoying Mini Cherry Cheese Danishes is not just about the flavors; it’s also about the joy of sharing these wonderful treats with others. Whether it’s a holiday, celebration, or just a weekend treat, these danishes are an amazing addition that will keep everyone coming back for more! With ease of preparation and irresistible flavor, you’ll find yourself making these delightful pastries repeatedly.
Additional Tips
– Use Fresh Cherries: If you have access to fresh cherries, they can elevate the flavor of your Mini Cherry Cheese Danishes. Just pit and slice them before using them as a filling.
– Experiment with Cheese: For a twist, try incorporating different cheeses, like ricotta or mascarpone, to blend seamlessly with the cream cheese.
– Add Spices: Sprinkle a little cinnamon or almond extract into your cream cheese mixture for a hint of extra flavor.
– Keep an Eye on Baking Time: Every oven can vary in temperature. Therefore, start checking your danishes a few minutes early to prevent over-browning.
Recipe Variation
Feel free to get creative with your Mini Cherry Cheese Danishes! Here are some delightful variations to consider:
1. Berry Medley: Use a mix of berries—blueberries, raspberries, and strawberries—alongside the cherries for a colorful and flavorful twist.
2. Nutty Topping: Add crushed almonds or walnuts on top of the cherry filling for a delightful crunch.
3. Chocolate Drizzle: Drizzle melted chocolate over the baked danishes for a luxurious finish.
4. Different Fruit Fillings: Swap out the cherry filling for other fruits like apple, peach, or mango for a taste variation.
Freezing and Storage
– Storage: Keep your unbaked danishes in the refrigerator, sealed in an airtight container, for up to 24 hours before baking.
– Freezing: You can also freeze the baked danishes. Allow them to cool completely, and then place them in a freezer-safe container for up to three months.
– Reheating: When ready to enjoy, heat them in the oven at 350°F (175°C) for about 10-15 minutes to restore their flakiness.
Special Equipment
You’ll need a few essential tools to make your Mini Cherry Cheese Danishes perfectly:
– Baking Sheet: A standard baking sheet works well. Ensure it’s lined with parchment paper for easy cleanup.
– Mixing Bowls: A sturdy bowl for mixing your cream cheese filling.
– Rolling Pin: For rolling out the puff pastry evenly.
– Pastry Brush: Useful for applying the egg wash for a perfectly golden finish.
– Wire Rack: To cool the danishes after baking.
Frequently Asked Questions
Can I use store-bought cherry filling?
Certainly! Store-bought cherry filling saves time and is a great option.
How can I make these danishes gluten-free?
Use gluten-free puff pastry, available at most grocery stores.
Can I adjust the sweetness of the cream cheese filling?
Yes, simply reduce or increase the sugar according to your taste preferences.
How should I store leftovers?
Keep them in an airtight container in the fridge for up to five days.
What pairs well with these danishes?
They are perfect with coffee, tea, or even a scoop of vanilla ice cream!
Conclusion
Creating Mini Cherry Cheese Danishes is a delightful baking experience that brings joy to any occasion. Their irresistible sweet and flaky character, combined with the vibrant cherry filling, makes them an ideal treat. Whether served warm at brunch, shared at a gathering, or enjoyed as a simple dessert, these danishes are sure to impress. With a few preparation tips and variations, you can customize them to suit any palate. So roll up your sleeves, and savor the pleasure of baking these charming pastries that everyone will adore!

Mini Cherry Cheese Danishes: An Incredible Ultimate Treat
- Total Time: 0 hours
Ingredients
– 1 package (8 oz) cream cheese, softened
– 1/2 cup granulated sugar
– 1 teaspoon vanilla extract
– 1 package (1 lb) puff pastry, thawed
– 1 cup cherry pie filling (or fresh cherries)
– 1 egg, beaten (for egg wash)
– Powdered sugar, for dusting (optional)
Instructions
Follow these simple steps to create your Mini Cherry Cheese Danishes:
1. Preheat the oven: Begin by preheating your oven to 400°F (200°C). Line a baking sheet with parchment paper for easy cleanup.
2. Mix the cream cheese: In a bowl, combine the softened cream cheese, granulated sugar, and vanilla extract. Beat until smooth and creamy.
3. Prepare the puff pastry: Roll out the thawed puff pastry onto a lightly floured surface. Cut it into squares, approximately 4×4 inches each.
4. Add cream cheese mixture: Spoon a generous tablespoon of the cream cheese mixture into the center of each square.
5. Top with cherry filling: Add a spoonful of cherry pie filling on top of the cream cheese layer, being careful not to overfill.
6. Fold and shape: Fold each corner of the pastry square toward the center to create a pinwheel shape. You can also leave the corners open for a more rustic look.
7. Brush with egg wash: Lightly brush the tops of each danish with the beaten egg to create a golden finish during baking.
8. Bake: Place the baking sheet in the preheated oven and bake for 25-30 minutes, or until the pastries are puffed and golden brown.
9. Cool on wire rack: Remove from the oven and let the danishes cool for 10 minutes on a wire rack.
10. Dust with powdered sugar: For an extra touch, dust with powdered sugar before serving.
- Prep Time: 15 minutes
- Cook Time: 25-30 minutes
Nutrition
- Serving Size: 12 danishes
- Calories: 210 kcal
- Fat: 10g
- Protein: 3g